During a research project, SySS IT security consultant Sebastian Hölzle worked on the problem of parsing Local Security Authority (LSA) process memory dumps using PowerShell and here are his results.
Introduction
Within a Windows system, a pentester (or an attacker) focuses on two components which are usually attacked as soon as the administrative privileges are achieved. The first component is the Windows registry which holds the sensitive information about local accounts. On normal clients, this information can be used if the password of the local user accounts (e.g. the local administrator) is reused on other systems to compromise parts or the whole network infrastructure.
Next to the registry, the process of the Local Security Authority Subsystem (or short LSASS) is also a high value target. This process holds information about all logged-on identities in different forms. So especially within Active Directory environments, this opens the possibility to extract hashes or even passwords from high value user accounts (e.g. domain admins).
In case those accounts have or had a logon session which was not properly terminated by a logoff, the process on the victim machine still holds credential data of those accounts. Those logon sessions could originate from interactive logons, scheduled tasks, services, run as application, etc.
By attacking those two key parts within a Windows system, an attacker can extract sensitive data, which could lead to the compromise of the whole Active Directory environment.
Extraction of sensitive information
In this article, we will focus on the second part, i.e. the extraction of secrets from the LSASS.exe process. For the extraction of secrets from the Windows registry various tools are available. Further, due to the use of the Local Admin Password Solution (short LAPS), this attack vector often is only interesting if the right prerequisites are met.
To extract information from this process, special tools are required. As already implied by the name, it is a process, which means the information is hold within the random access memory (RAM) of the target machine. This makes the extraction quite difficult. In case the secrets have to be extracted live, a tool is required which can communicate with the process within the RAM. There is one famous tool for this scenario: Mimikatz. The disadvantage of this tool is that it is well-known, so nearly every endpoint protection solution is normally able to detect and block it. There are many techniques to hide Mimikatz and the execution, but this is usually a cat-and-mouse game.
The other possibility to extract sensitive information from the LSASS process are memory dumps. The idea behind this technique is to create an image of the process which contains all information (including sensitive information), and to analyze this memory dump on another system. This possibility is very common but also has its drawbacks. The creation of the dump file itself can also fail (e.g. due to endpoint protection software, permissions etc.). But even if this works, the result file needs to be transferred to the system where it can be analyzed. To analyze such memory images also special tools are required. Usually there are two quite popular ways to do that.
- Mimikatz which can also be used to analyze dump files, but needs to be run under Windows.
- pypykatz which allows to analyze the files under Linux.
Next to the challenges the transfer of the created dump file can cause, also a logical flaw seems to be present. A file created by use of Windows tools containing Windows data structures needs to be analyzed either by Mimikatz on a completely separate machine or it needs to be transferred to a Linux machine to use pypykatz. This leads to the question: Is there no possibility to do that on Windows with already available standard tools? It is a Windows file with Windows data structures in it; dump files of other processes are used for troubleshooting inside and outside of Microsoft. So there seems to be a way to work with those files and therefore also a way to extract the interesting information (e.g. hashes, credentials) from the dump files without the use of Mimikatz.
Goals of the R&D project
Within the Windows world, the Swiss army knife of doing something is PowerShell. By the use of PowerShell, many different things can be accomplished (for attackers and defenders).
To get a better idea of what we want to do, we summarize what we know and which path we want to explore:
- Extraction of sensitive information from the
LSASS.exeprocess. This can be accomplished live or by using a memory dump. The live extraction is much more complicated, requires special permissions, and can usually much easier be detected. So if we want to extract information from the LSASS process on Windows (ideally on a host with a turned-on endpoint protection solution) without being detected or blocked, we should work with memory dumps. - We know that the memory dump contains all relevant information (crypto material, sensitive data, etc.), because we can work with the dump on other systems – even Linux systems. So the memory dump seems to hold all data which is required.
- We can assume that we require many different functions within Windows itself. Usually, the most powerful environment on Windows for this is PowerShell. By use of PowerShell, we get access to various built-in functionalities and also have the possibility to add and use Microsoft .NET functions if needed.
With the goals laid out, let’s start with the dump of the LSASS process. Since we want to work with memory dumps, the first question is: What are memory dumps and is there an easy way to work with those files – ideally within PowerShell?
Memory dumps: a short overview
So first things first: What are memory dumps?
Good question! First of all, memory dumps are images of processes at a certain time. This means before we start to dig into what dumps are, we should understand what we dump: a process or, more precisely, the LSASS.exe process.
The LSASS process is responsible for coordinating and provisioning different kinds of credentials. The list of data within the process goes from the expected logon credentials, over Kerberos tickets to DPAPI (data protection API) keys. All this information is divided in different parts and organized in separate libraries (DLLs) or credential packages.
The following image provides a rough overview and gives an idea of the process layout and connections between the different parts of the logon procedures:
 Logon procedure within Windows (source: Microsoft)
With that image in mind, we can assume a memory dump of the Local Security Authority (LSA) process contains multiple modules (e.g. Kerberos.dll, lsasrv.dll, etc.) which need to be identified, separated, and analyzed. Further, it is a running process within the memory of Windows.
Simply put, this means that each module (e.g. lsasrv.dll) holds one part of data which is static for the runtime of the process (e.g. the initialization vector), and next to that the modules hold links to the changing data (like keys, credentials, etc.) which are stored in a separate part of the process. Later, we will get a more detailed insight in the definition of the border between those two parts.
Now, we have a very rough idea of the data structure we want to explore. But what kind of magic are Mimikatz or pypykatz using to dig up the treasures from those data dumps? To get a better idea where we need to start and how we need to use our chosen tool set (PowerShell), we have to look at already established tool sets and how they are working. So the next step is to follow pypykatz through the extraction of the credentials.
The process of the extraction
The first observation we make during the understanding of pypykatz is the focus on the segment of the lsasrv.dll. Next to the crypto material, which is required for the decryption of sensitive data, it also includes the references to the encrypted logon credentials.
But again, let’s start with the basic steps: The credential data is usually encrypted, therefore we need the crypto material. As explained, the material is located within the memory of the module lsasrv.dll. Within the lsasrv.dll memory, the crypto material can be identified by use of special patterns and offsets. Those offsets and patterns are differing between the Windows versions and are the initial navigation points for any further operation within the dump file.
For the used Windows 10 version, the following pattern and offsets are used:
Pattern: \x83\x64\x24\x30\x00\x48\x8d\x45\xe0\x44\x8b\x4d\xd8\x48\x8d\x15
This pattern needs to be identified within the lsasrv.dll and is the initial navigation point for the following offsets.
Offset to initialization vector (IV) pointer = 67 This offset combined with the pattern results in a pointer (a memory address) where the initialization vector (IV) is located.
Offset to DES key pointer = -89 This offset combined with the pattern results in a pointer (a memory address) where the DES key is located.
Offset to AES key pointer = 16 This offset combined with the pattern results in a pointer (a memory address) where the AES key is located.
As result, we should receive the AES key, the DES key, and an IV. This information is required to decrypt the credential data.
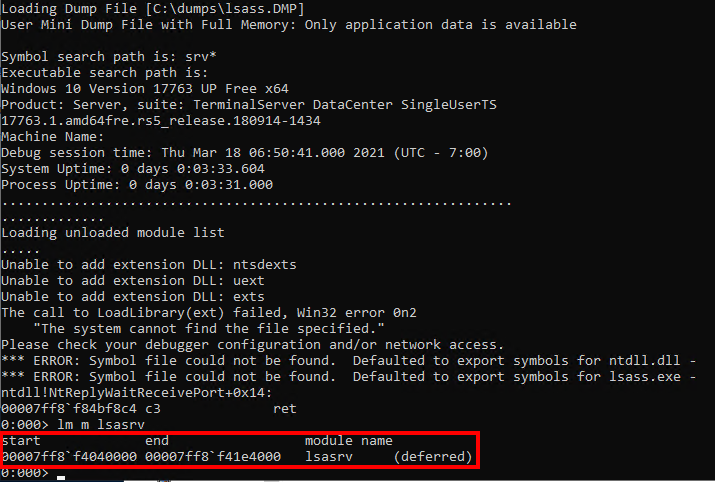
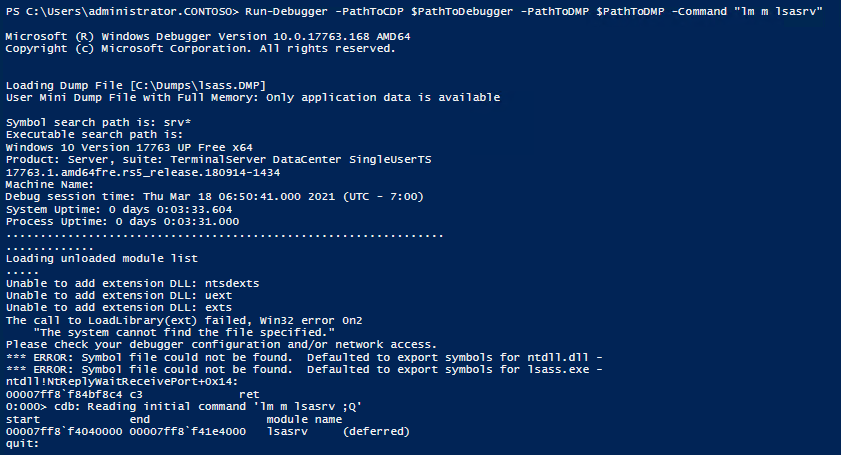
That’s the theory. But how can we identify the lsasrv.dll within a memory dump? Because we want to follow pypykatz by using Windows tools, we use the Microsoft Console Debugger (cdb.exe). It is a lightweight debugger provided by Microsoft. So to identify the lsasrv.dll module within a memory dump, the Microsoft Console Debugger provides the command lm m. By using this option, a module name can be searched within a dump file. The result looks like this:
 Location of the
 lsasrv.dll module within the memory dump
Within the result output we can see the address range of the lsasrv.dll memory. This comes quite handy because, as already stated, within that memory range we need to identify the pattern for the crypto material. By use of the commands s and -b we can search a byte pattern within a given address range.
 Search for byte pattern within the dumped
 lsasrv.dll memory range
This provides us with the pattern address which needs to be combined with the specified offsets to receive the crypto material.
The combination of the offset is a very simple mathematical addition. We just need to convert the hexadecimal string representation to an integer number, add the offset, and convert the result back to a hexadecimal representation.
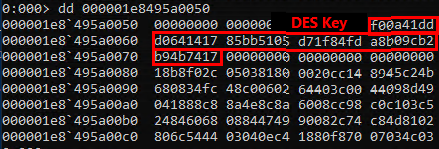
The following images show the different keys. As you may notice the DES and AES key are stored in different address ranges of the dump. This indicates that the data AES and DES keys are saved within the heap of the process (not important for what we want to achieve, just an interesting observation).
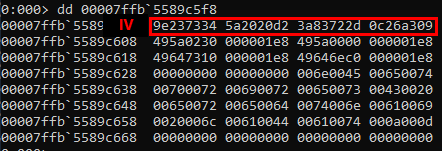
Initialization vector (IV):
 Acquired IV
DES key:
 Aquired DES key
AES key:
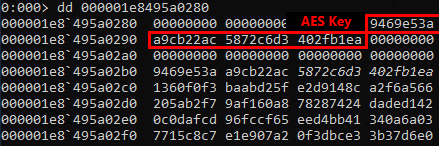 Acquired AES key
With the cryptographic keys for the decryption, the next step is the extraction of the actual credential data. The main difference is that the credential data is organized in lists which are linked to each other. Therefore, we need to identify the first entry of these lists.
This procedure is the same as for the crypto material. We need to find a byte pattern within the memory of the module lsasrv.dll. When the pattern is identified and the given offsets are applied, the memory address for the first entry of the credential list is identified.
The pattern used for the tested Windows 10 version is: \x33\xff\x41\x89\x37\x4c\x8b\xf3\x45\x85\xc0\x74
Combined with the following offset: 23
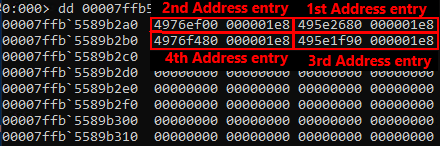 Identified entry addresses for credential lists
The magic at this point is quite easy to understand: find a byte pattern and follow the pointers. But this is the easy part; now the credentials need to be identified, extracted, and decrypted.
Credential data
As already mentioned, the credential data is organized in linked and nested lists. This circumstance makes the automated parsing of those lists quite difficult. Both pypykatz and Mimikatz use process templates for this.
The following figure visualizes the organization of those lists:
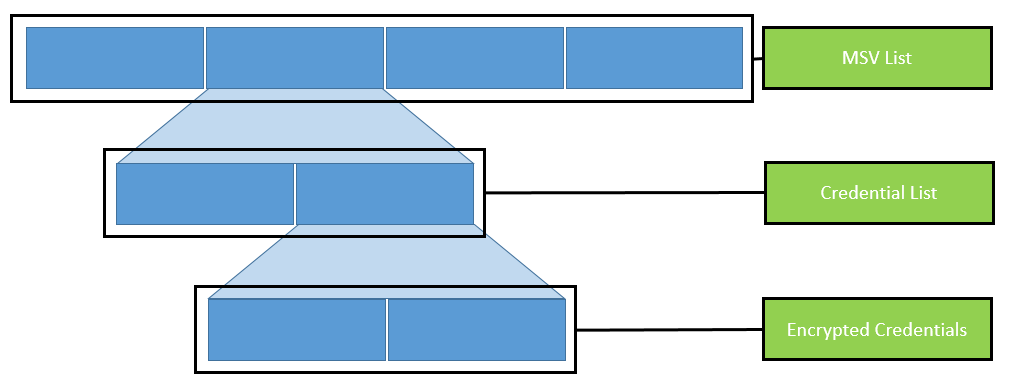 Organization of nested lists
When we check the source code of e.g. pypykatz, it becomes clear that the template for the parsing of those lists is selected based on the Windows operating system version. The template itself is an instruction of various data types which, if correctly applied, provides the memory structure of the credential data.
So when we apply the template to the process structure, we are able to parse and extract the part that is of our interest: the credentials.
But how can we apply a template on a memory dump? First, let’s understand what this template describes, i.e. data types. So for example within the template, there is the data type FLINK (which indicates the address of the next entry). This data type is 8 bytes long. This information comes from two sources: the templates of pypykatz and Mimikatz.
To extract this information of the FLINK, we start at the extracted EntryAddresses and read 8 bytes. The next data type is BLINK (also 8 bytes). To extract this information, we need to read the next 8 bytes after the FLINK, and so on until all data types are applied.
For the application of templates, you start at a given position, read the given number of bytes, remember the position, and read the next given bytes until no more bytes are left.
If we have correctly applied the templates, we will be rewarded with all the encrypted credentials.
 Encrypted credentials in memory dump
The extracted credentials are encrypted (we remember, we extracted some crypto material). So logon credentials (those we are looking for) are encrypted by use of the 3DES algorithm. Hence, for the decryption of the extracted encrypted credentials, we need the extracted 3DES key and the corresponding IV.
If both are applied successfully, the result is the username and the NT hash of that specific user.
This is basically the process pypykatz follows to extract the logon credentials, and it marks the goal we want to achieve. Now the question is: How we can implement those steps in PowerShell?
PowerShell
The first step within PowerShell would be the navigation within the memory dump file, and ensuring that we are able to identify byte patterns (which are required for the crypto material and MSV entries). Furthermore, we need to find a way to navigate by use of memory addresses (to follow the pointers).
When we are able to navigate within the dump file, we can focus on the parsing of memory areas to extract the relevant credential data.
With those steps on our bucket list, we hit a little roadblock: We could not identify an easy way to parse the whole memory dump with the original memory addresses. Because for the extraction of the crypto material and the identification the entry of the credential list exact memory addresses are used.
We explored some possibilities to parse files as binary files by use of the awesome function Search-Binary of Atamido, but without the correct memory addresses.
The workaround for this issue is the Microsoft Console Debugger (cdb.exe). This is a lightweight debugger which can be used to debug and navigate within those files. But it also provides a command line interface which is very handy for the extraction of single parts of the memory dump.
So the idea is to call cdb.exe from the PowerShell script with a given address, byte pattern, or other parameters, and work with the output of this program call. This worked surprisingly well. So we built a little function named Run-Debugger which calls the debugger with a command and provides the output of the corresponding program run as result.
 Debugger command from PowerShell
With that problem resolved, we are able to navigate through the memory dump file and extract data. The next step is the parsing of the credential data. Here, PowerShell has the proper solution. By using the BinaryReader .NET function, the credential lists can be parsed quite easily.
The idea behind the implemented function is that the BinaryReader function starts at a given position (we remember the extracted list entries). Then, we extract a certain number of bytes (based on the numbers of the data type and template), add the number of extracted bytes to the initial position of the BinaryReader and start again. The one decisive step was the translation of the templates for the parsing to the correct data types.
By using the function Run-Debugger, we are able to extract small portions of the data from the memory address. Plus, with the BinaryReader function, we are able to read a stream of raw binary data. But we still need a connection between those two, because the debugger runs with memory addresses and the BinaryReader works with offsets within a binary file.
There, the awesome function Search-Binary comes into play. It can find byte patterns within a binary file. We use this in the following way: When we hit a jump point within a credential list (when we need to switch to different parts of the memory), we extract a pattern of this memory address by use of the debugger. This is because the debugger can work with the addresses. The issue comes with the BinaryReader function which is used for the parsing of the credentials. It does not work with addresses, it uses positions (offsets) within the binary file.
To identify those positions, we hand over the pattern from the debugger to the Search-Binary function which will provide as a result the exact position within the file and therefore the position where we need to place the BinaryReader.
After the translation of the templates and some testing (and hours of bug fixing), the result is our PowerShell software tool Invoke-LSAParse. It includes the executable cdb.exe as Base64-encoded string which will be written to the temp directory of the user which is executing the PowerShell script. This executable will be deleted at the end of the execution. Besides this dependency, Invoke-LSAParse is a pure PowerShell implementation which currently is undetected by the usual endpoint protection solutions or the Antimalware Scan Interface (AMSI) of PowerShell. The result of a successful Invoke-LSAParse call is the username and the NT hash of all logged-on identities, as the following demo exemplarily shows.
 Demo of Invoke-LSAParse for successfully extracting user credentials from an LSASS memory dump
The current limitations are the implemented templates for parsing data structures. Currently, only Windows 10 and Windows Server until 2016 are supported. Older Windows versions have no templates for the parsing. Another limitation of the current versions concerns the supported logon credentials (no DPAPI, no Kerberos, etc.).
From a defender point of view, the tool Invoke-LSAParse will not work if PowerShell is running in constrained language mode or application allowlisting, e.g. using AppLocker, prevents the execution of executables from the temp directory. Next to those measures against the tool itself, if the LSASS process is protected (e.g. by Credential Guard or specific endpoint protection solutions), usually no valid data can be extracted.
Our developed software tool Invoke-LSAParse is available on our SySS GitHub Page.